
Looking for How to Make Mango Salsa - Easily! With Step-by-step Photos, Recipe, Directions, Ingredients and Costs in 2025? Scroll down this page and follow the links. And if you bring home some fruit or vegetables and want to can, freeze, make jam, salsa or pickles, see this page for simple, reliable, illustrated canning, freezing or preserving directions. There are plenty of other related resources, click on the resources dropdown above. If you are having a hard time finding canning lids, I've used these, and they're a great price & ship in 2 days.
If you have questions or feedback, please let me know! There are affiliate links on this page. Read our disclosure policy to learn more.
How to Make Mango Salsa - Easily! With Step-by-step Photos, Recipe, Directions, Ingredients and Costs
How to Make Homemade Mango Salsa
Click here for a PDF print version
 If
you like mango salsa like you've had in restaurants and bought in the
stores, then you will LOVE your own home made mango salsa. you can
impress friends and family with this easy and tasty recipe! You can
refrigerate it or can it to have in the winter! Here's how to do it,
complete instructions in easy steps and completely illustrated.
If
you like mango salsa like you've had in restaurants and bought in the
stores, then you will LOVE your own home made mango salsa. you can
impress friends and family with this easy and tasty recipe! You can
refrigerate it or can it to have in the winter! Here's how to do it,
complete instructions in easy steps and completely illustrated.
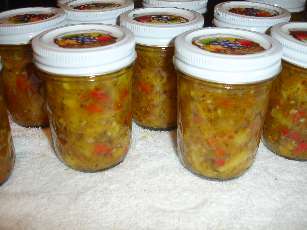
Prepared this way, the jars have a shelf life of about 12 to 18 months, and aside from storing in a cool, dark place, require no special attention.
You may also be interested in How to make GREAT mango chutney! or Mango-raspberry jam or how to can mangoes.
Directions for Making and Canning Mango Salsa
Yield: 7 to 9 eight ounce jars
Ingredients
- 6 cups diced unripe mangoes (you will need about 4 large, hard green mangoes or slightly under-ripe - just not soft and mushy)
- 11/2 cups diced red bell pepper or roaster red peppers
- 1/2 cup finely chopped yellow onion (I like Vidallia's)
- 1/2 teaspoon crushed red pepper flakes
- 2 teaspoons finely chopped garlic (puree is fine)
- 2 teaspoons chopped cilantro (or dried cilantro)
- 1 teaspoon diced or dried mint leaves (optional)
- 2 teaspoons finely chopped ginger (ginger paste works well)
- 1 cup light brown sugar
- 11/4 cups cider vinegar (5%)
- 1/2 cup water or lime juice
Equipment
- At least 1 large pot
- Large spoons and ladles,
- Jar grabber (to pick up the hot jars)
- Lid lifter (I like the lid rack that holds 12 lids or you can pull them out one at a time with the lid-lifter that has a magnet from the almost-boiling water where you sanitize them. ($4 at mall kitchen stores and local "big box" stores, but it's usually cheaper online from our affiliates)
- Jar funnel ($4 at mall kitchen stores and local "big box" stores, but it's usually cheaper online from our affiliates)
- Canning jars (often called Ball jars, Mason jars or Kerr jars) (Publix, Kroger, other grocery stores and some "big box" stores carry them - now about $12 per dozen quart jars (up 50% in 2 years!) including the lids and rings)
- 1 water bath canner (a huge pot with a lifting rack to sanitize the jars of mangoes after filling (about $30 to $35 at mall kitchen stores and local "big box" stores, but it's usually cheaper online from our affiliates) You CAN use a large pot instead, but the canners are deeper, and have a rack top make lifting the jars out easier. If you plan on canning every year, they're worth the investment.
Recipe and Directions
Step 1 - Selecting the mangoes
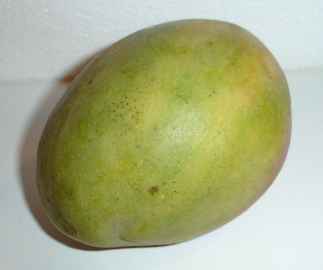 Choose
ripe, mature fruit of ideal quality for eating fresh or cooking. They
should not be mushy, but they also should not be rock hard: just as ripe
as you would eat them fresh. You can also use solid green mangoes.
Select firm, non-fibrous fruit.
Caution: Handling green mangoes may irritate the skin of some
people in the same way as poison ivy. (They belong to the same plant
family.) (see
this page for more information) To avoid this reaction, wear plastic
gloves while working with raw green mango. Do not touch your face, lips
or eyes after touching or cutting green mangoes until all traces are
washed away.
Choose
ripe, mature fruit of ideal quality for eating fresh or cooking. They
should not be mushy, but they also should not be rock hard: just as ripe
as you would eat them fresh. You can also use solid green mangoes.
Select firm, non-fibrous fruit.
Caution: Handling green mangoes may irritate the skin of some
people in the same way as poison ivy. (They belong to the same plant
family.) (see
this page for more information) To avoid this reaction, wear plastic
gloves while working with raw green mango. Do not touch your face, lips
or eyes after touching or cutting green mangoes until all traces are
washed away.
Step 2 - How many mangoes and where to get them
You can pick your own, or buy them at the grocery store. But for large quantities, you will find that Costco, Sam's Club and BJ's seem to have the largest mangoes and best prices.
Step 3 - Wash the jars
and lids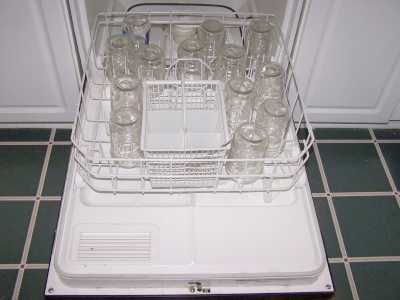
This is a good time to get the jars ready! The dishwasher is fine for the jars; especially if it has a "sanitize" cycle. Otherwise put the jars in boiling water for 10 minutes. I just put the lids in a small pot of almost boiling water for 5 minutes, and use the magnetic "lid lifter wand" (available from target, other big box stores, and often grocery stores; and available online - see this page) to pull them out.
Step 4 -Wash the mangoes!
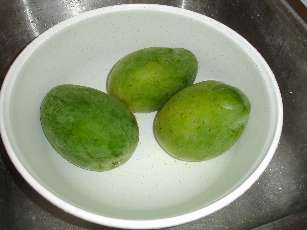 I'm
sure you can figure out how to wash the mangoes in plain cold or
lukewarm water.
I'm
sure you can figure out how to wash the mangoes in plain cold or
lukewarm water.
Step 5 - Peeling the Mangoes
 Green
mangoes are fairly firm, so a regular vegetable peeler works pretty
well. This is probably the most tedious step of the process, though.
Green
mangoes are fairly firm, so a regular vegetable peeler works pretty
well. This is probably the most tedious step of the process, though.
Step 6 - Cut up the mangoes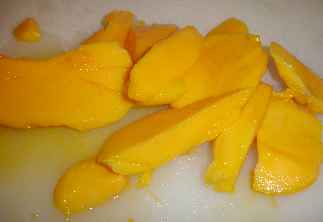
 Cut
out any brown spots and mushy areas. Slice the mangoes in 1/4 thick
slices! It just takes practice to figure out where the pit is. the
pit is sort of flat, rather than egg-shaped, so you will get more flesh of
some parts of the mango than others.
Cut
out any brown spots and mushy areas. Slice the mangoes in 1/4 thick
slices! It just takes practice to figure out where the pit is. the
pit is sort of flat, rather than egg-shaped, so you will get more flesh of
some parts of the mango than others.
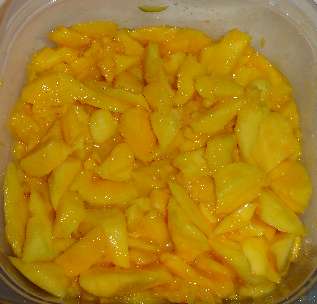
Then chop the mango slices up into 1/4 to 1/2-inch cubes.
See here for related tools, equipment, supplies on Amazon This mango splitter works great!
Step 7 - Add the spices
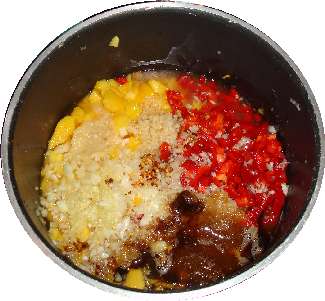 To
the 6 cups of diced mangoes, add the spices:
To
the 6 cups of diced mangoes, add the spices:
|
Step 8 - Cook the mango salsa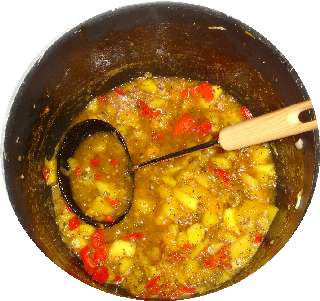
Bring to a boil over high heat, stirring to dissolve sugar and mix the spices. Reduce to simmering, and simmer 5 minutes. We don't want to overcook this!
Step 9 - Fill the jars
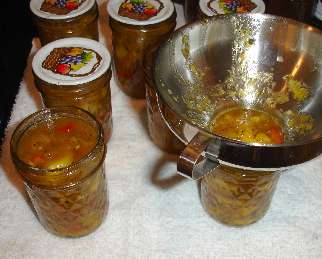 Wipe
rim and screw threads with a clean damp cloth. Add lid, screw band and
tighten firmly and evenly. Do not over tighten.
Wipe
rim and screw threads with a clean damp cloth. Add lid, screw band and
tighten firmly and evenly. Do not over tighten.
Step 10 - Process the jars in the water bath
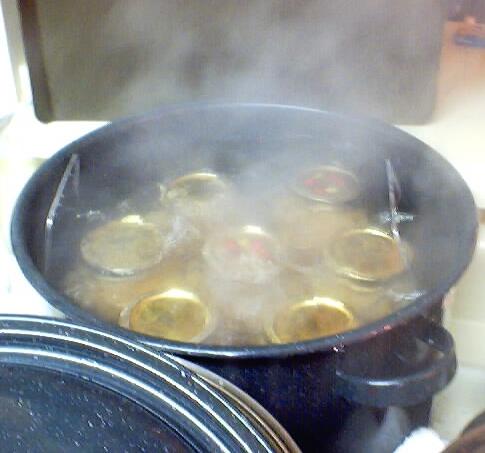 Put
the sealed jars in the canner and keep them cover with at least 1 inch
of water and boiling. Boil them for at least 20 minutes (and no more
than 30 min).
Put
the sealed jars in the canner and keep them cover with at least 1 inch
of water and boiling. Boil them for at least 20 minutes (and no more
than 30 min).
| Recommended process time for Mangoes in a boiling-water canner. | |||||
| Process Time at Altitudes of | |||||
| Style of Pack | Jar Size | 0 - 1,000 ft | 1,001 - 3,000 ft | 3,000 - 6,000 ft | Above 6,000 ft |
| Hot | Pints Quarts |
15 min 20 |
20 25 |
20 30 |
25 35 |
Step 11 - Remove and cool
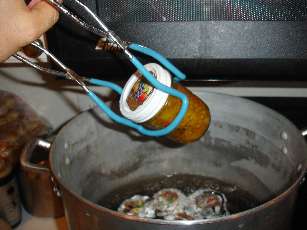 Lift
the jars out of the water and let them cool without touching or bumping
them in a draft-free place (usually takes overnight), here they won't be
bumped. You can then remove the rings if you like, but if you leave them
on, at least loosen them quite a bit, so they don't rust in place due to
trapped moisture. Once the jars are cool, you can check that they are
sealed verifying that the lid has been sucked down. Just press in the
center, gently, with your finger. If it pops up and down (often making a
popping sound), it is not sealed. If you put the jar in the refrigerator
right away, you can still use it. Some people replace the lid and
reprocess the jar, then that's a bit iffy. If you heat the contents back
up, re-jar them (with a new lid) and the full time in the canner, it's
usually ok.
Lift
the jars out of the water and let them cool without touching or bumping
them in a draft-free place (usually takes overnight), here they won't be
bumped. You can then remove the rings if you like, but if you leave them
on, at least loosen them quite a bit, so they don't rust in place due to
trapped moisture. Once the jars are cool, you can check that they are
sealed verifying that the lid has been sucked down. Just press in the
center, gently, with your finger. If it pops up and down (often making a
popping sound), it is not sealed. If you put the jar in the refrigerator
right away, you can still use it. Some people replace the lid and
reprocess the jar, then that's a bit iffy. If you heat the contents back
up, re-jar them (with a new lid) and the full time in the canner, it's
usually ok.
Mangoes, pears and apples may also show a blue, red
or pink color change after canning. This is the result of natural chemical
changes that sometimes occur as fruits are heated. It is harmless and won't
affect flavor!
Also, avoid storing canned food near heat sources such as a furnace,
water heater, hot water or sunny areas. Jars need to be kept cool and
dark
for longer storage life and to protect against spoilage. Be sure to store in
a dry place. If the lid or band rusts, that can cause the seal to break.
Your salsa will probably be darker in color than this. It depends upon how much spice you use and how long you cook it.
Picking Tips
[General picking tips and a guide to each fruit and vegetable] [How
much do I need to pick?
(Yields - how much raw makes how much cooked or frozen)] [Selecting
the right varieties to pick] [All
about apple varieties - which to pick and why!] [Picking tips for Vegetables]
[ Strawberry picking tips]
[ Blueberries picking tips]
Illustrated Canning, Freezing, Jam Instructions and Recipes
[ All About Home Canning, Freezing and Making Jams, Pickles, Sauces, etc. ] [FAQs - Answers to common questions and problems] [Recommended books about home canning, jam making, drying and preserving!] [Free canning publications to download and print]
Home Canning Kits
This is the same type of standard canner that my grandmother used to make everything from applesauce to jams and jellies to tomato and spaghetti sauce. This complete kit includes everything you need and lasts for years: the canner, jar rack, jar grabber tongs, lid lifting wand, a plastic funnel, labels, bubble freer. It's much cheaper than buying the items separately. You'll never need anything else except jars & lids (and the jars are reusable)! There is also a simple kit with just the canner and rack, and a pressure canner, if you want to do vegetables (other than tomatoes). To see
more canners, of different styles, makes and prices, click here!
Don't forget the Ball Blue Book!
