
How to freeze green beans and other beans from your garden or the shop - Easily! With Step-by-step Photos, Recipe, Directions, Ingredients and Costs
How to Freeze Green Beans
If you like frozen green beans in the winter, just imagine how good it would taste if you had picked a bag yourself and then quickly froze it at home! It is also one of the simplest ways to put up a vegetable for the winter. Here's how to do it, complete instructions in easy steps and completely illustrated. The green beans will taste MUCH better than anything you've ever had from a store.
Directions for Freezing Green Beans
Ingredients
- fresh green beans - any quantity. I figure one handful per serving.
Equipment
- Vacuum food sealer or "ziploc" type freezer bags (the freezer bag version is heavier and protects better against freezer burn.
- 1 Large pot of boiling water
- 2 large bowls, one filled with cold water and ice.
- 1 sharp knife
Instructions
Step 1 - Get yer green beans!
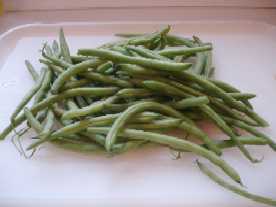 Start
with fresh green beans - as fresh as you can get. If there is a
delay between harvesting and freezing, put it in the refrigerator or put
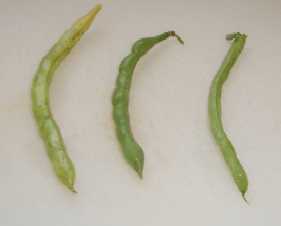
ice on it. And don't use beans that are old, overripe or dried out (see
below):
Start
with fresh green beans - as fresh as you can get. If there is a
delay between harvesting and freezing, put it in the refrigerator or put
ice on it. And don't use beans that are old, overripe or dried out (see
below):
Step 2 - Wash the green beans!
I'm sure you can figure out how to rinse the green beans
in plain cold or lukewarm water.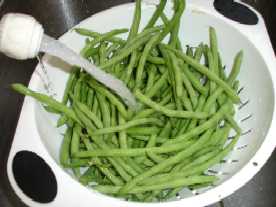
Norpro Deluxe Bean Frencher With Clamp
See here for related tools, equipment, supplies on Amazon
Fermentation Jars (2 pack), 2 Liter Fermentation Kit with Weights and Airlocks
Step 3 - Trim the ends and cut into smaller pieces
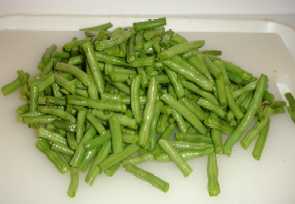
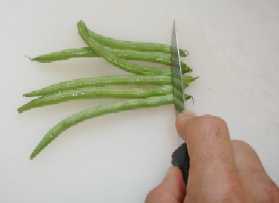 Just
take a sharp knife and cut of both ends (about 1/4 of an inch, or half
the width of an average woman's little finger). Then cut them into
pieces of the size you prefer, usually
Just
take a sharp knife and cut of both ends (about 1/4 of an inch, or half
the width of an average woman's little finger). Then cut them into
pieces of the size you prefer, usually
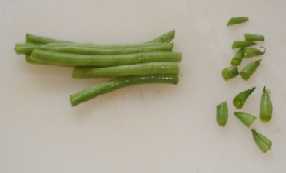 about
1 inch long.
about
1 inch long.
Of course, if your prefer French cut green beans, you can cut the beans lengthwise instead, or you can use a "bean Frencher". The "Frencher" enables you to prepare a huge quantity of beans quickly!
See the bottom of this page for makes, models, prices and ordering info for bean frenchers.
Step 4 - Get the pots ready
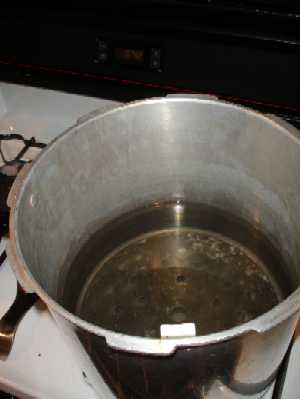 Get
the pot of boiling water ready (about 2/3 filled) and a LARGE bowl with
ice and cold water.
Get
the pot of boiling water ready (about 2/3 filled) and a LARGE bowl with
ice and cold water.
Step 5 - Blanch the green beans.
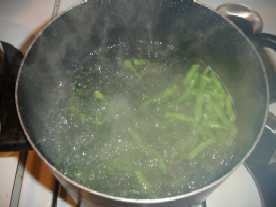 All
fruits and vegetables contain enzymes and bacteria
that, over time, break down the destroy nutrients and change the color,
flavor, and texture of food during frozen storage. green beans requires a
brief heat treatment, called blanching, in boiling water or steam,
to destroy the enzymes before freezing. Blanching times for beans is 3
minutes (the duration should be just long enough to stop the action of the
enzymes and kill the bacteria).
All
fruits and vegetables contain enzymes and bacteria
that, over time, break down the destroy nutrients and change the color,
flavor, and texture of food during frozen storage. green beans requires a
brief heat treatment, called blanching, in boiling water or steam,
to destroy the enzymes before freezing. Blanching times for beans is 3
minutes (the duration should be just long enough to stop the action of the
enzymes and kill the bacteria).
Begin counting the blanching time as soon as you place the green beans in the boiling water. Cover the kettle and boil at a high temperature for the required length of time. You may use the same blanching water several times (up to 5). Be sure to add more hot water from the tap from time to time to keep the water level at the required height.
Step 6 - Cool the green beans
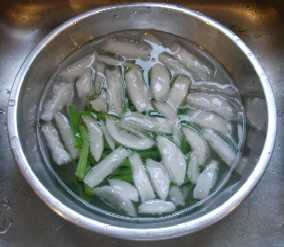 Cool
green beans immediately in ice water. Drain the green beans thoroughly
(this shouldn't take more than a minute).
Cool
green beans immediately in ice water. Drain the green beans thoroughly
(this shouldn't take more than a minute).
After vegetables are blanched, cool them quickly to prevent overcooking. Plunge the green beans into a large quantity of ice-cold water (I keep adding more ice to it). A good rule of thumb: Cool for the same amount of time as the blanch step. For instance, if you blanch sweet green beans for 7 minutes, then cool in ice water for 7 minutes.
Drain thoroughly.
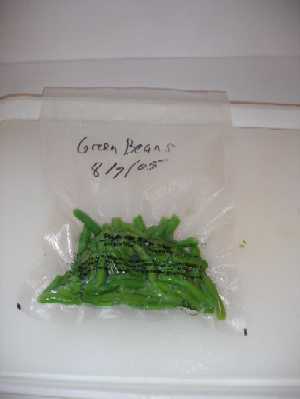
Step 7 - bag the green beans
 I
love the FoodSavers (see
this page for more information) with their vacuum sealing! I am
not paid by them, but these things really work. If you don't have
one, Ziploc bags work, too, but it is hard to get as much air out of the
bags. Remove the air to prevent drying and freezer burn. TIP:
If you don't own a vacuum food sealer to freeze foods, place food in a
Ziploc bags, zip the top shut but leave enough space to insert the tip of
a soda straw. When straw is in place, remove air by sucking the air out.
To remove straw, press straw closed where inserted and finish pressing the
bag closed as you remove straw. It works fairly well, but I'll stick to
the Foodsaver, since the bags are microwaveable and much thicker than a
Ziploc bag (even the Ziploc "freezer bags")
I
love the FoodSavers (see
this page for more information) with their vacuum sealing! I am
not paid by them, but these things really work. If you don't have
one, Ziploc bags work, too, but it is hard to get as much air out of the
bags. Remove the air to prevent drying and freezer burn. TIP:
If you don't own a vacuum food sealer to freeze foods, place food in a
Ziploc bags, zip the top shut but leave enough space to insert the tip of
a soda straw. When straw is in place, remove air by sucking the air out.
To remove straw, press straw closed where inserted and finish pressing the
bag closed as you remove straw. It works fairly well, but I'll stick to
the Foodsaver, since the bags are microwaveable and much thicker than a
Ziploc bag (even the Ziploc "freezer bags")
Step 8 - Done!
 Pop
them into the freezer, on the quick freeze shelf, if you have one!
Pop
them into the freezer, on the quick freeze shelf, if you have one!
Tips:
- Harvest early in the morning, especially if the weather is hot, to get peak flavor.
- Harvest the green beans at its peak maturity (firm, straight, not lumpy)
- Process promptly after harvesting, or keep cooled in the fridge or with ice until then.
Frequently Asked Questions
-
When you take your green beans out of the freezer, how long do they take to cook?
Just the same as store-bought frozen green beans: 3 to 5 minutes; just until hot and tender. - I've frozen green beans but they seem so rubbery after being cooked.
Any idea why?
Generally, that means the beans were either old to being with, or they were overcooked. It only takes 3 minutes to blanch the beans, then plunge them immediately into ice water.
- How long can they be frozen?
It depends upon how cold is your freezer and how you packed them. Colder (deep freezes) are better than frost free compartments, which actually cycle above freezing (that's how they melt the ice). Vacuum packing results in longer storage capability, too. Thicker bags also help prevent freezer burn.
In general, up to 9 months in a ziploc bag in an ordinary freezer, and 14 months in a deep freeze in a vacuum packed bag. After that, the beans won't make you sick; they just won't taste as good.
- When blanching green beans you say to cook for 3 minutes only. When
we put the beans into the boiling water the boiling stops for several
minutes before starting again. This may add 5 or 10 minutes to the process.
Is this good or should we take the beans out after 3 minutes even if the
water hasn't come back to a boil?
Excellent question. The directions from the USDA assume that we're using a large enough pot and a large enough burner that it returns to a boil quickly (say 2 or 3 minutes). If you can, use a larger pot on a hotter burner. If that's not practical, I just add a couple of minutes to the time - otherwise the food gets overcooked!
Picking Tips
[General picking tips and a guide to each fruit and vegetable] [How much do I need to pick? (Yields - how much raw makes how much cooked or frozen)] [Selecting the right varieties to pick] [All about apple varieties - which to pic
k and why!] [Picking tips for Vegetables]
[ Strawberry picking tips]
[ Blueberries picking tips]
Canning Books, Supplies and Accessories
These are my favorite essential canning tools, books and supplies. I've been using many of these for over 50 years of canning! The ones below on this page are just the sampling of. my preferred tools. but you can find much more detailed and extensive selections on the pages that are linked below.
- Vacuum Foodsealers for freezing, dried foods, and refrigerated foods - the FoodSaver line
- Selecting a KitchenAid mixer and attachments for home canning
- Steam Juicers
- Strainers, pit removers, seed-skin-stem removers, jelly strainers, etc. All types, makes and prices (from $19 to $350)
- Cherry pitters reviews, prices and ordering
- Food dehydrators - easy and fast to dry your own fruits, veggies, sun-dried tomatoes, etc.
The All New Ball Book Of Canning And Preserving: Over 350 of the Best Canned, Jammed, Pickled, and Preserved Recipes Paperback
This is THE book on canning! My grandmother used this book when I was a child.; It tells you in simple instructions how to can almost anything; complete with recipes for jam, jellies, pickles, sauces, canning vegetables, meats, etc.
If it can be canned, this book likely tells you how! Click on the link below for more information and / or to buy (no obligation to buy)The New Ball Blue Book of Canning and Preserving
Canning and Preserving for Dummies by Karen Ward
This is another popular canning book. Click here for more information, reviews, prices for Canning and Preserving For Dummies
Of course, you do not need to buy ANY canning book as I have about 500 canning, freezing, dehydrating and more recipes all online for free, just see Easy Home Canning Directions.
Home Canning Kits
See here for related tools, equipment, supplies on Amazon See here for related tools, equipment, supplies on Amazon
I have several canners, and my favorite is the stainless steel one at right. It is easy to clean and seems like it will last forever. Mine is 10 years old and looks like new.
The black ones are the same type of standard canner that my grandmother used to make everything from applesauce to jams and jellies to tomato and spaghetti sauce.
This complete kit includes everything you need and lasts for years: the canner, jar rack, Jar grabber tongs, lid lifting wand, a plastic funnel, labels, bubble freer, It's much cheaper than buying the items separately. It's only missing the bible of canning, the Ball Blue Book.
You will never need anything else except jars & lids (and the jars are reusable)!
The complete list of canners is on these pages:
- Water bath canners - Good for acidic foods, like applesauce, pickles, salsa, jams, jellies, most fruits
- Pressure canners - needed for low and non-acidic foods, like canned vegetables (corn, green beans, etc), and meats
- Canners for glass top stoves if you have a glass or ceramic stove
- Canners for induction stovetops

Pressure Canners
If you plan on canning non-acidic foods and low acid foods that are not pickled - this means: meats, seafood, soups, green beans corn, most vegetables, etc., then you ABSOLUTELY must use a Pressure Canner.
Of course, you can use a pressure canner as a water bath canner as well - just don't seal it up, so it does not pressurize. This means a Pressure Canner is a 2-in-1 device. With it, you can can almost ANYTHING.
There are also other supplies, accessories, tools and more canners, of different styles, makes and prices, click here!

Basic Canning Accessories
From left to right:
- Jar lifting tongs to pick up hot jars
- Lid sanitizer / lifter - to remove lids from the pot of boiling water (sterilizing )
- Lids- disposable - you may only use them once
- Ring - holds the lids on the jar until after the jars cool - then you remove them, save them and reuse them
- Canning Jar funnel - to fill the jars
FREE Illustrated Canning, Freezing, Jam Instructions and Recipes
Don't spend money on books. that you don't need to. Almost everything you can find in some book sold online or in a store is on my website here for free. Start with theEasy Home Canning Directions below. That is a master list of canning directions which are all based upon the Ball Bblue book, the National Center for Home Food Preservation and other reputable lab tested recipes. Almost every recipe I present in addition to being lab tested com. is in a step by step format with photos for each step and complete. explanations. that tell you how to do it, where to get the supplies and pretty much everything you need to know. In addition, there almost always in a PDF format so you can print them out and use them while you cook.
[ Easy Home Canning Directions]
[FAQs - Answers to common questions and problems]
[Recommended books about home canning, jam making, drying and preserving!]


Looking for canning equipment and supplies?
Water bath canner with a jar rack
Pressure canners for gas, electric and induction stoves: Presto 23Qt or T-fal 22Qt
Canning scoop (this one is PERFECT)
Ball Blue book (most recent version)
Jars: 8oz canning jars for jams
Find Other types of farms:
Farm markets and roadside stands
Road trips and camping resources
Local Honey, apiaries, beekeepers
Consumer fraud and scams information
Home canning supplies at the best prices on the internet!
Maple Syrup Farms, sugarworks, maple syrup festivals
Environmental information and resources
Farms For Your Event for birthday parties, weddings, receptions, business meetings, retreats, etc.
Festivals - local fruit and vegetable festivals
Get the
most recent version of
the Ball Blue Book
