
Looking for How to Freeze Winter Squash in 2025? Scroll down this page and follow the links. And if you bring home some fruit or vegetables and want to can, freeze, make jam, salsa or pickles, see this page for simple, reliable, illustrated canning, freezing or preserving directions. There are plenty of other related resources, click on the resources dropdown above. If you are having a hard time finding canning lids, I've used these, and they're a great price & ship in 2 days.
If you have questions or feedback, please let me know! There are affiliate links on this page. Read our disclosure policy to learn more.
How to Freeze Winter Squash
(Acorn, Banana, Buttercup, Butternut, Golden Delicious, Hubbard, Spaghetti Squash, etc.)
Winter squash will keep for many months (4 to 8 months) in
a cool, dry environment, like a basement, but some people prefer to store it in the freezer, in a form that is ready eat or use in cooking. Here's
how to do it, complete instructions in easy steps and completely illustrated. And it is much easier than you think, using my "patented" tips and
tricks!
Directions for Freezing squash
Ingredients and Equipment
|
|
Instructions
Step 1 - Get the squash!
Start with fresh ripe squash. The color should be deep, the rind should be hard and it should have been stored long enough to reach full sweetness (usually a few weeks after harvest).
Step 2 - Wash the squash!
I'm sure you can figure out how to rinse the whole squash in plain cold or lukewarm water using your hands and possibly a gentle brush. Singing or chanting "wash the squash, wash the squash" is not necessary, but my 3 year seems to appreciate it.
Step 3 - Slice the squash in half or quarters
Just take a sharp knife and carefully cut the squash in half. You can cut it again (into quarters) if that makes it easier for you to remove the seeds and fit the pieces in your cooking container.
Step 4 - Scoop out seeds and stringy pulp
Just like making a jack-o-lantern from a pumpkin, you need to scoop out the loose "guts" from the squash. To facilitate the use of child labor, tell them you are scooping out the squash's brains and scraping it's skull clean. Of course, they may have nightmares for weeks, but that's what you get for using child labor, you cruel s.o.b......
Pause to recover. (Sorry, *I* thought that was pretty funny...)
Step 5 - Cook the squash until soft
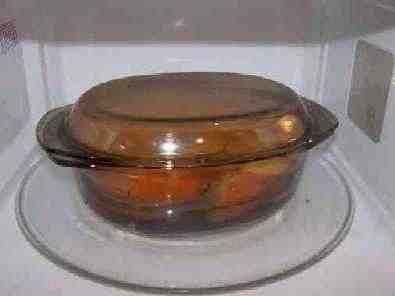 I find a microwave is
easiest, but use whatever method you prefer.
I find a microwave is
easiest, but use whatever method you prefer.
If you use the microwave, just put it in a glass container with a couple of inches of water in it and cook for 15 minutes on high, check to see if it is soft, then repeat in smaller increments of time until it is soft enough to scoop the innards out. Normally it takes 20 to 30 minutes in total.
Note: You CAN cook it on the stovetop; it will just take longer (almost twice as long).
Other ways to cook the squash are:
- in boiling water,
- in a steamer,
- in a pressure cooker or
- in an oven
The key is to cook it until it is soft!
Step 6 - Scoop out the cooked winter squash
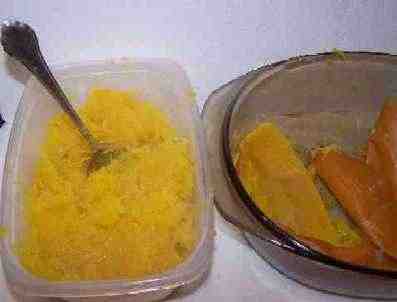 Using a broad, smooth spoon,
(such as a tablespoon) gently lift and scoop the cooked winter squash out of the skin. It should separate easily an in fairly large chucks, if the winter
squash is cooked enough.
Using a broad, smooth spoon,
(such as a tablespoon) gently lift and scoop the cooked winter squash out of the skin. It should separate easily an in fairly large chucks, if the winter
squash is cooked enough.
Step 7 - Puree the winter squash
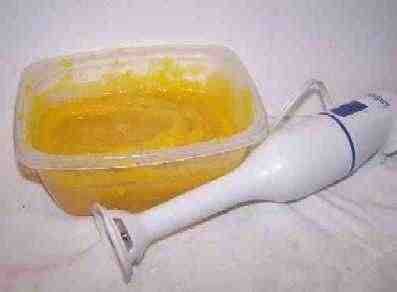 To get a nice, smooth consistency,
I use a Pillsbury hand blender. A regular blender works, too (unless you made a few frozen daiquiris and drank them first..). Or even just a large fork or
hand mixer with time and patience.
To get a nice, smooth consistency,
I use a Pillsbury hand blender. A regular blender works, too (unless you made a few frozen daiquiris and drank them first..). Or even just a large fork or
hand mixer with time and patience.
With the hand blender, it just takes 2 or 3 minutes!
Note: For spaghetti squash, mashing the cooked pulp is not necessary. That's the one squash where it's unmashed texture is part of its appeal.
Step 8 - Done with the winter squash!
The winter squash is no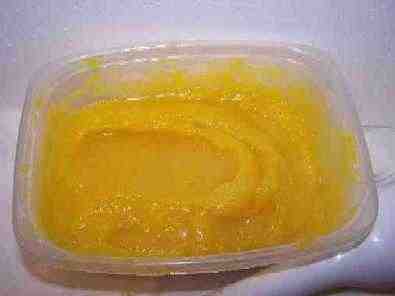 w cooked
and ready for freezing or pie recipe. Get the frozen daiquiris out from step 7 and take a break! :)
w cooked
and ready for freezing or pie recipe. Get the frozen daiquiris out from step 7 and take a break! :)
You can pack it containers, like Ziploc bags or plastic containers, exclude as much air as you can, and freeze it!
... or to start making tasty treats.
It should keep for many months. Freezing keeps winter squash safe to eat almost indefinitely, but the recommended maximum storage time of 12 months is best for taste and quality. The quality of the frozen winter squash is maintained best in a very cold freezer (deep freezer), and one that keeps them frozen completely with no thaw cycles. Excluding any air from inside the bags which leads to freezer burn, by using vacuum-sealed bags, is also important to maintaining quality
how about ...
-
How to make a pumpkin pie and How to make a flakey pie crust
-
How to make Pumpkin Bread
-
How to make pumpkin soup
-
How to make roasted pumpkin seeds
Canning Books, Supplies and Accessories
These are my favorite essential canning tools, books and supplies. I've been using many of these for over 50 years of canning! The ones below on this page are just the sampling of. my preferred tools. but you can find much more detailed and extensive selections on the pages that are linked below.
- Vacuum Foodsealers for freezing, dried foods, and refrigerated foods - the FoodSaver line
- Selecting a KitchenAid mixer and attachments for home canning
- Steam Juicers
- Strainers, pit removers, seed-skin-stem removers, jelly strainers, etc. All types, makes and prices (from $19 to $350)
- Cherry pitters reviews, prices and ordering
- Food dehydrators - easy and fast to dry your own fruits, veggies, sun-dried tomatoes, etc.
The All New Ball Book Of Canning And Preserving: Over 350 of the Best Canned, Jammed, Pickled, and Preserved Recipes Paperback
This is THE book on canning! My grandmother used this book when I was a child.; It tells you in simple instructions how to can almost anything; complete with recipes for jam, jellies, pickles, sauces, canning vegetables, meats, etc.
If it can be canned, this book likely tells you how! Click on the link below for more information and / or to buy (no obligation to buy)The New Ball Blue Book of Canning and Preserving
Canning and Preserving for Dummies by Karen Ward
This is another popular canning book. Click here for more information, reviews, prices for Canning and Preserving For Dummies
Of course, you do not need to buy ANY canning book as I have about 500 canning, freezing, dehydrating and more recipes all online for free, just see Easy Home Canning Directions.
Home Canning Kits
See here for related tools, equipment, supplies on Amazon See here for related tools, equipment, supplies on Amazon
I have several canners, and my favorite is the stainless steel one at right. It is easy to clean and seems like it will last forever. Mine is 10 years old and looks like new.
The black ones are the same type of standard canner that my grandmother used to make everything from applesauce to jams and jellies to tomato and spaghetti sauce.
This complete kit includes everything you need and lasts for years: the canner, jar rack, Jar grabber tongs, lid lifting wand, a plastic funnel, labels, bubble freer, It's much cheaper than buying the items separately. It's only missing the bible of canning, the Ball Blue Book.
You will never need anything else except jars & lids (and the jars are reusable)!
The complete list of canners is on these pages:
- Water bath canners - Good for acidic foods, like applesauce, pickles, salsa, jams, jellies, most fruits
- Pressure canners - needed for low and non-acidic foods, like canned vegetables (corn, green beans, etc), and meats
- Canners for glass top stoves if you have a glass or ceramic stove
- Canners for induction stovetops

Pressure Canners
If you plan on canning non-acidic foods and low acid foods that are not pickled - this means: meats, seafood, soups, green beans corn, most vegetables, etc., then you ABSOLUTELY must use a Pressure Canner.
Of course, you can use a pressure canner as a water bath canner as well - just don't seal it up, so it does not pressurize. This means a Pressure Canner is a 2-in-1 device. With it, you can can almost ANYTHING.
There are also other supplies, accessories, tools and more canners, of different styles, makes and prices, click here!

Basic Canning Accessories
From left to right:
- Jar lifting tongs to pick up hot jars
- Lid sanitizer / lifter - to remove lids from the pot of boiling water (sterilizing )
- Lids- disposable - you may only use them once
- Ring - holds the lids on the jar until after the jars cool - then you remove them, save them and reuse them
- Canning Jar funnel - to fill the jars
FREE Illustrated Canning, Freezing, Jam Instructions and Recipes
Don't spend money on books. that you don't need to. Almost everything you can find in some book sold online or in a store is on my website here for free. Start with theEasy Home Canning Directions below. That is a master list of canning directions which are all based upon the Ball Bblue book, the National Center for Home Food Preservation and other reputable lab tested recipes. Almost every recipe I present in addition to being lab tested com. is in a step by step format with photos for each step and complete. explanations. that tell you how to do it, where to get the supplies and pretty much everything you need to know. In addition, there almost always in a PDF format so you can print them out and use them while you cook.
[ Easy Home Canning Directions]
[FAQs - Answers to common questions and problems]
[Recommended books about home canning, jam making, drying and preserving!]


Looking for canning equipment and supplies?
Water bath canner with a jar rack
Pressure canners for gas, electric and induction stoves: Presto 23Qt or T-fal 22Qt
Canning scoop (this one is PERFECT)
Ball Blue book (most recent version)
Jars: 8oz canning jars for jams
Find Other types of farms:
Farm markets and roadside stands
Road trips and camping resources
Local Honey, apiaries, beekeepers
Consumer fraud and scams information
Home canning supplies at the best prices on the internet!
Maple Syrup Farms, sugarworks, maple syrup festivals
Environmental information and resources
Farms For Your Event for birthday parties, weddings, receptions, business meetings, retreats, etc.
Festivals - local fruit and vegetable festivals
Get the
most recent version of
the Ball Blue Book
