Looking for How to start your own vegetable plants from seeds - Save money and grow better varieties! in 2025? Scroll down this page and follow the links. And if you bring home some fruit or vegetables and want to can, freeze, make jam, salsa or pickles, see this page for simple, reliable, illustrated canning, freezing or preserving directions. There are plenty of other related resources, click on the resources dropdown above. If you are having a hard time finding canning lids, I've used these, and they're a great price & ship in 2 days.
If you have questions or feedback, please let me know! There are affiliate links on this page. Read our disclosure policy to learn more.
How to start your own vegetable plants from seeds - Save money and grow better varieties!
How to start your own vegetable plants from seeds - Save money and grow better varieties!
Growing your own vegetable plants from seed is EASY - once you know the key tips! And the plants you grow will cost only 1/20th of what buying the same (or not as good) plants from Home Depot, Lowes, WalMart or a nursery would cost! Okay, here's all you need - and then how, in simple steps, with photos!
Materials to grow vegetables from seeds:
You don't need much, and it's all inexpensive. How much of each you need depends upon how many plants you want to grow. Let's assume you're going grow 22 plants (why 22? Just wait; we'll get to that)
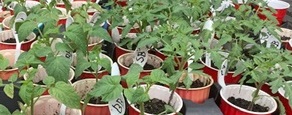
- Red Solo cups - at Costco you can get about 240 of them for $14 or at Sam's Club, $13. That's insane. That means, 22 would cost about $1.50. Of course, you could a smaller amount at the grocery store or Dollar Tree.
- Potting soil - At Sam's Club, a 55-quart bag of Miracle-Gro Moisture Control Potting Mix is only $11.48. You can of course get
a smaller bag elsewhere, or save the excess for the next year in your shed. Do NOT think of using soil from the garden. It will have
fungus, bugs, bacteria and loads of weed seeds and you won't know which are the vegetables you planted and which are weeds. Terrible idea. For
22 plants, you'll use about 1/5 of the bag. Cost less than $3.
- Plastic spoons or plastic knives - These are your labels. Why buy plastic plant labels at 10 times the cost? Just write the plant name on the spoon or knife. Tip: white plastic shows the names better than clear. If you want, you could also just write the name directly on the cups. Costco plastic spoons are about $10 for 600 spoons. Dollar store plastic spoons are about $1.25 for 48.
- Seeds - Most seed backs cost between $2 and $5 and have anywhere from a rip-off 15 seeds to 100 seeds. Let's assume 2 packets at at $6 total.
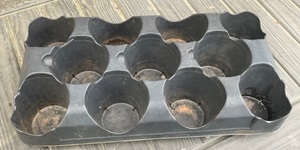
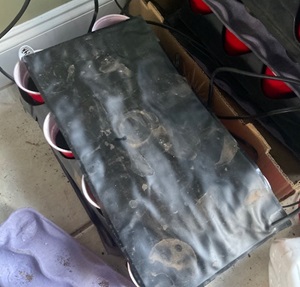
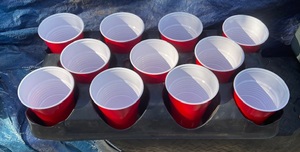
- Empty plant cup holding trays (ask at WalMart, Home Depot, Lowes etc if you may take an empty tray) Notice each tray holds 11 cups!
- MiracleGro or similar fertilizer - MiracleGro really does work.
Total cost for 22 plants = $11 or 50 cents per plant
(plus fertilizer, but I didn't include that, because he cost is almost negligible, you use 1 tablespoon to a gallon of water. For 22 plants you may use a 1/2 gallon every 2 days, until the plants get bigger than 2 inches)
I typically start about 200 seedlings this way each year: tomatoes, summer squash, cucumbers, eggplants, peppers, zucchini, lettuce, kale, rhubarb, broccoli, cabbage, etc.
Do the math:
Compare growing a year's worth of vegetable plants at home saves over $1,000:
- At Home Depot, 200 plants times ($5.28 plus tax $0.37) = $1,130
- Grown at home: 200 plants times $0.50 = $100.
The plants cost less than 1/10th what they do at the stores, and you get the exact varieties you want!
Optional
Seed heating mats - These are thermostatic heating mats that you place underneath the tray and it warms the soil. They cost around $15 each and last a lifetime. It cuts the time for the seeds to sprout in half. I put one tray under the mat, and one on top to maximum them!
Other needed equipment
- Hand trowel, scoop or just use one of the cups
- Scissors or something sharp - to poke one or 2 small holes in the side of the cups to let excess water out.
- Permanent marker - surely you have one of these
Method
When to start
Each veggie takes a different amount of time to germinate and to grow up to a size that can be transplanted into the garden (usually 3 to 6 inches in height). Seed packets usually have this info on the back. But, in general terms;
- Tomatoes, eggplants and peppers take about 4 to 6 weeks in total from seed to transplant,
- Cabbage, broccoli, cauliflower take about 4 weeks
- Squash, cucumbers, melons take 3 or 4 weeks.
- Rhubarb takes 4 to 6 weeks
- Lettuce, kale, spinach and other greens usually take 2 or 3 weeks.
Step 1 - Get your seeds
Sure you can buy them online from Burpees at their super inflated prices... Their prices have become INSANE especially when you add their shipping charges. But the odd thing is, you can buy Burpee, Ferry-Morse and other brands of seeds at WalMart, Home Depot, Lowes and even the local over-priced nursery for half the price.
The real key is WHAT (or "which", for you grammar nerds) variety/varieties do you want to grow and why?
- Heirloom varieties - advantage: usually great old time flavor. Disadvantage: usually less productivity and less disease resistance
- Hybrids - Advantage: plant vigor and usually better disease resistance. Disadvantage: sometimes (not always) at the expense of
flavor,
- Organic seeds - no advantage here at all. Sorry to burst your overly-virtuous bubble, this is just a marketing scam to sell overpriced seeds. Pretty much all seeds are "organic": in that they are tiny, protected from any sprays until they are harvested and there's no earthly way anything could make it from the exterior of a seed to the plant or fruit you would eat from the plant that then grew from the seed. Don't waste your money on this scam
Assume a germination rate (what percentage of the seeds will sprout) over about 33%. It can be higher like, 80%, but you are new at this, so you may plant some too deep, too shallow, overwater, underwater. Go with 33%. So if you want 22 plants, you'll need at least 66 seeds.
See this page for a Master List of Tomato varieties.
So pick the varieties you want and let's move on.
More related information
- Everything to know about vegetable seeds - Germination - temperature tables - How long does it take for each vegetable seed to germinate at various temperatures, what percentage germinates, how long can you keep seeds
- Vegetable Yields in the Home Garden and Farm - how much can you expect to harvest?
- Days to harvest for many vegetables - how long after to transplant a plant to the garden or sow seeds directly in the garden will it be until harvest?
- Growing tomatoes at home, detailed information and tips
- Proper storage conditions for vegetables: temperature, humidity and time in storage
Step 2 - Collect the other supplies
- Trays: Wherever they sell vegetable plants, ask if you can have an empty tray. Usually they don't mind. These trays are PEFECT to
hold the solo cups and keep them from tipping over, even in a high wind!
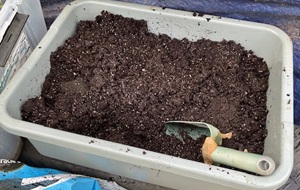
- Potting soil: I find the best is the Miracle Grow in the blue bag with the moisture holding properties. Costco often sells this in the early Spring. But any seed starting or sterile potting soil will do. DO NOT use soil from your garden or ordinary top soil, even in bags! I pour some soil into a bucket to make it easier to scoop!
- Red Solo Cups or similar
- Plastic spoons or plastic knives
Step 3 - Fill the cups 2/3 with potting soil
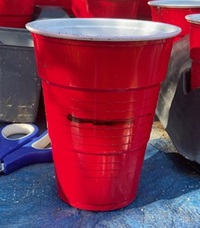
Put the cups into a tray (they usually hold 11 cups) and fill each cup 2/3 to 3/4 as shown in the images.
Why not fill to the top? Because there will no place for water later! When the plants get 2 to 4 inches tall, they will need a fair amount of water each day, and this void space is perfect to ahold the amount of water they will need!
Step 4 - Tamp the soil down, then add water
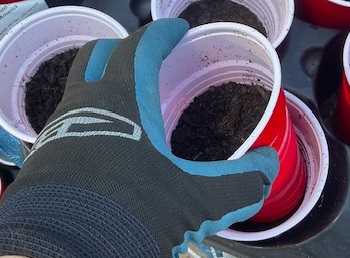
Take one cup with soil in it and use it to gently tamp down the soil
Once tamped down, the soil should fill the cup to 2/3 full.
Then pour several ounces of water in each. Literally about 2 or 3 ounces of water.
You want the soil moist, but NOT soggy!
Step 5 - Punch a hole in the side of each cup, 1/3 up from the bottom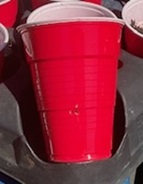
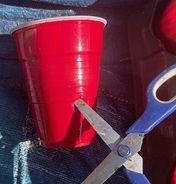
This step is a HUGE key as to why this method works!
This is IMPORTANT. The hole, made with one side of a pair of Scissors, MUST be in the side, about one-third up from the bottom.
This is to allow excess water OUT, while keeping enough so capillary action can put it up to the soil above.
This little hole is all that is needed for drainage. It allows excess water to drain out, keeping the seedlings from becoming waterlogged, while also allowing the drainage to be slow enough to allow dry soil to absorb the water.
Never put the hole in the bottom of the cup or all the water will just drain out before the soil can absorb it.
Step 6 - Add the seeds
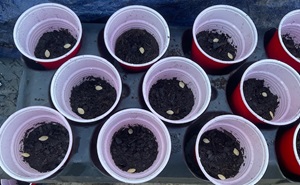 Put
3 seeds in each cup, space apart, like the points of an equilateral triangle. The germination rate (how many seeds actually sprout) varies with
variety of vegetable, the soil temperature and moisture and the age of the seeds. Most should have a germination rate of 70% or better... but
putting 2 or 3 seeds in each cup ensures a good strong seedling will emerge.
Step 7 - Cover the seeds
Add enough loose potting soil to cover each seed to 4 times the diameter of the seed. If there is too much soil, the seedlings may not have the strength to push it aside and emerge. Too little, and the seeds dry out and die.
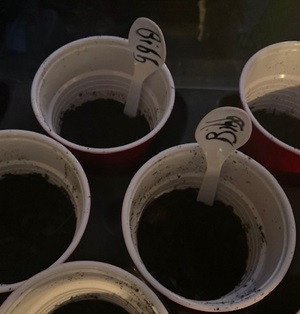
- Lettuce or kale need only 1/8 of an inch of potting soil.
- Tomato or pepper seed needs 1/4 inch of soil.
- Squash or cucumber seeds, about 1/3 inch of soil.
Step 8 - use a spoon to label each cup
Use the Sharpie to write the name of the veggie variety on the spoon. I use abbreviations that I will remember.
Like BET for Better Boy tomato or K for kale, LET for lettuce, etc.
Whatever works for you!
Step 9 - Wet the soil in each cup with 5 or 6 sprays from a water spray bottle.
The idea of using the spray bottle is it gets that top covering layer of soil wet, without washing the soil off the seeds and uncovering them!
Step 10 - Put the trays on the warming mat or in a sunny window
And now you wait for the seeds to sprout. I use the spray bottle every couple of days to give each cup a 2 or 3 squirts to keep the soil moist but not soggy!
See this page for germination tables (how long till the seedlings emerge. Usually it is between 5 and 10 days, although some seeds like
rhubarb can take longer. 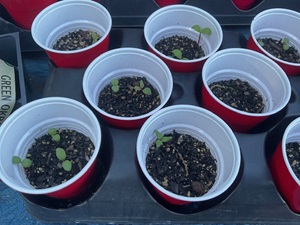
Step 11 - Once sprouted, move outside, water to keep moist
Obviously, if there is any danger of the temperature going below 40F, you will need to bring them back inside. But the point is, they need sun!
Water as needed, usually every other day, to keep the soil moist, but not soggy.
Use MiracleGro or a similar liquid fertilizer. If you just water with plain water, the plants WILL die. At this stage, to grow quickly and become healthy, sturdy plants, I water them every day with MiracleGro (1 Tablespoon per gallon of water)
Step 12 - Planting in the garden
Once they have their 3rd or 4th set of true leaves (around 4 to 6 inches tall or higher) they are strong enough to plant out in the garden, just like the plants from the store.
You can save the cups and reused them next year. I find they usually last 3 or 4 years, saving you the time to punch holes in new cups.

Related Pages
- Master list of tomato varieties - descriptions and links to get the seeds
- If you want to make tomato sauce, see our Master List of Roma and Paste Tomato Varieties for the Home Garden
- How to Grow Tomatoes in Your Yard or Patio - Everything you need to know
- Tomato plant diseases - symptoms and what to do
- See this list of disease-resistant tomato varieties
Related farms
Farm markets and roadside stands
Venues: Farms, Wineries, Orchards for your event, wedding or party
Winery tours and wine tastings
Horse rides, stables, lessons, trails
Maple Syrup farms and sugarworks
Bed & Breakfasts on Farms, Wineries, Ranches and Orchards
Canning Books, Supplies and Accessories
These are my favorite essential canning tools, books and supplies. I've been using many of these for over 50 years of canning! The ones below on this page are just the sampling of. my preferred tools. but you can find much more detailed and extensive selections on the pages that are linked below.
- Vacuum Foodsealers for freezing, dried foods, and refrigerated foods - the FoodSaver line
- Selecting a KitchenAid mixer and attachments for home canning
- Steam Juicers
- Strainers, pit removers, seed-skin-stem removers, jelly strainers, etc. All types, makes and prices (from $19 to $350)
- Cherry pitters reviews, prices and ordering
- Food dehydrators - easy and fast to dry your own fruits, veggies, sun-dried tomatoes, etc.
The All New Ball Book Of Canning And Preserving: Over 350 of the Best Canned, Jammed, Pickled, and Preserved Recipes Paperback
This is THE book on canning! My grandmother used this book when I was a child.; It tells you in simple instructions how to can almost anything; complete with recipes for jam, jellies, pickles, sauces, canning vegetables, meats, etc.
If it can be canned, this book likely tells you how! Click on the link below for more information and / or to buy (no obligation to buy)The New Ball Blue Book of Canning and Preserving
Canning and Preserving for Dummies by Karen Ward
This is another popular canning book. Click here for more information, reviews, prices for Canning and Preserving For Dummies
Of course, you do not need to buy ANY canning book as I have about 500 canning, freezing, dehydrating and more recipes all online for free, just see Easy Home Canning Directions.
Home Canning Kits
See here for related tools, equipment, supplies on Amazon See here for related tools, equipment, supplies on Amazon
I have several canners, and my favorite is the stainless steel one at right. It is easy to clean and seems like it will last forever. Mine is 10 years old and looks like new.
The black ones are the same type of standard canner that my grandmother used to make everything from applesauce to jams and jellies to tomato and spaghetti sauce.
This complete kit includes everything you need and lasts for years: the canner, jar rack, Jar grabber tongs, lid lifting wand, a plastic funnel, labels, bubble freer, It's much cheaper than buying the items separately. It's only missing the bible of canning, the Ball Blue Book.
You will never need anything else except jars & lids (and the jars are reusable)!
The complete list of canners is on these pages:
- Water bath canners - Good for acidic foods, like applesauce, pickles, salsa, jams, jellies, most fruits
- Pressure canners - needed for low and non-acidic foods, like canned vegetables (corn, green beans, etc), and meats
- Canners for glass top stoves if you have a glass or ceramic stove
- Canners for induction stovetops
Pressure Canners
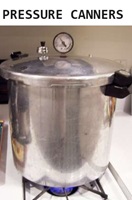
If you plan on canning non-acidic foods and low acid foods that are not pickled - this means: meats, seafood, soups, green beans corn, most vegetables, etc., then you ABSOLUTELY must use a Pressure Canner.
Of course, you can use a pressure canner as a water bath canner as well - just don't seal it up, so it does not pressurize. This means a Pressure Canner is a 2-in-1 device. With it, you can can almost ANYTHING.
There are also other supplies, accessories, tools and more canners, of different styles, makes and prices, click here!
Basic Canning Accessories
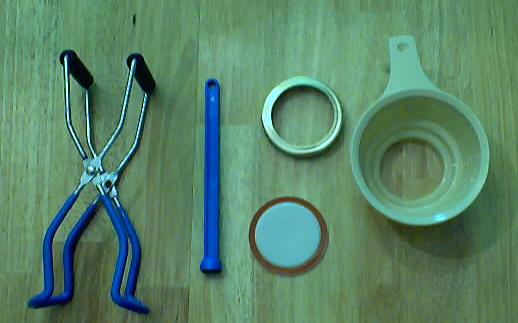
From left to right:
- Jar lifting tongs to pick up hot jars
- Lid sanitizer / lifter - to remove lids from the pot of boiling water (sterilizing )
- Lids- disposable - you may only use them once
- Ring - holds the lids on the jar until after the jars cool - then you remove them, save them and reuse them
- Canning Jar funnel - to fill the jars
FREE Illustrated Canning, Freezing, Jam Instructions and Recipes
Don't spend money on books. that you don't need to. Almost everything you can find in some book sold online or in a store is on my website here for free. Start with theEasy Home Canning Directions below. That is a master list of canning directions which are all based upon the Ball Bblue book, the National Center for Home Food Preservation and other reputable lab tested recipes. Almost every recipe I present in addition to being lab tested com. is in a step by step format with photos for each step and complete. explanations. that tell you how to do it, where to get the supplies and pretty much everything you need to know. In addition, there almost always in a PDF format so you can print them out and use them while you cook.
[ Easy Home Canning Directions]
[FAQs - Answers to common questions and problems]
[Recommended books about home canning, jam making, drying and preserving!]
Looking for canning equipment and supplies?
Water bath canner with a jar rack
Pressure canners for gas, electric and induction stoves: Presto 23Qt or T-fal 22Qt
Canning scoop (this one is PERFECT)
Ball Blue book (most recent version)
Jars: 8oz canning jars for jams
Find Other types of farms:
Farm markets and roadside stands
Road trips and camping resources
Local Honey, apiaries, beekeepers
Consumer fraud and scams information
Home canning supplies at the best prices on the internet!
Maple Syrup Farms, sugarworks, maple syrup festivals
Environmental information and resources
Farms For Your Event for birthday parties, weddings, receptions, business meetings, retreats, etc.
Festivals - local fruit and vegetable festivals
Get the
most recent version of
the Ball Blue Book
With this Presto 23 quart pressure canner and pressure cooker, you can "can" everything, fruits, vegetables, jams, jellies, salsa, applesauce, pickles, even meats, soups, stews. Model 01781

You can make jams, jellies, can fruit, applesauce, salsa and pickles with water bath canners, like this Granite Ware 12-Piece Canner Kit, Jar Rack, Blancher, Colander and 5 piece Canning Tool Set

