
Looking for How to freeze peppers from your garden or the shop (directions, recipe, with photos and free) in 2025? Scroll down this page and follow the links. And if you bring home some fruit or vegetables and want to can, freeze, make jam, salsa or pickles, see this page for simple, reliable, illustrated canning, freezing or preserving directions. There are plenty of other related resources, click on the resources dropdown above. If you are having a hard time finding canning lids, I've used these, and they're a great price & ship in 2 days.
If you have questions or feedback, please let me know! There are affiliate links on this page. Read our disclosure policy to learn more.
How to freeze peppers from your garden or the shop (directions, recipe, with photos and free)
How to Freeze Peppers: Sweet, Bell, Banana, Hot, Chili, Jalapeno and Other Types!
 If you like frozen peppers in the winter, just imagine how good it would
taste if you had picked a bag yourself and then quickly froze it at home! It is also one of the simplest ways to put up a vegetable for the winter. Here's
how to do it, complete instructions in easy steps and completely illustrated. The peppers will taste MUCH better than any canned or frozen you've ever had from
a store. And if you'd rather
can your peppers, see this page.
If you like frozen peppers in the winter, just imagine how good it would
taste if you had picked a bag yourself and then quickly froze it at home! It is also one of the simplest ways to put up a vegetable for the winter. Here's
how to do it, complete instructions in easy steps and completely illustrated. The peppers will taste MUCH better than any canned or frozen you've ever had from
a store. And if you'd rather
can your peppers, see this page.
Directions for Freezing peppers
Ingredients
- fresh peppers - any quantity. I figure one handful per serving.
Equipment
- 1 Large pot of boiling water
- 2 large bowls, one filled with cold water and ice.
- 1 sharp knife
- Vacuum food sealer or "ziploc" type freezer bags (the freezer bag version is heavier and protects better against freezer burn.
Instructions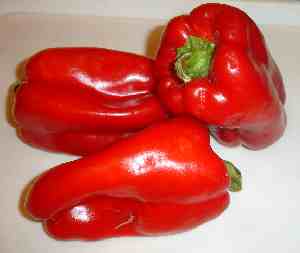
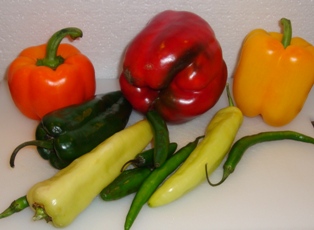
Step 1 - Get yer peppers!
Start with fresh peppers - as fresh as you can get. Select crisp, tender, green or bright peppers. If there is a delay between harvesting and freezing, put it in the refrigerator or put ice on it. And don't use peppers that are old, limp, overripe or dried out (see below):
Step 2 - Wash the peppers!
 I'm sure you can figure out how to rinse the peppers in plain cold
or lukewarm water.
I'm sure you can figure out how to rinse the peppers in plain cold
or lukewarm water.
Step 3 - Slice the peppers in half, scoop out the seeds and cut into smaller pieces
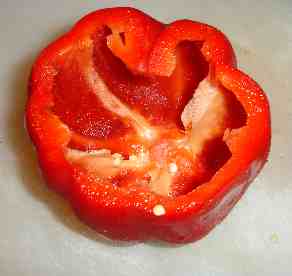 Cut out stems, cut in half and remove seeds. If desired, cut into
1/2-inch strips or rings.
Cut out stems, cut in half and remove seeds. If desired, cut into
1/2-inch strips or rings.
Of course, if your prefer Julian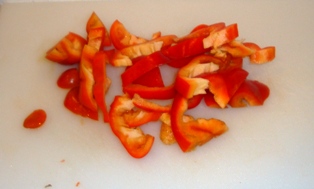 ne
cut peppers, you can cut the peppers lengthwise in thin strips instead or chop into smaller pieces.
ne
cut peppers, you can cut the peppers lengthwise in thin strips instead or chop into smaller pieces.
Step 4 - Decide how you will be using them later!
This determines how you will prepare them
- If you will be using them heated (in
cooking):
Then you will need to water blanch them - go on to Step 5
- If you will be using them
in uncooked foods where you need a crisper texture, or possibly still use them in cooked foods:
SKIP TO STEP 7
Step 5 - Blanch the peppers.
Get the pots ready. Get the pot of boiling water r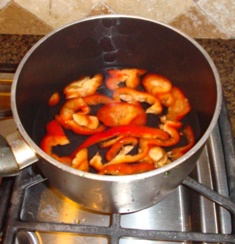 eady (about 2/3
filled) and a LARGE bowl with ice and cold water.
eady (about 2/3
filled) and a LARGE bowl with ice and cold water.
All fruits and vegetables contain enzymes and bacteria that, over time, break down the destroy nutrients and change the color, flavor, and texture of food during frozen storage. peppers requires a brief heat treatment, called blanching, in boiling water or steam, to destroy the enzymes before freezing. Blanch the pepper halves for 3 minutes; and strips or rings for 2 minutes. B
Then cool them promptly in a large bowl of ice water for 3 or 4 minutes. Drain and package, leaving 1/2-inch headspace. Seal and freeze.
The duration is intended to be just long enough to stop the action of the enzymes and kill the bacteria.
Begin counting the blanching time as soon as you place the peppers in the boiling water. Cover the kettle and boil at a high temperature for the required length of time. You may use the same blanching water several times (up to 5). Be sure to add more hot water from the tap from time to time to keep the water level at the required height.
Step 6 - Cool the peppers
Cool peppers immediately in ice water. Drain the peppers thoroughly.
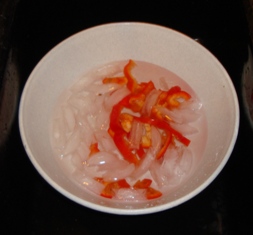 After vegetables are blanched, cool them quickly to prevent
overcooking. Plunge the peppers into a large quantity of ice-cold water (I keep adding more ice to it). A good rule of thumb: Cool for the same amount
of time as the blanch step. For instance, if you blanch sweet peppers for 7 minutes, then cool in ice water for 7 minutes.
After vegetables are blanched, cool them quickly to prevent
overcooking. Plunge the peppers into a large quantity of ice-cold water (I keep adding more ice to it). A good rule of thumb: Cool for the same amount
of time as the blanch step. For instance, if you blanch sweet peppers for 7 minutes, then cool in ice water for 7 minutes.
Drain thoroughly.
Step 7 - Bag the peppers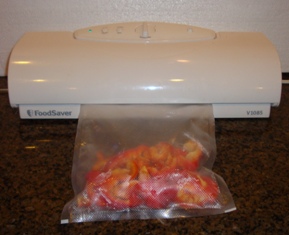
I love the FoodSavers (see this page for more information) with their vacuum sealing! I am not
paid by them, but these things really work. If you don't have one, ziploc bags work, too, but it is hard to get as much air out of the bags.
remove the air to prevent drying and freezer burn. TIP: If you don't own a vacuum food sealer to freeze foods, place food in a Ziploc bags,
zip the top shut but leave enough space to insert the tip of a soda straw. When straw is in place, remove air by sucking the air out. To remove
straw, press straw closed
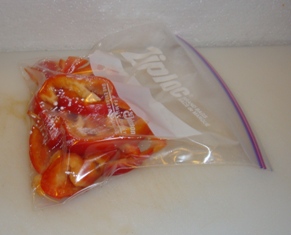 where inserted and finish pressing the bag closed as you remove
straw.
where inserted and finish pressing the bag closed as you remove
straw.
Step 8 - Done!
Pop them into the freezer, on the quick freeze shelf, if you have one!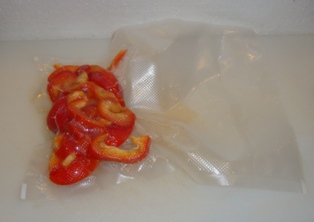
Tips:
- Harvest the peppers at its peak maturity but not old - mushy! Younger is better than older
- Process promptly after harvesting, or keep cooled in the fridge or with ice until then.
Frequently Asked Questions
- How long can they be frozen?
It depends upon how cold is your freezer and how you packed them. Colder (deep freezes) are better than frost free compartments, which actually cycle above freezing (that's how they melt the ice). Vacuum packing results in longer storage capability, too. Thicker bags also help prevent freezer burn.
In general, up to 9 months in a ziploc bag in an ordinary freezer, and 14 months in a deep freeze in a vacuum packed bag. After that, they peppers won't make you sick; they just won't taste a s good.


Looking for canning equipment and supplies?
Water bath canner with a jar rack
Pressure canners for gas, electric and induction stoves: Presto 23Qt or T-fal 22Qt
Canning scoop (this one is PERFECT)
Ball Blue book (most recent version)
Jars: 8oz canning jars for jams
Find Other types of farms:
Farm markets and roadside stands
Road trips and camping resources
Local Honey, apiaries, beekeepers
Consumer fraud and scams information
Home canning supplies at the best prices on the internet!
Maple Syrup Farms, sugarworks, maple syrup festivals
Environmental information and resources
Farms For Your Event for birthday parties, weddings, receptions, business meetings, retreats, etc.
Festivals - local fruit and vegetable festivals
Get the
most recent version of
the Ball Blue Book
