
Water Bath Canning Foods at Home: Easy Step by Step Illustrated Instructions
Water bath canning is the process most people use to can fruits, vegetables, jams, jellies, and pickles at home. Unfortunately, the canners rarely come with directions, and the instructions in many canning books can be complicated and hard to follow. These boiling water bath canning directions below may serve as a guide and a reminder to the basic steps in home pressure canning food whether you have misplaced your canning books, are new to home canning or just need a refresher.
Of course, you should refer to the more specific directions that came with your pressure canner. If you lost the manual, see this page for free replacement manuals which you can download and print. Also see this page for many specific recipes and directions to make many foods to can, from jams, jellies, pickles, applesauce and more !
You may also find the glossary of home canning, freezing and preserving terms to be useful.
Water bath canners
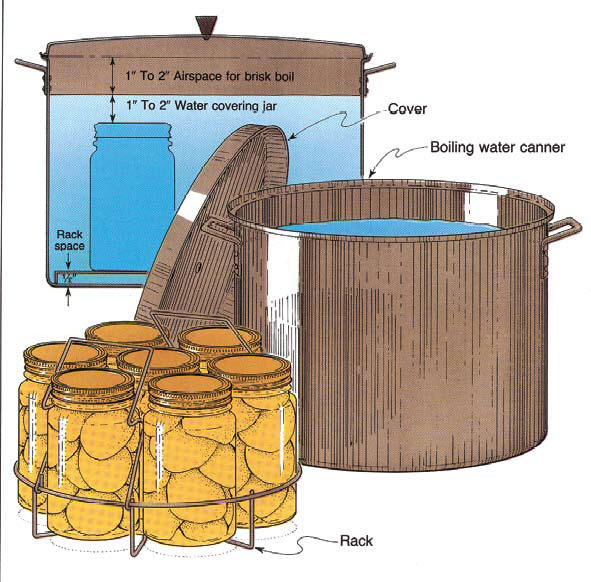
Essentially, a water bath canner,is a very, very large pot, with dimensions to hold at least 7 quart jars and allow them to be submerged by 1 to 2 inches of water. The canners usually include a rack with handles to make it easier (and safer) to put the jars in and take them out of the boiling water. Most boiling water canners are made of aluminum or porcelain-covered steel. Many boiling water canners do not have completely flat bottoms, so if you have a smooth-top stove (such as a ceramic or glass topped stove), see this page for alternatives . Gas stoves are ideal for home canning since either a flat or ridged bottom may be used on a gas burner. To ensure uniform processing of all jars with an electric range, the canner should be no more than 4 inches wider in diameter than the element on which it is heated. (When centered on the burner or element, the canner should not be more than 2 inches wider on any side.)
Keep in mind that water bath canners are suitable only for acidic foods (see this
Table of the pH and/or acidity of common fruits, vegetables, grains, breads and common food products
). Low acid foods must be canned in a Pressure Canner. (See
this page about how to choose a canner
and
this page about pressure canners
). You must use the type of canner called for in the recipe. Keep in mind that you can always use a Pressure Canner as a water bath canner,(just don't seal it up, so it doesn't pressurize!) so if you can only afford one canner, get the pressure canner, and you can use it for all types of food. Pressure canners ARE much more expensive, though, so most people start with a water bath canner, even though it limits what they may can.
Follow these steps for successful boiling water canning:
Setting up the equipment
- The first step in pressure canning is to clean, inspect and assemble the pressure canner. Before each canning season, check the dial gauge for accuracy. The dial gauge is a delicate instrument which must be handled with care. Do not submerse cover or let gauge come in contact with any liquid. You should have the gauge inspected if the cover has been submerged in water or dropped, gauge glass is broken or has fallen out, parts are rusty, pointer is not in the "0" block, or if you believe the gauge may not be accurate. The gauge can usually be checked at your local county extension office. See this page: https://www.pickyourown.org/countyextensionagentoffices.htm to find your local county agent. If you are unable to have your dial gauge checked locally, carefully remove the gauge and call your canner's Consumer Service Department for directions. Also check the sealing ring, overpressure plug, and the rubber gasket of the air vent/cover lock. Replace these parts when they become hard, deformed, cracked, worn, pitted, or unusually soft.
- Check the jars for nicks, cracks, and sharp edges. Check the rings (screw bands) for dents or rust. Use only jars, lids, and bands in perfect condition so an airtight seal may be obtained. Wash and rinse jars, lids, and bands. Po
 ur hot water into jars and set aside until needed. A dishwasher is a great way to clean and preheat the jars. The jars and lids don't need to be sterile (unless the recipe calls for less than 10 minutes of "processing" in the canner; the canner sanitizes the jar as well as the contents), just clean and warm (to prevent breakage from thermal shock).
- Before you start preparing your food, fill the canner half full with clean warm water for a canner load of pint jars. For other sizes and numbers of jars, you will need to adjust the amount of water so it will be 1 to 2 inches over the top of the filled jars.
- Put the canner on your stove, centering on the burner and preheat the water to 140°F (just simmering) for raw-packed foods and to 180°F (barely boiling) for hot-packed foods. You can begin preparing food for your jars while this water is preheating. The recipe will tell you whether it is a raw-pack or ht pack. If you have a glass or ceramic stove, be sure that the canner does not overextend the burner by more than 1 inch, and check the stove's manual to be sure the use of a Pressure Canner is ok.
See this page for more information about canning on glass and ceramic stoves
.
Filling the jars and canner
- Select fresh firm food. Sort food according to size. Clean food thoroughly. Prepare according to recipe. (
see this page for many specific recipes and directions to make many foods to can, from jams, jellies, pickles, applesauce and more
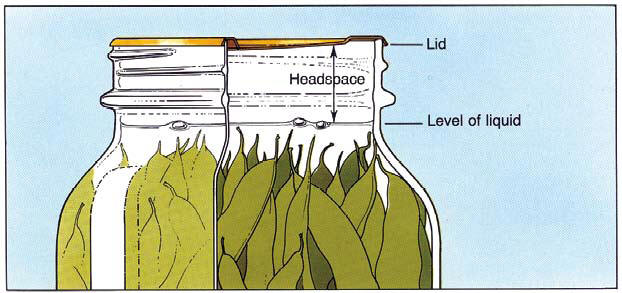
!) Fill the hot canning jars promptly with food and liquid to recommended level (headspace) according to the recipe.
- Work out air bubbles with a clean nonmetallic spatula (see picture above). Wipe sealing edge clean with a damp cloth. Adjust bands snugly, so the jars don't leak, but not TOO tight!
- Load the filled jars, fitted with lids, into the canner one at a time, using a jar lifter. (If you have a shaped wire rack that has handles to hold it on the canner sides, above the water in the canner, you can load jars onto the rack in the raised position and then use the handles to lower the rack with jars into the water.)
When moving jars with a jar lifter, make sure the jar lifter is securely positioned below the neck of the jar (below the screw band of the lid). Keep the jar upright at all times. Tilting the jar could cause food to spill into the sealing area of the lid. - Add more boiling water, if needed, so the water level is at least one to two inches above the jar tops. For process times over 30 minutes, the water level should be 2 to 3 inches above the jars.
- Put the cover on the canner.
- Turn the heat setting to its highest position, cover the canner with its lid and heat until the water boils vigorously.
- Set a timer (after the water is boiling) for the total minutes required for processing the food.
Processing the jars in the canner
- Keep the canner covered for the process time. The heat setting may be lowered as long as a gentle but complete boil is maintained for the entire process time.
- Add more boiling water during the process, if needed, to keep the water level 1 to 2 inches above the jar tops.
- If the water stops boiling at any time during the process, turn the heat on its highest setting, bring the water back to a vigorous boil, and begin the timing of the process over, from the beginning (using the total original process time).
At the end of the processing time
- When the jars have been processed in boiling water for the recommended time, turn off the heat and remove the canner lid. Wait 5 minutes before removing jars.
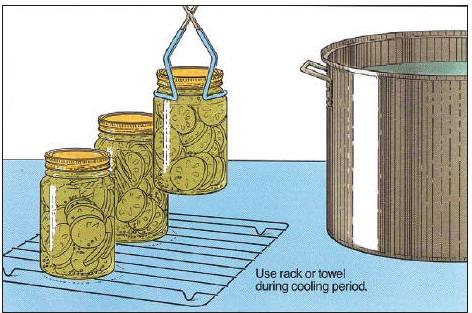
- Using a jar lifter, remove the jars one at a time, being careful not to tilt the jars. Carefully place them directly onto a towel or cake cooling rack, leaving at least one inch of space between the jars during cooling. Avoid placing the jars on a cold surface or in a cold draft.
- Remove jars from canner with a jar lifter, trying to keep them upright without tilting. Set jars apart on board or cloth away from draft to cool. A towel or cake cooling rack makes a good surface. Leave at least one inch of space between the jars during cooling. Let the jars sit undisturbed while they cool, normally 8 to 12 hours. Do not tighten the ring bands on the lids or push down on the center of the flat metal lid while the jars are cooling.
- Once the jars are cooled, remove ring bands from sealed jars (otherwise the bands may rust in place and be hard to open). If necessary, wash jars and lids to remove all residues Put any unsealed jars in the refrigerator and use those first.
- When jars are cold, test seal, remove bands, wipe jars, label, date, and store in a cool, dry place. I use a permanent marker, like a Sharpie, to put the date and contents ("applesauce", strawberry jam", etc.) on the lid of each jar. I put the paper labels (
see this page for free templates to make your own
) on when I give the jars away, so the labels will look their best. Most canner foods will taste good for about a year. Technically, they are safe for years past this, as long as they remained sealed, stored properly and show no signs of spoilage. But after a year or two the quality and taste will appreciably decline.
Testing jar seals

After cooling jars for 12 to 24 hours, remove the screw bands and test seals with one of the
following options:
Option 1.
Press the middle of the lid with a finger or thumb. If the lid springs up when you release your finger, the lid is unsealed.Option 2.
Tap the lid with the bottom of a teaspoon. If it makes a dull sound, the lid is not sealed. If food is in contact with the underside of the lid, it will also cause a dull sound. If the jar is sealed correctly, it will make a ringing, high-pitched sound.Option 3.
Hold the jar at eye level and look across the lid. The lid should be concave (curved down slightly in the center). If center of the lid is either flat or bulging, it may not be sealed.
Storage - Storing canned foods
If lids are tightly vacuum-sealed on cooled jars, remove screw bands, gently wash the lid and jar to remove food residue; then rinse and dry the jars. Label and date the jars and store them in a clean, cool, dark, dry place. A basement is usually an ideal location. The foods should remain tasty for up to a year. After that, it will remain safe to eat, as long as the seal is intact, but quality will slowly decline.
Do not store jars above 95°F or near hot pipes, a range, a furnace, under a sink, in an uninsulated attic, or in direct sunlight. Under these adverse conditions, the food will lose quality in a few weeks or months and may spoil. Dampness may corrode metal lids, break seals, and allow recontamination and spoilage.
Accidental freezing of canned foods will not cause spoilage unless jars become unsealed and recontaminated. However, freezing and thawing may soften food. If jars must be stored where they may freeze, wrap them in newspapers, place them in heavy cartons, and cover with more newspapers and blankets.
Problems and solutions
- Altitudes above sea level - Recipes normally include directions for the proper pressure and processing time if you are more than 1,000 ft above sea level.
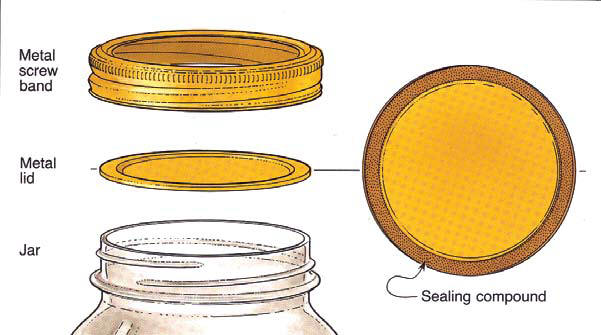
- Canning jars, lids and rings - While there are many styles and shapes of glass jars on the market, only canning jars are recommended for home canning. canning jars are available in 1/2 pint, pint, and quart capacities with threads on which a cap may be screwed. See the chart below for the jar capacity of your canner. Additional information may be obtained from the manufacturers of canning jars. CLOSURES FOR canning jars: The two-piece vacuum cap consists of a flat metal lid held in place with a screw band. A rubber compound on the underside of the lid forms a seal during processing. Follow the closure manufacturer's directions for using the two-piece cap and for testing for a proper seal. If the closure has not sealed, completely reprocess or use the food immediately. Refer to the closure manufacturer's directions for additional information.
-
Reprocessing unsealed jars
If a lid fails to seal on a jar, remove the lid and check the jar-sealing surface for tiny nicks. If necessary, change the jar, add a new, properly prepared lid, and reprocess within 24 hours using the same processing time. Headspace in unsealed jars may be adjusted to 1-1/2 inches and jars could be frozen instead of reprocessed. Foods in single unsealed jars could be stored in the refrigerator and consumed within several days.
For water bath canners and other supplies, see this page! If you have a glass top radiant stove, see Canners for glass top stoves? See below for prices, descriptions and ordering options for pressure canners.
For other supplies:
- Books on canning, freezing, drying, preserving and jam making
- Strainers, pit removers, seed-skin-stem removers, jelly strainers, etc. All types, makes and prices (from $19 to $350)
- Vacuum Foodsealers for freezing, dried foods, and refrigerated foods - the FoodSaver line
- Canning Lids and Rings,
- Canning jars,
- Canning mixes, pectin, etc .
- And just for fun, the history of the canning jar
You can also find free information from the USDA in this PDF file (it will take a while to load!) about selecting and using canners here!
For more information, and NO obligation to buy, just click on the links in the boxes on the left!
Pressure canners!If you want to can low-acid foods such as red meats, sea food, poultry, milk, and all fresh vegetables with the exception of most tomatoes, you will need a Pressure Canners. These foods fit into the low acid group since they have an acidity, or pH level, of 4.6 or greater. The temperature which must be reached and maintained (for a specified amount of time) to kill the bacteria is 240 F. Pressure canning is the only canning method recommended safe by the U.S.D.A. for low-acid foods such as vegetables, meats, and fish. Ordinary water bath canners can only reach 212 F and cannot to kill the types of bacteria that will grow in low acid foods. This temperature can be reached only by creating steam under pressure as achieved in quality pressure canners. There are several manufacturers of pressure canners. The two leading ones are Presto and All American (Wisconsin Aluminum). They are more expensive than water bath canners, but extremely well built - I bought mine in 1988 and it still looks and works like new! |
|

|
Presto 01781 23-Quart Pressure Cooker/Canner. There is also a 16 quart version at a lower cost. Click on the links at left or above for more info and current pricing. Click on the box at left for more information. See the seller's website for features, pricing and user reviews!
|
|
|
See the seller's website for features, pricing and user reviews! |
| See here for related tools, equipment, supplies on Amazon All-American 930 Pressure Canner |
All American Pressure Canner and Cookers - In 3 SizesSee the seller's website for features, pricing and user reviews! |
| See here for related tools, equipment, supplies on Amazon | |
| See here for related tools, equipment, supplies on Amazon | Canning all sorts of fruit and vegetables, even meat with a Pressure Canner it's easy. And although a Pressure Canner costs $100 to $200 ( see this page for pressure canners models, makes and prices ), they last a lifetime, and your children and grandchildren may be using it. You can also find free information from the USDA in this PDF file (it will take a while to load!) about selecting and using canners here! |


Looking for canning equipment and supplies?
Water bath canner with a jar rack
Pressure canners for gas, electric and induction stoves: Presto 23Qt or T-fal 22Qt
Canning scoop (this one is PERFECT)
Ball Blue book (most recent version)
Jars: 8oz canning jars for jams
Find Other types of farms:
Farm markets and roadside stands
Road trips and camping resources
Local Honey, apiaries, beekeepers
Consumer fraud and scams information
Home canning supplies at the best prices on the internet!
Maple Syrup Farms, sugarworks, maple syrup festivals
Environmental information and resources
Farms For Your Event for birthday parties, weddings, receptions, business meetings, retreats, etc.
Festivals - local fruit and vegetable festivals
Get the
most recent version of
the Ball Blue Book
Get the
most recent version of
the Ball Blue Book of Home Canning
Find other types of farms:
- Easter egg hunts
- Children's consignment sales
- Farm markets and roadside stands
- Local Honey
- Local Meat, Milk and Eggs
- Road trip and camping
- Pumpkin patches and corn mazes
- Christmas Tree Farms and lots
- Maple Syrup farms and sugarworks
Highly rated canning supplies:
- Regular Mouth Canning Lids with food-grade with BPA Free Silicone seals for Ball, Kerr Jars for Canning
- Canning accessories kit: funnel, jar tongs, lid lifter, etc
- Food Dehydrator, 400W Electric with 8 Trays, 48 hour Timer and Temperature Control 95-176℉, BPA-Free
- Water Bath Canner, 21 Qts with lid, Jar Rack, Speckled Black, cans 7 quart jars, 9 pint jars or 13 half-pint jars
- Air Fryer: Instant Pot Instant Vortex Plus XL 8QT Clear Windows, Custom Programming, 8-in-1 Functions that Crisps, Broils, Roasts, Dehydrates, Bakes, Reheats
-
- Most recent version of the Ball Blue Book
- The Backyard Homestead:a guide to homesteading , on 1/4 acre, how to raise grains and vegetables; raise animals for meat, eggs, and dairy; and keep honey bees
- Smart silent HEPA Air Purifiers for Home, Large Rooms for Allergies, Smoke, Pets. Eliminates 99.97% of Dust, Pet Hair, Odors