
Looking for How to Make FROG Jam (Fig-Raspberry-Orange-Ginger Jam) - Easily! With Step-by-step Photos, Recipe, Directions, Ingredients and Costs in 2025? Scroll down this page and follow the links. And if you bring home some fruit or vegetables and want to can, freeze, make jam, salsa or pickles, see this page for simple, reliable, illustrated canning, freezing or preserving directions. There are plenty of other related resources, click on the resources dropdown above. If you are having a hard time finding canning lids, I've used these, and they're a great price & ship in 2 days.
If you have questions or feedback, please let me know! There are affiliate links on this page. Read our disclosure policy to learn more.
How to Make FROG Jam (Fig-Raspberry-Orange-Ginger Jam) - Easily! With Step-by-step Photos, Recipe, Directions, Ingredients and Costs
How to Make Homemade FROG Jam
(Fig-Raspberry-Orange-Ginger Jam) !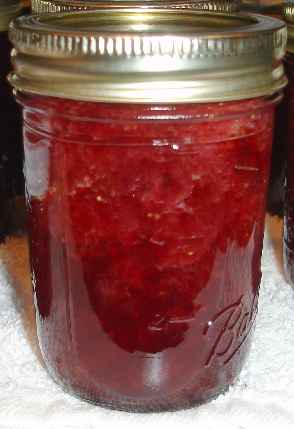
Yield: 6-8 half pints (8-ounce each) of jam
PDF print (full version) or PDF (short version)
FROG Jam (or F.R.O.G. jam) isn't made from real frogs... it actually tastes delicious and is easy to make; from figs, raspberries, oranges and ginger. You can easily "can" it to make your own shelf-stable preserves to give away as gifts. Here's how to do it, in 10 easy steps and completely illustrated. The fig and strawberry combination is a perfect match: the sweetness of figs coupled with the tartness and aromatic flavor of raspberries, oranges and ginger is ideal, allowing you to use much less sugar or even go sugarless! This recipe is all-natural, using fresh or frozen raspberries and figs. Fresh oranges and ginger are always available. Some other FROG recipe I've seen call for Jell-O instead of real fruit or pectin!I've got some other pages for specific types of jam, too: See this page for Fig Jam, this page for Blueberry Jam directions and this page for how to make apricot, peach, plum or nectarine jam.
For more information about figs and raspberries, see Fig Picking Tips, Strawberry Picking Tips and Miscellaneous strawberry facts. Also, see this page for directions about how to can figs and this page for strawberry and other berry jams!
For easy applesauce or apple butter directions, click on these links.
Ingredients
- 5 cups fresh figs - You will need about 3 cups of prepared figs, so you will start with about 4 or 5 cups of fresh figs, any variety (Brown Turkey, Kadota, Peter's Honey, Italian, Black Mission, Celeste, Alma, etc.) You can use frozen figs.
- 1/2 cup orange juice - best with lots of pulp
- 4 cups fresh raspberries - preferably fresh raspberries, but frozen (without added sugar or syrup) works, too. You will need about 2 to 3 cups, in total, of prepared raspberries, so you may need 4 to 5 cups of fresh berries, after removing hulls, stems and bad berries. And more if you want to make seedless, as you lose about 40% when removing seeds. I prefer to remove the seeds using a Foley food mill or a sieve.
- 1 teaspoon fresh peeled, pureed ginger - available at farm markets and grocery stores, especially Asian markets. You can buy it already pureed.
- Sugar - About 2 and 1/4 cups of dry, granulated (table) sugar. You could use 1.5 cups of Agave or honey instead, but honestly, the quality will suffer. You can omit the sugar and just add 1 cup of juice (white grape or peach work best), or if you are diabetic, even just use 1 cup Splenda (or about 1/3 that if you use Stevia).
- Pectin - 4 Tablespoons of low-sugar (or no-sugar needed) pectin. If you like the jam very thick, use 6 or 7 tablespoons of pectin. I do not recommend the "regular" pectin. It only works reliably under ideal conditions, and loads of added sugar.
- 1/4 cups lemon juice
Equipment
- 1 Water Bath Canner (a huge pot to sanitize the jars after filling (about $30 to $35 at mall kitchen stores, sometimes at big box stores and grocery stores.). Note: we sell canners and supplies here, too - at excellent prices - and it helps support this web site!
- Half pint canning jars (Grocery stores, like Publix, Kroger, Safeway carry them, as do some big box stores - about $7 per dozen 8 ounce jars including the lids and rings)
- Lids - thin, flat, round metal lids with a gum binder that seals them against the top of the jar. They may only be used once.
- Rings - metal bands that secure the lids to the jars. They may be reused many times.
- Jar funnel ($5 at Target, other big box stores, and often grocery stores; and available online - see this page) or order it as part of the kit with the Jar grabber .
- At least 1 large pot; I prefer 16 to 20 quart Nonstick ceramic coated pots for easy cleanup.
- Large spoons and ladles,
- Jar grabber (to pick up the hot jars)- Big box stores and
grocery stores sometimes carry them; and it is available online - see
this page. It's a tremendously useful to put jars in the canner
and take the hot jars out (without scalding yourself!). The kit sold
below has everything you need, and at a pretty good price:
Optional stuff:
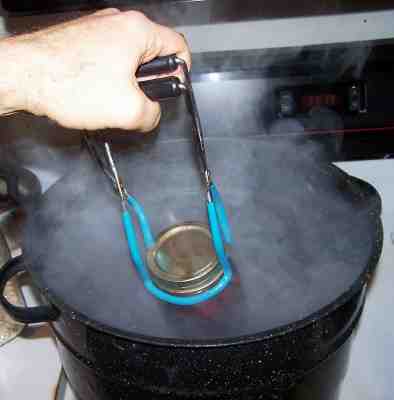
- Lid lifter (has a magnet to pick the lids out of the almost-boiling water where you sanitize them. ($4 at big box stores or it comes in the kit at left)
FROG Jam-making Directions
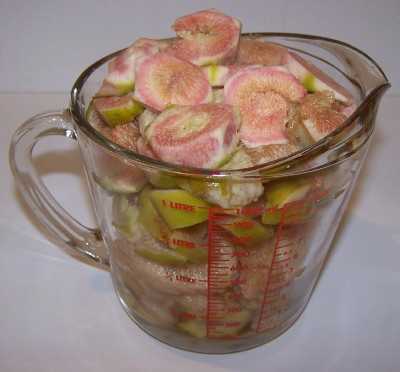
Step 1 - Pick the figs and berries! (or buy them already picked)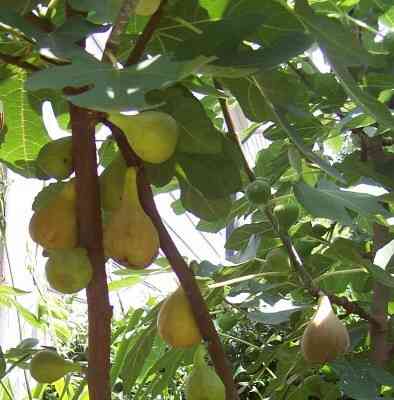
It's fun to go pick your own and you can obviously get better quality ones!
At right is a picture I took of Brown Turkey figs - they are plentiful in late August throughout the South. Other types of figs are fine, too. Raspberries are usually in season in May or June in most areas, so you may want to pick and freeze your raspberries (without sugar) and make this jam when the figs come in season. See this page on freezing raspberries.
I prefer to grow my own; which is really easy, especially for figs, raspberries can more challenging - but growing anything does take some space and time. That's why we have pick-your-own farms!
As mentioned above; you may use frozen berries (those without syrup or added sugar); which is especially useful if you want to make some jam in December to give away at Christmas!
Above and at left are raspberries that I picked at a pick-your-own farm. If you want to pick your own, here is a list and links to the pick your own farms.
How much fruit?
Jam can ONLY be made in rather small batches - about 6 cups of prepared fruit at a time - like the directions on the pectin say, DO NOT increase the recipes or the jam won't "set" (jell, thicken). (WHY? Alton Brown on the Food Channel says pectin can overcook easily and lose its thickening properties. It is easier and faster to get an even heat distribution in smaller batches. It takes about 4 cups of raw, unprepared berries and 4 cups of raw, whole, fresh figs per batch.
Step 2 - Wash the jars and lids
Canning jars in the dishwasher. Now's a good time to get the jars ready, so you won't be rushed later. The dishwasher is fine for the jars; especially if it has a "sanitize" cycle, the water bath processing will sanitize them as well as the contents! If you don't have a dishwasher with a sanitize cycle, you can wash the containers in hot, soapy water and rinse, then sanitize the jars by boiling them 10 minutes, and keep the jars in hot water until they are used.
NOTE: If a canning recipe calls for 10 minutes or more of process time in the canner, then the jars do not need to be "sanitized" before filling them. But really, sanitizing them first is just good hygiene and common sense! See this page for more detail about cleaning and sanitizing jars and lids.
Put the lids into a pan of hot, but not quite boiling water (that's what the manufacturer's recommend) for 10 minutes, and use the magnetic "lid lifter wand" to pull them out. Leave the jars in the dishwasher on "heated dry" until you are ready to use them. Keeping them hot will prevent the jars from breaking when you fill them with the hot jam.
Step 3 -Wash the raspberries!
I'm sure you can figure out how to wash the fruit in plain cold water.
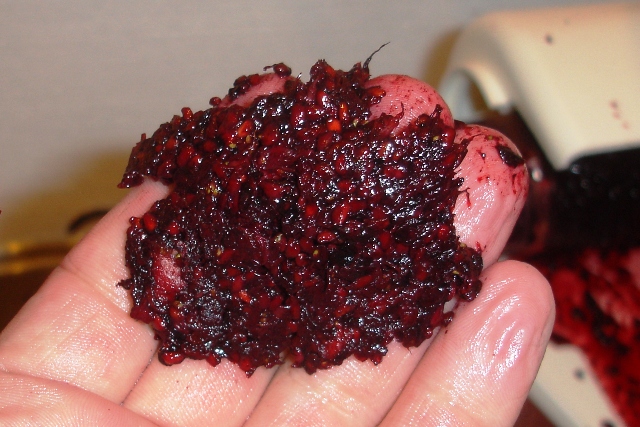
Step 4 -Remove the raspberry seeds (optional)
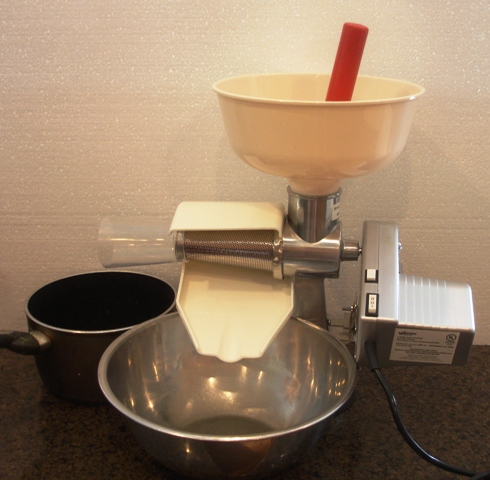
I usually remove the seeds because they are a size that get stuck in my teeth. The easiest way to do this is to use a food mill; a Villaware (manual or motorized) or a Roma mill; not a Foley*. I find the seeds separate more easily if I heat the raspberries up until almost boiling, in a pan with about 1 cup of added apple juice.
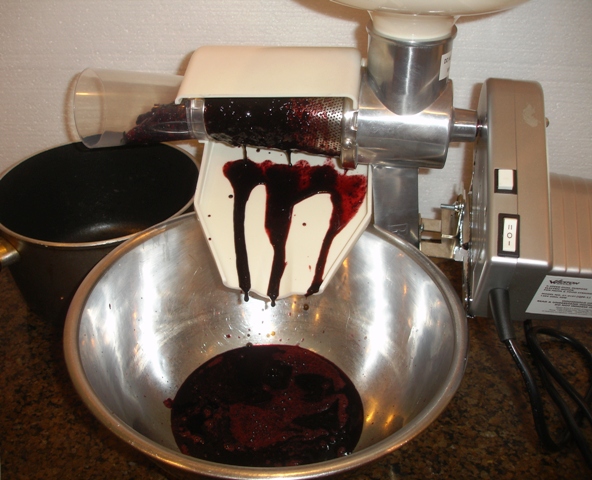
As you can see, it is really effective at removing just the seeds:
ASIDE:
Here's how the Foley food mill (below) works on BLACKBERRIES - not raspberries. They cost about $30.
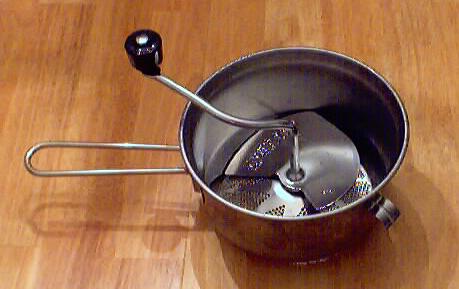
It works well for blackberries, not so well for raspberries, and no one tries to remove strawberry seeds (they're so small). I suppose you could train monkeys to pick them out, but they'd probably form a trade labor union. But I digress..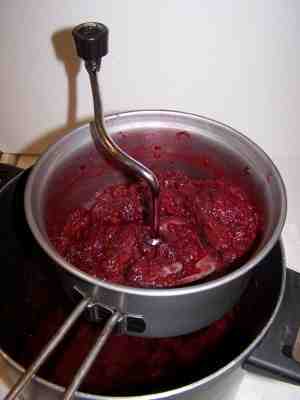
Step 5 - Peel and chop the figs
You need to cut off the stems and the bottom of the
fig, but you do not need to peel them - you CAN peel them if you
want to. I only peel the grody* looking ones (example photo below)
or those with thick skins.
(* knarly, gross, yucky)
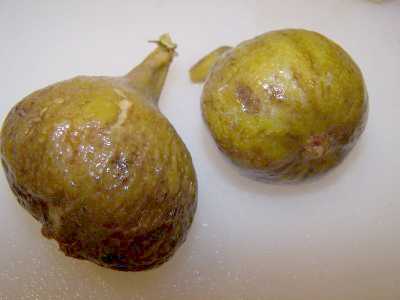
At left, sample figs with unappealing peels (skins). If the skin looks fine, I chop it up, but if the skins are tough, think or unappealing like these...
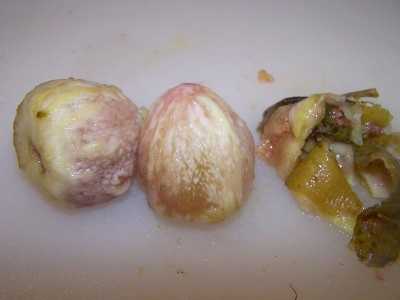
I peel ----->
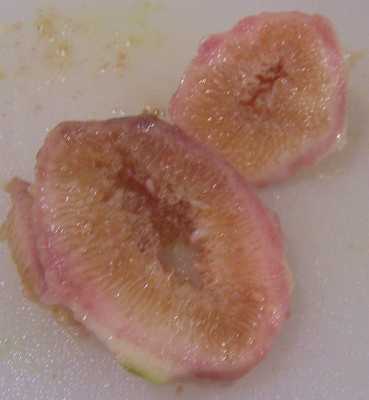 At
left is a sample slice of a perfectly ripe but not over-ripe fig. It
depends on the variety, but generally, they should be pink/yellowish and not
brown inside....
At
left is a sample slice of a perfectly ripe but not over-ripe fig. It
depends on the variety, but generally, they should be pink/yellowish and not
brown inside....
Some recipes call for the figs to sit in boiling water for 5 to 15 minutes
to "check o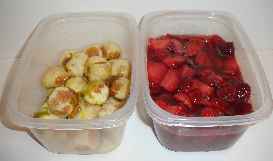 r
tenderize the skins. Since the skins have no flavor, I'd rather remove
them if they are thick or tough... otherwise, just chop them up along with
the rest of the fig.
r
tenderize the skins. Since the skins have no flavor, I'd rather remove
them if they are thick or tough... otherwise, just chop them up along with
the rest of the fig.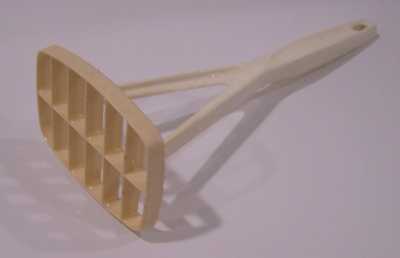 I do remove any stems and bruised spots.
 You will need 3 cups of the prepared (chopped) figs. You can chop them up more, if
you like, but I find they soften and break up during cooking, an
You will need 3 cups of the prepared (chopped) figs. You can chop them up more, if
you like, but I find they soften and break up during cooking, an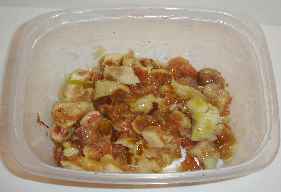 d
if I want smaller pieces, I just use a sharp-edged plastic potato masher
(shown at right) to mush them while cooking)
d
if I want smaller pieces, I just use a sharp-edged plastic potato masher
(shown at right) to mush them while cooking)
You should now have 2 or 3 cups of sliced raspberries and 3 to 4 cups of chopped figs!
Step 6 - Puree or blend?
If you like a very, very smooth FROG jam you can run the figs and raspberries through a blender, chopper or food processor. I like to see chunks of real fruit in the jam, so I don't.
If you have prepared ginger puree, it's all ready. If you have fresh ginger root, you need to peel it and crush it. I prefer to use the blender on the peeled ginger root.
Step 7 - Measure out the sugar and set aside
 If
you are using low or no-sugar pectin, you should only need 2 and 1/4 cups of
sugar. With regular pectin, about 4 cups of sugar. Mix the dry pectin with
about 1/4 cup of sugar and Keep this separate from the rest of the sugar. If
you are not using sugar, you will just have to stir more vigorously to prevent
the pectin from clumping. This helps to keep the pectin from clumping up
and allows it to mix better!
If
you are using low or no-sugar pectin, you should only need 2 and 1/4 cups of
sugar. With regular pectin, about 4 cups of sugar. Mix the dry pectin with
about 1/4 cup of sugar and Keep this separate from the rest of the sugar. If
you are not using sugar, you will just have to stir more vigorously to prevent
the pectin from clumping. This helps to keep the pectin from clumping up
and allows it to mix better!
If you would rather try to make jam with no added sugar, just substitute 1 cup of white grape or peach juice for the sugar. You could also use 1 cup Splenda (or about 1/3 that if you use Stevia, which is my preference) instead of the sugar! Or, as pointed out in the ingredients section, Agave or Honey.
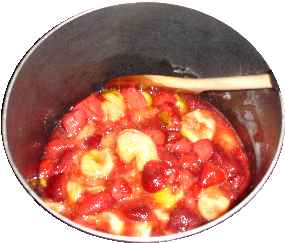
Step 8 - Mix the raspberries and figs with the pectin and cook to a full boil
 If
you haven't already, combine
the berries and figs in a large pot. Stir the lemon juice, ginger and pectin into
the berry/fig mixture. Hold off on the sugar - that goes in after the mix
comes to a boil, in step 10.
If
you haven't already, combine
the berries and figs in a large pot. Stir the lemon juice, ginger and pectin into
the berry/fig mixture. Hold off on the sugar - that goes in after the mix
comes to a boil, in step 10.
Put the pot on the stove over medium to high heat (stir often enough to prevent burning). It should take about 5 to 10 minutes to get it to a full boil (the kind that cannot be stirred away).
Why use pectin? You may run into grandmotherly types who sniff "I never used pectin!" at you. Well, sure, and their generation took a horse and buggy to work, died of smallpox and ate canned meat and green beans that tastes like wet newspapers. Old fashioned ways are not always better nor healthier. Pectin, which occurs naturally in fruit, is what makes the jam "set" or thicken. The pectin you buy is just natural apple pectin, more concentrated. Using pectin dramatically reduces the cooking time, which helps to preserve the vitamins and flavor of the fruit, and uses much less added sugar. But, hey, if you want to stand there and stir for hours, cooking the flavor away, who am I to stop you! :) Having said that, there are some fruits that have naturally high amounts of pectin (see this page for a list) and they simply don't need much or even any padded pectin.
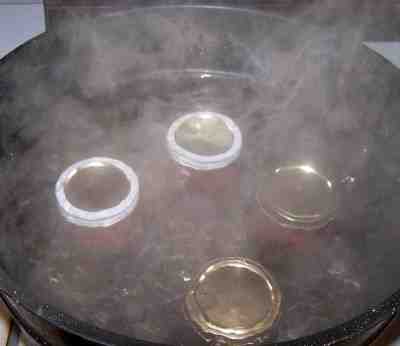
Step 9 - Get the lids warming in hot (but not boiling) water
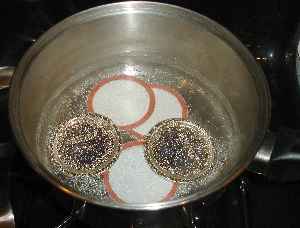 If
you haven't done so already, put the lids into a pan of hot water (barely
simmering) for at least several minutes; to soften up the gummed surface and
clean the lids.
If
you haven't done so already, put the lids into a pan of hot water (barely
simmering) for at least several minutes; to soften up the gummed surface and
clean the lids.
Need lids, rings and replacement jars?
Get them all here, delivered direct to your home, at the best prices on the internet!
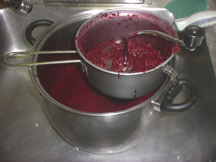
Step 10 - Add the remaining sugar and bring to a boil
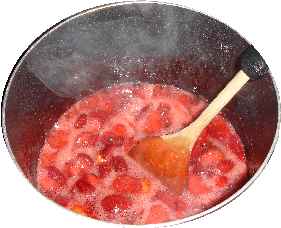 When
the berry-pectin mix has reached a full boil (photo at left), add the rest
of the sugar (about 2 cups of sugar per 6 cup batch of berries - OR the 1
cup of fruit juice OR the 1 cup Splenda (or about 1/3 that if you use
Stevia, which is my preference)) and then
When
the berry-pectin mix has reached a full boil (photo at left), add the rest
of the sugar (about 2 cups of sugar per 6 cup batch of berries - OR the 1
cup of fruit juice OR the 1 cup Splenda (or about 1/3 that if you use
Stevia, which is my preference)) and then
Step 11 - Return to a full, hard boil for 1 minute
... bring it back to a boil and boil hard for 1 minute.
Remove from the heat.
Step 12 - Skim any excessive foam
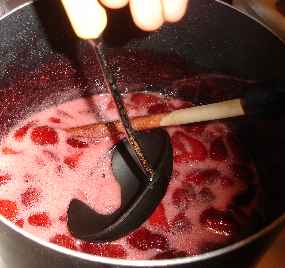 Foam...
What is it? Just jam with a lot of air from the boiling. But it
tastes more like, well, foam, that jam, so most people remove it. It is
harmless,
though. Some people add 1 teaspoon of butter or margarine to the mix in
step 6 to reduce foaming, but food experts debate whether that may contribute to
earlier spoilage, so I usually omit it and skim.
Foam...
What is it? Just jam with a lot of air from the boiling. But it
tastes more like, well, foam, that jam, so most people remove it. It is
harmless,
though. Some people add 1 teaspoon of butter or margarine to the mix in
step 6 to reduce foaming, but food experts debate whether that may contribute to
earlier spoilage, so I usually omit it and skim.
But save the skimmed foam! You can recover jam from it to use fresh! See this page for directions!
Step 13 - Testing for "jell" (thickness)
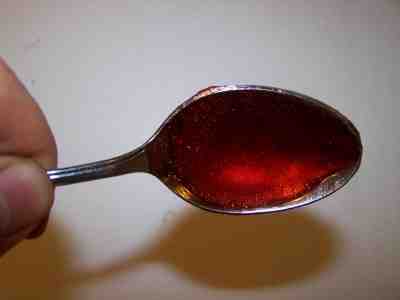 I
keep a metal tablespoon sitting in a glass of ice water, then take a half
spoonful of the mix and let it cool to room temperature on the spoon. If
it thickens up to the consistency I like, then I know the jam is ready. If
not, I mix in a little more pectin (about 1/4 to 1/2 of another package)
and bring it to a boil again for 1 minute.
I
keep a metal tablespoon sitting in a glass of ice water, then take a half
spoonful of the mix and let it cool to room temperature on the spoon. If
it thickens up to the consistency I like, then I know the jam is ready. If
not, I mix in a little more pectin (about 1/4 to 1/2 of another package)
and bring it to a boil again for 1 minute.
Notes about "set" (thickening or jell): It takes 3 ingredients for jams and jellies to set: pectin, sugar and acidity, heated uniformly for the right amount of time. The amount of pectin that is naturally occurring in the fruit varies from one type of fruit to another and by ripeness (counter intuitively, unripe contains more pectin). See this page for more about pectin in fruit. It takes the right balance, and sufficient amounts of each of pectin, sugar and acidity to result in a firm jam or jelly. Lastly, it takes a brief period (1 minute) of a hard boil, to provide enough heat to bring the three together. Generally speaking, if your jam doesn't firm up, you were short in pectin, sugar or acidity or didn't get a hard boil. That's ok - you can "remake' the jam; see this page!
Step 14 - Optional: Let stand for 5 minutes and stir completely.
Why? Otherwise, the fruit will often float to the top of the jar. This isn't a particular problem; you can always stir the jars later when you open them; but some people get fussy about everything being "just so", so I've included this step! Skipping this step won't affect the quality of the jam at all. I usually don't bother.
You will also notice that the less sugar you use, the more the fruit will float (chemists will tell you it is due to the decreased density of the solution!)
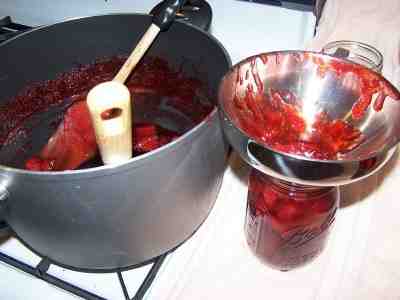 Step
15 - Fill the jars and put the lid and rings on
Step
15 - Fill the jars and put the lid and rings on
 Fill
them to within 1/4-inch of the top, wipe any spilled jam off the top, seat
the lid and tighten the ring around them. Then put the filled jars into the canner!
Fill
them to within 1/4-inch of the top, wipe any spilled jam off the top, seat
the lid and tighten the ring around them. Then put the filled jars into the canner!
This is where the jar tongs come in really handy!
Step 16 - Process the jars in the boiling water bath
Keep the jars covered with at least 2 inches of water. Keep the water
boiling. In general, boil them for 10 minutes, which is what SureJell (the
makers of the pectin) recommend. I say "in general" because you have
to
 process
(boil) them longer at higher altitudes than sea level, or if you use larger
jars, or if you did not sanitize the jars and lids right before using them.
The directions inside every box of pectin will tell you exactly. The
directions on the pectin tend to be pretty conservative. Clemson
University says you only need to process them for 5 minutes. I usually
hedge my bets and start pulling them out after 5 minutes, and the last jars
were probably in for 10. I rarely have a jar spoil, so it must work.
But you don't want to process them too long, or the jam will turn dark and
get runny. See the chart below for altitude adjustment to processing
times, if you are not in the sea level to 1,000ft above sea level range.
process
(boil) them longer at higher altitudes than sea level, or if you use larger
jars, or if you did not sanitize the jars and lids right before using them.
The directions inside every box of pectin will tell you exactly. The
directions on the pectin tend to be pretty conservative. Clemson
University says you only need to process them for 5 minutes. I usually
hedge my bets and start pulling them out after 5 minutes, and the last jars
were probably in for 10. I rarely have a jar spoil, so it must work.
But you don't want to process them too long, or the jam will turn dark and
get runny. See the chart below for altitude adjustment to processing
times, if you are not in the sea level to 1,000ft above sea level range.
Note: Some people don't even boil the jars; they just ladle it hot into hot jars, put the lids and rings on and invert them, but putting the jars in the boiling water bath REALLY helps to reduce spoilage! To me, it makes little sense to put all the working into making the jam and then not to process the jars to be sure they don't spoil!
|
Recommended process time for jams in a boiling water canner. |
||||
| Process Time at Altitudes of | ||||
| Style of Pack | Jar Size | 0 - 1,000 ft | 1,001 - 6,000 ft | Above 6,000 ft |
| Hot | Half-pints or Pints |
5 min | 10 | 15 |
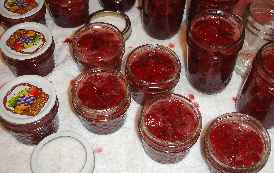
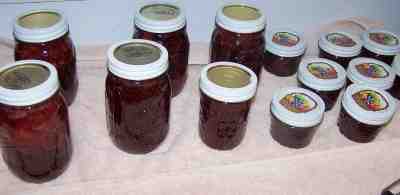
Step 17 - Remove and cool the jars - Done!
 Lift
the jars out of the water with your jar lifter tongs and let them cool
without touching or bumping them in a draft-free place (usually takes
overnight) You can then remove the rings if you like, but if you leave
them on, at least loosen them quite a bit, so they don't rust in place
due to trapped moisture. Once the jars are cool, you can check that they
are sealed verifying that the lid has been sucked down. Just press in
the center, gently, with your finger. If it pops up and down (often
making a popping sound), it is not sealed. If you put the jar in the
refrigerator right away, you can still use it. Some people replace the
lid and reprocess the jar, then that's a bit iffy. If you heat the
contents back up, re-jar them (with a new lid) and the full time in the
canner, it's usually ok.
Lift
the jars out of the water with your jar lifter tongs and let them cool
without touching or bumping them in a draft-free place (usually takes
overnight) You can then remove the rings if you like, but if you leave
them on, at least loosen them quite a bit, so they don't rust in place
due to trapped moisture. Once the jars are cool, you can check that they
are sealed verifying that the lid has been sucked down. Just press in
the center, gently, with your finger. If it pops up and down (often
making a popping sound), it is not sealed. If you put the jar in the
refrigerator right away, you can still use it. Some people replace the
lid and reprocess the jar, then that's a bit iffy. If you heat the
contents back up, re-jar them (with a new lid) and the full time in the
canner, it's usually ok.
Once cooled, they're ready to store. I find they last up to 12 months. But after about 6 to 8 months, they get darker in color and start to get runny. They still are safe to eat, but the flavor and texture aren't as good. So eat them in the first 6 months after you prepare them! Another trick is to keep the uncooked berries or other fruit in the freezer and make and can the jam as needed, so it's always fresh.
FAQS
- Comments from a visitor on June 09, 2014: "I would like to convert
it to a jelly recipe. I know how to strain out the juices for the jelly
making, but how can I determine how much sugar, pectin & lemon juice is
needed? I can look at various recipes on this site, but I\'m still guessing
how much of each would be needed. Any helpful hints/tips on this?
Answer:
To make it into a jelly... I'll tell you that is tough, due to the viscosity of figs and the seeds in raspberries. Usually, a jelly strainer or cheesecloth is use, but you will lose so much pulp, that it would cost a fortune.
I would suggest, instead, it is more practical to just run it through a sieve or better, a Foley food mill (about $22) and then through a blender or food processor to make it really smooth. - Comments from a visitor on July 08, 2013: "I used your recipe last year
for FROG jam. I am down to the last two jars and just canned
some fresh filling. I noticed that the color of last years is more brown
than red. Is it still good? I LOVE your website and refer to it constantly!
Robin Howard
Answer:
Yes, over time, the color usually darkens and the jam gets a bit more runny, but if it is still sealed and no other signs of spoilage are present, it's safe to eat!
Comments, Tips and Feedback:
Summary - Typical Cost of Making Homemade Jam - makes 8 jars, 8 oz each** |
||||
| Item | Quantity | Cost in 2025 | Source | Subtotal |
| Figs | 5 cups | $3 | Pick your own, or grow your own (figs are EASY to grow) | $3 |
| Berries | 4 cups (prepared) | $5 | Pick your own | $5.00 |
| Ginger | 1 teaspoon | $0.25 | Market or grocery store | $0.25 |
| Oange juice | 1/2 cup | $0.25 | Grocery store | $0.25 |
| Canning jars (8 oz size), includes lids and rings | 8 jars | $11/dozen 8 oz jars or $0.92/jar |
Grocery stores, like Public, Kroger, Safeway and sometimes, Big Lots, local hardware stores and big box stores | $10.00 |
| Sugar | 4 cups | $2.00 | Grocery stores, like Public, Kroger, Safeway and sometimes, Big Lots, local hardware stores and big box stores | $2.00 |
| Pectin (low sugar, dry) | 1 and a third boxes * | $2.00 per box | Grocery stores, like Public, Kroger, Safeway and sometimes, Big Lots, local hardware stores and big box stores | $2.70 |
| Total | $23.20 total or about $2.90 per jar (If you have jars to re-use, it's only $1.65 per jar) |
|||
|
** - This assumes you already have the pots, pans, ladles,, and reusable equipment. Note that you can reuse the jars and reduce the cost further; just buy new lids (the rings are reusable, but the flat lids are not)! |
||||
Can't find the equipment? We ship to all 50 states!
Use our Feedback form!
FAQs - Answers to Common Questions
|
Canning Books, Supplies and Accessories
These are my favorite essential canning tools, books and supplies. I've been using many of these for over 50 years of canning! The ones below on this page are just the sampling of. my preferred tools. but you can find much more detailed and extensive selections on the pages that are linked below.
- Strainers, pit removers, seed-skin-stem removers, jelly strainers, etc. All types, makes and prices (from $19 to $350)
- Selecting a KitchenAid mixer and attachments for home canning
- Vacuum Foodsealers for freezing, dried foods, and refrigerated foods - the FoodSaver line
- Cherry pitters reviews, prices and ordering
- Steam Juicers
- Food dehydrators - easy and fast to dry your own fruits, veggies, sun-dried tomatoes, etc.
The All New Ball Book Of Canning And Preserving: Over 350 of the Best Canned, Jammed, Pickled, and Preserved Recipes Paperback
This is THE book on canning! My grandmother used this book when I was a child.; It tells you in simple instructions how to can almost anything; complete with recipes for jam, jellies, pickles, sauces, canning vegetables, meats, etc.
If it can be canned, this book likely tells you how! Click on the link below for more information and / or to buy (no obligation to buy)The New Ball Blue Book of Canning and Preserving
Canning and Preserving for Dummies by Karen Ward
This is another popular canning book. Click here for more information, reviews, prices for Canning and Preserving For Dummies
Of course, you do not need to buy ANY canning book as I have about 500 canning, freezing, dehydrating and more recipes all online for free, just see Easy Home Canning Directions.
Home Canning Kits
See here for related tools, equipment, supplies on Amazon See here for related tools, equipment, supplies on Amazon
I have several canners, and my favorite is the stainless steel one at right. It is easy to clean and seems like it will last forever. Mine is 10 years old and looks like new.
The black ones are the same type of standard canner that my grandmother used to make everything from applesauce to jams and jellies to tomato and spaghetti sauce.
This complete kit includes everything you need and lasts for years: the canner, jar rack, Jar grabber tongs, lid lifting wand, a plastic funnel, labels, bubble freer, It's much cheaper than buying the items separately. It's only missing the bible of canning, the Ball Blue Book.
You will never need anything else except jars & lids (and the jars are reusable)!
The complete list of canners is on these pages:
- Water bath canners - Good for acidic foods, like applesauce, pickles, salsa, jams, jellies, most fruits
- Pressure canners - needed for low and non-acidic foods, like canned vegetables (corn, green beans, etc), and meats
- Canners for glass top stoves if you have a glass or ceramic stove
- Canners for induction stovetops

Pressure Canners
If you plan on canning non-acidic foods and low acid foods that are not pickled - this means: meats, seafood, soups, green beans corn, most vegetables, etc., then you ABSOLUTELY must use a Pressure Canner.
Of course, you can use a pressure canner as a water bath canner as well - just don't seal it up, so it does not pressurize. This means a Pressure Canner is a 2-in-1 device. With it, you can can almost ANYTHING.
There are also other supplies, accessories, tools and more canners, of different styles, makes and prices, click here!

Basic Canning Accessories
From left to right:
- Jar lifting tongs to pick up hot jars
- Lid lifter - to remove lids from the pot of boiling water (sterilizing )
- Lids- disposable - you may only use them once
- Ring - holds the lids on the jar until after the jars cool - then you remove them, save them and reuse them
- Canning Jar funnel - to fill the jars
Strainers
These are very useful for making sauces like applesauce, tomato sauce, spaghetti sauce, jellies, etc. Below are my favorites. The complete list is on these pages:
- Strainers, pit removers, seed-skin-stem removers, jelly strainers, etc. All types, makes and prices (from $19 to $350)
- Selecting a KitchenAid mixer and attachments for home canning
Inexpensive Old School Strainers: hand cranked Foley Food Mills
- The hand-cranked Foley food mill (see this page or clock the ad box) has been used for well over 100 years in homes all over America (and variants around the world). It is effective and inexpensive, and ideal for small batches. However, if you need to make many quarts, you will sure end up with tunnel carpel syndrome or some other repetitive strain injury.
Norpro 1951 Manual Food Strainer and other brand stariners, with optional motors; (almost identical to Victorio V250, Villaware and Roma models, all discontinued)
This is The next step up from the Foley food mill. First, it's far more ergonomic, and its handle is easier to use. Next, it works in continuous mode rather than batch mode. So you can do much larger volumes easily. Finally, It has an optional motor, so you can. remove the manual labor. It also offers many different size strainers to use for different types of berries, vegetables and fruit.
See the seller's website for more information, features, pricing and user reviews!
- A Johnny, Weston or Oxo strainer (about $60 - $100, see further down the page) or
- This trainer is. simply a more upscale and improved version of the one above.
- See this page for more information, reviews, descriptions of other strainers and supplies or to order!
KitchenAid - Best Large Volume Strainers
If you're going to do large volumes of fruit or vegetables , or do it year after year, then. you really should think about getting a higher end kitchen. utility device. Kitchen aids are the cream of the crop. Once you buy one of these, you keep at the rest of your life and it gets handed down to the next generation. . My sister is using one she inherited from my mother 25 years ago, who got it in the 1940s as a wedding gift. So, although the initial cost is high, they literally last for many lifetime. So the cost on an annual basis is pretty trivial, especially when you consider the cost of therapy and treatment for. the repetitive strain injuries you will get from manual cranking day after day. Add to that of course the cost of therapy for the emotional injuries you'll get from going insane, standing there hand cranking something for hours.
KitchenAid's with a sieve/grinder (with the attachments, costs about $400, but it lasts a lifetime and is fast and easy to use - I can make 100 quart jars of applesauce per day with one of these).
FREE Illustrated Canning, Freezing, Jam Instructions and Recipes
Don't spend money on books. that you don't need to. Almost everything you can find in some book sold online or in a store is on my website here for free. Start with theEasy Home Canning Directions below. That is a master list of canning directions which are all based upon the Ball Bblue book, the National Center for Home Food Preservation and other reputable lab tested recipes. Almost every recipe I present in addition to being lab tested com. is in a step by step format with photos for each step and complete. explanations. that tell you how to do it, where to get the supplies and pretty much everything you need to know. In addition, there almost always in a PDF format so you can print them out and use them while you cook.
[ Easy Home Canning Directions]
[FAQs - Answers to common questions and problems]
[Recommended books about home canning, jam making, drying and preserving!]


Looking for canning equipment and supplies?
Water bath canner with a jar rack
Pressure canners for gas, electric and induction stoves: Presto 23Qt or T-fal 22Qt
Canning scoop (this one is PERFECT)
Ball Blue book (most recent version)
Jars: 8oz canning jars for jams
Find Other types of farms:
Farm markets and roadside stands
Road trips and camping resources
Local Honey, apiaries, beekeepers
Consumer fraud and scams information
Home canning supplies at the best prices on the internet!
Maple Syrup Farms, sugarworks, maple syrup festivals
Environmental information and resources
Farms For Your Event for birthday parties, weddings, receptions, business meetings, retreats, etc.
Festivals - local fruit and vegetable festivals
Get the
most recent version of
the Ball Blue Book
