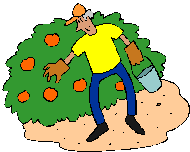
Looking for Home-Brewed Kombucha Alcohol Content and Cottage Food Laws in 2024? Scroll down this page and follow the links. And if you bring home some fruit or vegetables and want to can, freeze, make jam, salsa or pickles, see this page for simple, reliable, illustrated canning, freezing or preserving directions. There are plenty of other related resources, click on the resources dropdown above. If you are having a hard time finding canning lids, I've used these, and they're a great price & ship in 2 days.
If you have questions or feedback, please let me know! There are affiliate links on this page. Read our disclosure policy to learn more.
Home-Brewed Kombucha Alcohol Content and Cottage Food Laws
Home-Brewed Kombucha Alcohol Content and Cottage Food Laws
Kombucha is a brewed product (like beer, wine, sauerkraut), so the fermentation process produces a small amount of ethanol alcohol. This creates the natural preservation environment and makes it safe to drink. But, how much alcohol is good, safe and legal? And how is it tested? Most state cottage food laws require the Kombucha to have less than 0.5% alcohol. Even then the state may require that the kombucha be "canned" which essentially pasteurizes it and stops further fermentation and makes it shelf stable, rather than a TCS (A food that requires time and temperature control for safety).
Overview: How is Kombucha made?
It helps to understand the fermentation process in making kombucha. microorganisms. The process uses a special culture of yeast and special bacteria called SCOBY to produce a Kombuch Tea or Kombucha Brew.
The tea contains less than 0.5% alcohol, while the brew is typically 2% to 11%.
The yeast and bacteria used, to some extent, controls the amount of alcohol produced, which is why it is important to start with a tested commercial starter "mother". These are designed to die off before the alcohol levels rise too high.
The mix typically ferments for 7 to 21 days. During this time, the bacteria and yeast consume the sugars in mixture and produce carbon dioxide, ethanol, water and a mixture or organic compounds, which are considered to be the health value of Kombucha.
Finished kombucha can still ferment further (if it is not pastured, which it rarely is, as this kills the beneficial yeast cultures). Studies (see references) show that the alcohol content of bottled kombucha increases substantially after 7 days at room temperature, peaking at 1.57% after 14 days, then slightly decreasing after 3 weeks.
But if the bottled kombucha is stored at a cold temperature (4 C / 39 F) only started climbing gradually during the first 14 days and then leveled off. So a refrigerated storage significantly reduces the alcohol levels.
By comparison, here are the alcohol levels in typical products:
- Beer 3 - 7%
- Wine 8-14%
- Liquor 40% (a.k.a, 80 Proof)
Recommendations to keep alcohol levels low (and legal) in home-fermented Kombucha
Since most states cottage food laws that require the alcohol content must be under 0.5% in fermented products, if you plan to sell your feremented kombucha as a cottage food or home-processed food product, you need to control the alcohol content and periodically test it.
The recommendations to reduce kombucha alcohol content are:
- Warmer fermentation temperatures produce less alcohol, the recommended fermentation temperature is 74 to 84F (20 to 28°C)
- Lower sugar levels help, as sugar feeds the yeast, so keep added sugar to no more than 50g / quart
- Ferment for a longer period of time, up to 15 days.
- Refrigerate immediately after bottling to prevent further fermentation in the bottle
.
How to test kombucha for alcohol levels
Testing of liquid alcohol products is normally fairly straightforward using a hydrometer. But while wine and beer use yeast to ferment the mash, kombucha uses both bacteria for the primary fermentation as well as a second yeast fermentation. The bacteria form acids and other compounds which look similar to sugars in a hydrometer test.
So, the hydrometer alone won't work.
The methods used by small producers include either:
- sending a sample to a lab to have it professionally tested (Cornell
Univ Labs has Kombuch Testing Services for about $40)
or by - measuring the specific gravity to determine the starting and ending sugar content:
or by - Use a refractometer and an acid titration kit to measure the before and after on the sugars in the batch,
Obviously, regularly having samples tested at a professional lab and sticking rigorously to a consistent process is the way to go.
Testing Recommendations
The CBC (Canada DC tells us:
The following methods have been validated and shown to meet the performance
requirements.
Validated Analytical Methods Meeting AOAC Performance Requirements for Analysis of
Ethanol in Kombucha 3
1. Head-space gas chromatography (HS-GC) with flame ionization detector (FID) AOAC Method 2016.124
2. Head space gas chromatography (HC-GC) with Mass Spectrometry Detection (MS)5
3. Enzymatic method by r-Biopharm (Enztec Liquid Ethanol Ref. E834), AOAC Method 2017.076
4. Headspace solid phase micro-extraction & GC-MS by MilliporeSigma, AOAC Method 2019.047
5. Ethanol Assay Kit (K-EtOH) by Megazyme, AOAC Method 2019.08
Kombucha starter kits
- The Kombucha Shop Organic Kombucha Starter Kit . Very popular, it has a 1 Gallon Brewing Kit with everything required for brewing Kombucha At Home
- Kombucha Starter Kit that has a SCOBY, a 1 Gallon Glass Brew Jar, Temp Gauge, Tea & Sugar. This makes 1 Gallon of Kombucha
References
Other references are found in the links above.

Received: 27 April 2017 /Accepted: 19 June 2017 /Published online: 29 June 2017.
- Local Meat, Milk and Eggs
- Farm markets and roadside stands
- Fun Factory Tours
- Pumpkin patches
- Corn mazes
- Children's consignment sales
- Local Honey Finder
- Venues: Farms, Wineries, Orchards for your event, wedding or party
- Easter egg hunts
- Fruit and vegetable festivals
- Winery tours and wine tastings
- Horse rides, stables, lessons, trails
- Maple Syrup farms and sugarworks
- Bed and Breakfasts on Farms, Wineries, Ranches and Orchards
- Zombie Paintball venues
- Christmas Tree Farms and lots
- Environmental resources
- Consumer fraud information
- Wholesale food sources
- Resources for Farmers
Canning Books, Supplies and Accessories
These are my favorite essential canning tools, books and supplies. I've been using many of these for over 50 years of canning! The ones below on this page are just the sampling of. my preferred tools. but you can find much more detailed and extensive selections on the pages that are linked below.
- Vacuum Foodsealers for freezing, dried foods, and refrigerated foods - the FoodSaver line
- Selecting a KitchenAid mixer and attachments for home canning
- Steam Juicers
- Strainers, pit removers, seed-skin-stem removers, jelly strainers, etc. All types, makes and prices (from $19 to $350)
- Cherry pitters reviews, prices and ordering
- Food dehydrators - easy and fast to dry your own fruits, veggies, sun-dried tomatoes, etc.
The All New Ball Book Of Canning And Preserving: Over 350 of the Best Canned, Jammed, Pickled, and Preserved Recipes Paperback
This is THE book on canning! My grandmother used this book when I was a child.; It tells you in simple instructions how to can almost anything; complete with recipes for jam, jellies, pickles, sauces, canning vegetables, meats, etc.
If it can be canned, this book likely tells you how! Click on the link below for more information and / or to buy (no obligation to buy)The New Ball Blue Book of Canning and Preserving
Canning and Preserving for Dummies by Karen Ward
This is another popular canning book. Click here for more information, reviews, prices for Canning and Preserving For Dummies
Of course, you do not need to buy ANY canning book as I have about 500 canning, freezing, dehydrating and more recipes all online for free, just see Easy Home Canning Directions.
Home Canning Kits
See here for related tools, equipment, supplies on Amazon See here for related tools, equipment, supplies on Amazon
I have several canners, and my favorite is the stainless steel one at right. It is easy to clean and seems like it will last forever. Mine is 10 years old and looks like new.
The black ones are the same type of standard canner that my grandmother used to make everything from applesauce to jams and jellies to tomato and spaghetti sauce.
This complete kit includes everything you need and lasts for years: the canner, jar rack, Jar grabber tongs, lid lifting wand, a plastic funnel, labels, bubble freer, It's much cheaper than buying the items separately. It's only missing the bible of canning, the Ball Blue Book.
You will never need anything else except jars & lids (and the jars are reusable)!
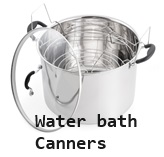
The complete list of canners is on these pages:
- Water bath canners - Good for acidic foods, like applesauce, pickles, salsa, jams, jellies, most fruits
- Pressure canners - needed for low and non-acidic foods, like canned vegetables (corn, green beans, etc), and meats
- Canners for glass top stoves if you have a glass or ceramic stove
- Canners for induction stovetops
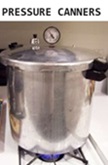
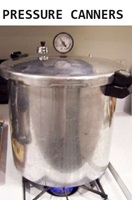
Pressure Canners
If you plan on canning non-acidic foods and low acid foods that are not pickled - this means: meats, seafood, soups, green beans corn, most vegetables, etc., then you ABSOLUTELY must use a Pressure Canner.
Of course, you can use a pressure canner as a water bath canner as well - just don't seal it up, so it does not pressurize. This means a Pressure Canner is a 2-in-1 device. With it, you can can almost ANYTHING.
There are also other supplies, accessories, tools and more canners, of different styles, makes and prices, click here!
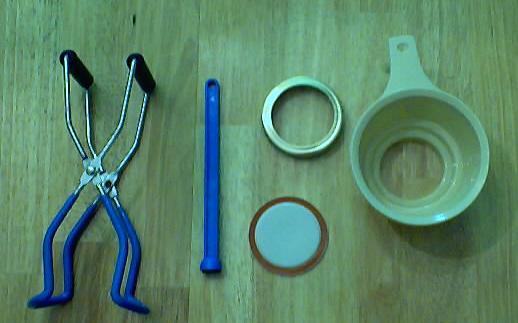
Basic Canning Accessories
From left to right:
- Jar lifting tongs to pick up hot jars
- Lid lifter - to remove lids from the pot of boiling water (sterilizing )
- Lids- disposable - you may only use them once
- Ring - holds the lids on the jar until after the jars cool - then you remove them, save them and reuse them
- Canning Jar funnel - to fill the jars
FREE Illustrated Canning, Freezing, Jam Instructions and Recipes
Don't spend money on books. that you don't need to. Almost everything you can find in some book sold online or in a store is on my website here for free. Start with theEasy Home Canning Directions below. That is a master list of canning directions which are all based upon the Ball Bblue book, the National Center for Home Food Preservation and other reputable lab tested recipes. Almost every recipe I present in addition to being lab tested com. is in a step by step format with photos for each step and complete. explanations. that tell you how to do it, where to get the supplies and pretty much everything you need to know. In addition, there almost always in a PDF format so you can print them out and use them while you cook.
[ Easy Home Canning Directions]
[FAQs - Answers to common questions and problems]
[Recommended books about home canning, jam making, drying and preserving!]
Looking for canning equipment and supplies?
Water bath canner with a jar rack
Pressure canners for gas, electric and induction stoves: Presto 23Qt or T-fal 22Qt
Canning scoop (this one is PERFECT)
Ball Blue book (most recent version)
Find Other types of farms:
- Easter egg hunts
- Children's consignment sales
- Farm markets and roadside stands
- Road trips and camping resources
- Local Honey, apiaries, beekeepers
- Local Meat, Milk and Eggs
- Consumer fraud and scams information
- Home canning supplies at the best prices on the internet!
- Maple Syrup Farms, sugarworks, maple syrup festivals
- Environmental information and resources
- Farms For Your Event for birthday parties, weddings, receptions, business meetings, retreats, etc.
- Festivals - local fruit and vegetable festivals
- Pumpkin patches and corn mazes
- Christmas Tree Farms and lots
Get the
most recent version of
the Ball Blue Book
