

Grilled Summer Vegetables: How to make grilled summer squash (directions, recipe, with photos)
This month's notes: April 2025: Stored US apples are still available. See your state's crop availability calendar for more specific dates of upcoming crops.
Valentine's Day - February 14 - See this website for Valentines Day history, facts and top picks for fast, easy, inexpensive gifts for the man, woman or children in your life!
Easter will be April 16, 2017 - if you want to take your children to a free Easter egg hunt - see our companion website to find a local Easter Egg hunt!
And we have home canning, preserving, drying and freezing directions. You can access recipes and other resources from the drop down menus at the top of the page or the site search. If you have any questions or suggestions, feel free to write me! Also make your own ice cream; see How to make ice cream and ice cream making equipment and manuals. Have fun, eat healthier and better tasting, and save money by picking your own locally grown fruit and vegetables, and then using our easy directions
 Subscribe
to our: Email
alerts; Follow us on Twitter
Add
this page to your favorites! -
Email this page to a friend, or to yourself
Subscribe
to our: Email
alerts; Follow us on Twitter
Add
this page to your favorites! -
Email this page to a friend, or to yourself
How to Make Gourmet Grilled Vegetables Easily - From Your Surplus Squash!
Grilled Vegetables with Feta
(Zucchini, Yellow Squash, Crookneck, Pattypan, Straightneck,
White Scallop, etc.)
Click here for a PDF print version!
 If
you're like most people, you plant a few zucchini, yellow squash (crookneck or
straightneck) and a few peppers... and then you have squash coming out your
ears. The first week you eat it. Then you give it away. Then people
run when they see you coming with more squash.
If
you're like most people, you plant a few zucchini, yellow squash (crookneck or
straightneck) and a few peppers... and then you have squash coming out your
ears. The first week you eat it. Then you give it away. Then people
run when they see you coming with more squash.
Here's a really simple recipe to turn that excess squash into a gourmet side dish that you can server to the family or a dinner party. Snobs, food-trendies and crunchy-granola types will all like this, as grilled vegetables, particularly squash, is the latest trend at gourmet restaurants, AND it is healthy, low-fat, low calorie, natural, can be made from organic, sustainably-raised veggies and is also VERY tasty.
Here's how to do it, complete instructions in easy steps and completely illustrated. The squash will taste MUCH better than anything you've ever had from a store.
Ingredients
- Fresh summer squash - 3 or 4 small yellow squash and 2 small green zucchini, but you can use make larger batches. You want young squash! When it gets big to the point where seeds are forming, summer squash become tough and are more suitable for making zucchini bread or use in hand-to-hand combat. I figure one medium sized squash per serving (it does cook down)
- 2 or 3 large onions
- 2 or 3 fresh red, yellow or orange Peppers (sweet, Bell-type work best)
- Extra-Virgin olive oil (about 1/4 cup)
- 1/4 cup crumbled feta cheese
- 2 tablespoons finely diced dried oregano and
- 2 tablespoons of "Herbs d'Provence" - if you haven't got this, ground rosemary and thyme will do.
Equipment
- Outdoor grill or barbecue - OR - indoor oven (electric or gas - with a broiler element)
- 1 sharp knife
- If you want to freeze it, you will also need vacuum food sealer or "ziploc" type freezer bags (the freezer bag version is heavier and protects better against freezer burn.
Instructions
Step 1 - Get the veggies!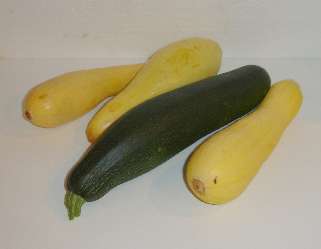
Start with fresh squash - as fresh and young as you can get. If there is a delay between harvesting and freezing, put it in the refrigerator or put ice on it. Harvest before the seeds become mature and when color is still uniformly dark
Step 2 - Wash the squash!
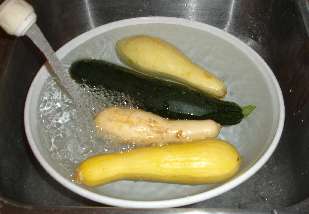 I'm
sure you can figure out how to rinse the squash in plain cold or lukewarm
water.
I'm
sure you can figure out how to rinse the squash in plain cold or lukewarm
water.
Step 3 - Slice the squash and onions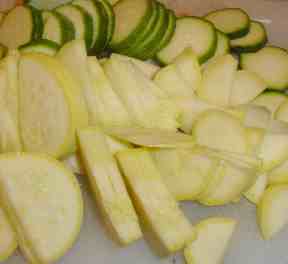
Just take a sharp knife and cut of both ends - blossom and stem end (cut about 1/4 of an inch, or half the width of an average woman's little finger)
Slice into 1/8th inch thick slices.
Prepare quickly, (if you leave it sit cut for more than a half hour, it will start to discolor). Do enough squash for one blanching at a time.
Step 4 - Prepare the peppers
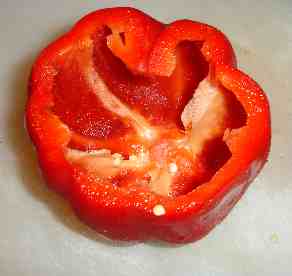 Similarly,
you will need to remove the stem end of the peppers, and wash out the
seeds from the inside (seed cavity) of the peppers, then slice into
1/8th inch thick slices.
Similarly,
you will need to remove the stem end of the peppers, and wash out the
seeds from the inside (seed cavity) of the peppers, then slice into
1/8th inch thick slices.
Step 5 - Marinate in olive oil and herbs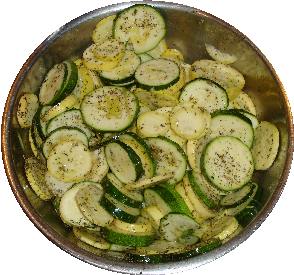
Put the slices squash, peppers and onions in a bowl. Add the 1/4 cup of extra virgin olive oil and the herbs (2 tablespoons of each oregano and herbs d'Provence). Mix well and let stand for at least 10 to 15 minutes. 30 minutes is perfect.
Step 6 - Grill the veggies - 10 minutes each side
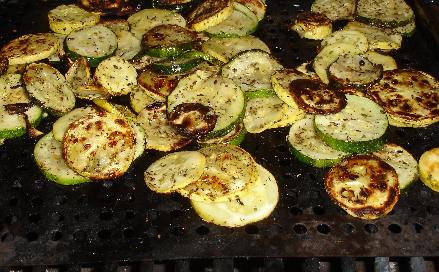 I
use one of those stainless steel trays or baskets, to keep the veggies
from sliding through the grill. Given them about 5 to 15 minutes per side
- it really depends upon how hot your grill is. At 400F, it's about
10 minutes per side, until you see some golden brown appearing on the
veggies.
I
use one of those stainless steel trays or baskets, to keep the veggies
from sliding through the grill. Given them about 5 to 15 minutes per side
- it really depends upon how hot your grill is. At 400F, it's about
10 minutes per side, until you see some golden brown appearing on the
veggies.
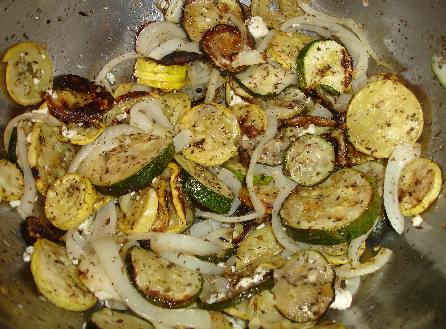
Step 7 - Remove from the grill and mix with feta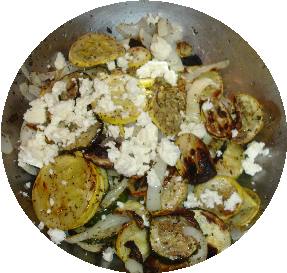
Just pop the grilled vegetables back into the bowl they were in (it's not meat, so there's no bacteria to worry about) and mix well with the 1/4 cup crumbled finely feta cheese. Do this while the veggies are still hot, so the cheese will melt a bit!
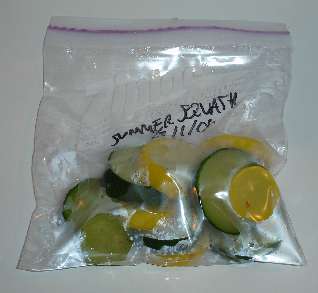
Step 8 - Serve - or Freeze!
Serve
them to your guests, or freeze it for the winter.
I love the FoodSavers (see this page for more information) with their vacuum sealing! I am not paid by them, but these things really work. If you don't have one, ziploc bags work, too, but it is hard to get as much air out of the bags. remove the air to prevent drying and freezer burn. TIP: If you don't own a vacuum food sealer to freeze foods, place food in a Ziploc bags, zip the top shut but leave enough space to insert the tip of a soda straw. When straw is in place, remove air by sucking the air out. To remove straw, press straw closed where inserted and finish pressing the bag closed as you remove straw.
Note:
If the squash is very wet, after draining it, just put it in the food saver bag and freeze it (unsealed and upright) in your freezer. THEN, several hours later or the next day, when it is frozen, you can seal it with no mess!
Step 9 - Done!
Pop them into the freezer, on the quick freeze shelf, if you have one!
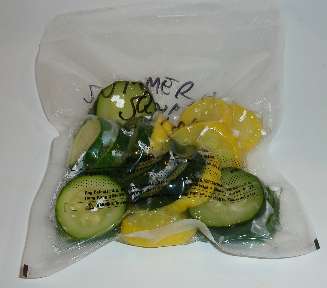
Ziploc bag Foodsaver vac bag
Tips:
- Harvest the squash at its peak maturity (firm, not limp or old)
- Process promptly after harvesting, or keep cooled in the fridge or with ice until then.
- If the squash is watery when thawed, discard the liquid before using.
- An alternative method is to cook the squash first - using your favorite recipe for a zucchini casserole, or saut?ed squash, etc., and then simply freeze the cooked squash! Of course, it does take up more room in your freezer.
Frequently Asked Questions
- How long can they be frozen?
It depends upon how cold is your freezer and how you packed them. Colder (deep freezes) are better than frost free compartments, which actually cycle above freezing (that's how they melt the ice). Vacuum packing results in longer storage capability, too. Thicker bags also help prevent freezer burn.
In general, up to 9 months in a ziploc bag in an ordinary freezer, and 14 months in a deep freeze in a vacuum packed bag. After that, they beans won't make you sick; they just won't taste a s good.
- Hi, I have a question about yellow squash. I am a newby to growing
gardens but last year I did as said about the yellow squash (to freeze it).
I have a vacuum sealer (love it). But when I pulled a package of squash out
to eat it, it was so soggy. I also tried blanching for about a minute but it
was all the same. When I take it out of the freezer I just warm the whole
bag in water then open it. Just soggy. We like to eat it somewhat firm. I
was told to just wash it, cut the ends off and freeze it. Is this safe?
Yes, you can certainly freeze it without blanching. The purpose of blanching prior to freezing is to stop the enzymes that degrade the flavor, it's not for safety. As long as you eat the squash within 4 to 6 months, the flavor should be ok. Freezing without blanching may reducing the sogginess of the of the squash, but I doubt that it will help much. Freezing ruptures the cell walls and that is primarily what causes the sogginess.
I blanch if I am going to store them for a long time or use it in cooking. If I want to use a vegetable raw, and not keep it frozen for more than a few months, then I skip the blanching, too. But it still nowhere near as crisp as fresh.
Picking Tips
[General picking tips and a guide to each fruit and vegetable] [How
much do I need to pick?
(Yields - how much raw makes how much cooked or frozen)] [Selecting
the right varieties to pick] [All
about apple varieties - which to pick and why!] [Picking tips for Vegetables]
[ Strawberry picking tips]
[ Blueberries picking tips]
Illustrated Canning, Freezing, Jam Instructions and Recipes
[ All About Home Canning, Freezing and Making Jams, Pickles, Sauces, etc. ] [FAQs - Answers to common questions and problems] [Recommended books about home canning, jam making, drying and preserving!] [Free canning publications to download and print]
