How to Make Home-made Chili Powder - Easily! With Step-by-step Photos, Recipe, Directions, Ingredients and Costs
This month's notes: July 2025: Stored US apples are still available. See your state's crop availability calendar for more specific dates of upcoming crops.
Valentine's Day - February 14 - See this website for Valentines Day history, facts and top picks for fast, easy, inexpensive gifts for the man, woman or children in your life!
Easter will be April 16, 2017 - if you want to take your children to a free Easter egg hunt - see our companion website to find a local Easter Egg hunt!
And we have home canning, preserving, drying and freezing directions. You can access recipes and other resources from the drop down menus at the top of the page or the site search. If you have any questions or suggestions, feel free to write me! Also make your own ice cream; see How to make ice cream and ice cream making equipment and manuals. Have fun, eat healthier and better tasting, and save money by picking your own locally grown fruit and vegetables, and then using our easy directions
 Subscribe
to our: Email
alerts; Follow us on Twitter
Add
this page to your favorites! -
Email this page to a friend, or to yourself
Subscribe
to our: Email
alerts; Follow us on Twitter
Add
this page to your favorites! -
Email this page to a friend, or to yourself
Making your own chili powder is easy and allows you to get just the right flavor and degree of heat or spice that you want!
You can start from scratch, by drying the raw ingredients yourself, or start with each already dried and blend them. Either way, I'll explain how below.
Ingredients
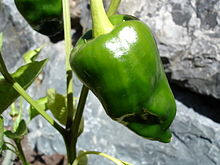 3 ancho chili
peppers, stemmed, seeded and sliced. Ancho chili's are the
dried form of the poblano pepper. The poblano (shown at right) is
a mild chili pepper from Puebla, Mexico. The ripened red poblano is much
hotter and more flavorful than the less ripe, green poblano. There is
great variation in hotness among this pepper. Different peppers
from the same plant have been reported to vary substantially in heat
intensity. If you can't get poblano or try a closely related variety,
the mulato, which is darker in color, sweeter in flavor and softer in
texture.
3 ancho chili
peppers, stemmed, seeded and sliced. Ancho chili's are the
dried form of the poblano pepper. The poblano (shown at right) is
a mild chili pepper from Puebla, Mexico. The ripened red poblano is much
hotter and more flavorful than the less ripe, green poblano. There is
great variation in hotness among this pepper. Different peppers
from the same plant have been reported to vary substantially in heat
intensity. If you can't get poblano or try a closely related variety,
the mulato, which is darker in color, sweeter in flavor and softer in
texture.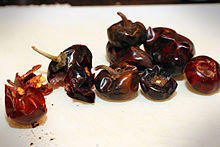 3 cascabel chiles, stemmed,
seeded and sliced - The cascabel chili (little bell), shown at
right, also known as the rattle chili, is another Mexican pepper, whose
loose seeds rattle inside the dried cascabel when shaken.
3 cascabel chiles, stemmed,
seeded and sliced - The cascabel chili (little bell), shown at
right, also known as the rattle chili, is another Mexican pepper, whose
loose seeds rattle inside the dried cascabel when shaken.- 1 tablespoon of dried coriander seeds - These
should be readily available in their dried form wherever herbs are sold.
Or you can grow your own Cilantro. Coriander is the seeds from
Cilantro!
 3 dried arbol chiles, stemmed, seeded and
sliced - The Chile de árbol (also called bird's beak chile and
rat's tail chile) is a small and potent Mexican chili pepper about 2 to
3 inches (5.1 to 7.6 cm) long, and 1⁄4 to 3⁄8 inch (0.64 to 0.95 cm) in
diameter. Their heat index is between 15,000 and 30,000 Scoville units.
If you cannot find árbol chili peppers, you can use Cayenne pepper
(30-50,000 Scoville units) or Pequin pepper (100-140,000 Scoville
units). As with all hot peppers, be careful not to touch your eyes, nose
or other sensitive skin after handling this pepper; and wash hands
thoroughly after handling the pepper or its seeds.
3 dried arbol chiles, stemmed, seeded and
sliced - The Chile de árbol (also called bird's beak chile and
rat's tail chile) is a small and potent Mexican chili pepper about 2 to
3 inches (5.1 to 7.6 cm) long, and 1⁄4 to 3⁄8 inch (0.64 to 0.95 cm) in
diameter. Their heat index is between 15,000 and 30,000 Scoville units.
If you cannot find árbol chili peppers, you can use Cayenne pepper
(30-50,000 Scoville units) or Pequin pepper (100-140,000 Scoville
units). As with all hot peppers, be careful not to touch your eyes, nose
or other sensitive skin after handling this pepper; and wash hands
thoroughly after handling the pepper or its seeds.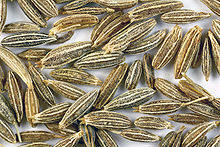 2 tablespoons whole cumin seeds
- These should be readily available in their dried form wherever herbs
are sold. Shown at right.
2 tablespoons whole cumin seeds
- These should be readily available in their dried form wherever herbs
are sold. Shown at right.- 2 tablespoons garlic powder - Again, readily
available in their dried form wherever herbs are sold, but if you grow
garlic, you can dry it, too.
- 1 tablespoon dried oregano - Easy to grow and easy
to dry.
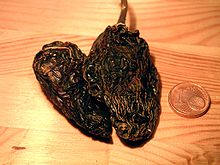 1
teaspoon Chipotle pepper - Chipotles are smoked dried jalapeno
pepper. You're probably better off buying them smoked and dried than
trying to msoke-dry your own, if you really want to capture that smokey
flavor.
1
teaspoon Chipotle pepper - Chipotles are smoked dried jalapeno
pepper. You're probably better off buying them smoked and dried than
trying to msoke-dry your own, if you really want to capture that smokey
flavor.
Directions
Step 1 - Drying the peppers
If you want a milder flavor, remove stems and seeds from all the chiles. Put the chiles in a single layer on a baking sheet and bake for 4 or 5 minutes. Remove the pan and check the chiles (they cool almost immediately). The smaller chiles will be toasted first, so remove them and set aside. Bake the larger pieces another 4 minutes and check again. The poblanos will be done last, but as portions of them toast, break them off and set aside returning the pan to the oven if necessary.
You can purchase the pepers in their dried form, which is especially important for the chipotle,
Step 2 - Toasting
Put all of the dried chiles and the cumin into a medium cast iron or nonstick saute pan over medium-high heat. Cook, moving the pan constantly, until you begin to smell the cumin toasting. This should take about 4 or 5 minutes. Set them aside to cool completely.
Step 3 - Blending
Once cool, place the chiles, coriander
and cumin into your blender along with the garlic powder,
oregano. Process until they turn into a powder. Be sure to wait a few
minutes to let the dust to settle, then pour into an airtight container to
store for up to 6 months. Storing in the freezer helps to lengthen the
storage time of the flavor.
Tips
Comments and Feedback>
Illustrated Canning, Freezing, Jam Instructions and Recipes
[ Easy Home Canning Directions] [FAQs - Answers to common questions and problems] [Recommended books about home canning, jam making, drying and preserving!] [Free canning publications to download and print]