
Looking for How to Make Home Canned Sweet Potatoes (or Yams) - directions, recipe, with photos in 2025? Scroll down this page and follow the links. And if you bring home some fruit or vegetables and want to can, freeze, make jam, salsa or pickles, see this page for simple, reliable, illustrated canning, freezing or preserving directions. There are plenty of other related resources, click on the resources dropdown above. If you are having a hard time finding canning lids, I've used these, and they're a great price & ship in 2 days.
If you have questions or feedback, please let me know! There are affiliate links on this page. Read our disclosure policy to learn more.
How to Make Home Canned Sweet Potatoes (or Yams) - directions, recipe, with photos
How to Make Home Canned Yams
 You probably take
yams for granted.
You're there, the can of yam is there, there's a yam on the label... open it and
mix it up with spices to make a casserole or yam pie or candied yams. Ah, but
candied yams or a yam pie made
from a home canned yam tastes so much better than the store-bought glop that was processed last
year and commercially canned! Here's how to do it, complete instructions in easy steps and
completely illustrated. And it is much easier than you think, using my
"patented" tips and tricks!
You probably take
yams for granted.
You're there, the can of yam is there, there's a yam on the label... open it and
mix it up with spices to make a casserole or yam pie or candied yams. Ah, but
candied yams or a yam pie made
from a home canned yam tastes so much better than the store-bought glop that was processed last
year and commercially canned! Here's how to do it, complete instructions in easy steps and
completely illustrated. And it is much easier than you think, using my
"patented" tips and tricks!
And what's the difference between a sweet potato and a yam? The North Carolina Sweet Potato Commission says this:
"Several decades ago when orange flesh sweet potatoes were introduced in the southern United States producers and shippers desired to distinguish them from the more traditional white flesh types. The African word "nyami" referring to the starchy, edible root of the Dioscorea genus of plants was adopted in its English form, "yam". Yams in the U.S. are actually sweet potatoes with relatively moist texture and orange flesh. Although the terms are generally used interchangeably, the U.S. Department of Agriculture requires that the label "yam" always be accompanied by "sweet potato." "
Directions for Canning Yams
Ingredients and Equipment
- yams (see step 1) - any quantity
- A sharp, large serrated knife
- Canning jars - pints or quarts
- a Pressure Canner
- Water,
- Sugar (or Stevia (in a prepared form like Truvia, it measures same as sugar; if you use another form, you will need do your own conversion) - or Splenda, if you prefer, , Fruit Juice or Honey) - See step 3
Recipe and Directions
Step 1 - Choose your yams
Choose medium to large yams that have been cured for at least one week (they're sweeter). Select sound, firm roots. Can them within 1 to 2 months after harvest. For the most food value, choose yams of a deep orange color. Choose small to medium-sized potatoes. They should be mature and not too fibrous.
Handle them carefully to prevent bruising. Ideal storage conditions are a dry, unrefrigerated area at 55 to 60 degrees F. Do NOT refrigerate, because temperatures below 55 degrees F. will chill it, giving it a hard core and an undesirable taste when cooked.
Sort according to size and wash.
- It takes an average of 2- 1/2 pounds of fresh yams per quart.
- An average of 17-1/2 pounds is needed per canner load of 7 quarts
- an average of 11 pounds is needed per canner load of 9 pints.
- A bushel weighs 50 pounds and yields 17 to 25 quarts.
Step 2 - Partially cook the yams
Cook until almost tender using any one of the following methods:
- in water,
- in steam,
- in a pressure cooker or
- in the oven.
Cook them until they are partially soft (about 15 to 20 minutes in fully boiling water). This is a good time to get your pressure canner filled to 4 inches with water, and start it heating up, with the lid OFF.
Step 3 - Make your syrup / solution
Later, after you fill the jars with the prepared yams, you must fill the void space (up to the headspace) with a liquid. There are several choices, depending upon how sweet you like them, dietary needs, desire to go "natural, etc. This page shows you all of the options and how to make the solution that's right for you. For most people, a medium syrup of 2 cups of hot water to each cup of sugar is fine. You will need about 6 cups of water and 3 cups of sugar per 9 pint jars, or 8 cups of hot water and 4 cups of sugar per 7 quart jars.
Step 4 - Peel and slice in half (if needed)
Peel the yams. Then cut medium potatoes, if needed, so that pieces
are uniform in size. Caution: Do not mash or puree pieces. The USDA has
not been able to get safe results in tests with mashed yams.
Step 5 - Fill the jars
Fill jars, leaving 1-inch of headspace. To keep yams from
darkening, mix 2 tablespoons orange or lemon juice with each quart of mashed
yams. Cover with your choice of fresh boiling water or syrup, leaving
1-inch headspace. It is not recommended to dry pack yams.
Seethis page for more details about headspace! Adjust lids and process,
following the next steps. Pressure Canner works and its components" longdesc="Diagram of how a Pressure Canner works and its components" style="float: right">
Step 6 - Put the jars in the PRESSURE CANNER and the lid on the canner (but still vented)
Using the jar tongs, put the jars on the rack in the canner. By now the water level has probably boiled down to 3 inches. If it is lower than that, add more hot tap water to the canner. When all the jars that the canner will hold are in, put on the lid and twist it into place, but leave the weight off (or valve open, if you have that type of pressure canner).
 Step
7 - Let the canner vent steam for 10 minutes
Step
7 - Let the canner vent steam for 10 minutes
Put the heat on high and let the steam escape through the vent for 10 minutes to purge the airspace inside the canner.
Step 8 - Put the weight on and let the pressure build
After 10 minutes of venting, put the weight on and close any openings to allow the pressure to build to 11 pounds.
Step 9 - Process for 65 or 90 minutes as required (see the tables below)
|
Recommended process time for Yams in a dial-gauge pressure canner. |
||||||
|
|
Canner Pressure (PSI) at Altitudes of |
|||||
|
Style of Pack |
Jar Size |
Process Time |
0-2,000 ft |
2,001-4,000 ft |
4,001-6,000 ft |
6,001-8,000 ft |
|
Hot |
Pints |
65 min |
11 lb |
12 lb |
13 lb |
14 lb |
|
Quarts |
90 |
11 |
12 |
13 |
14 |
|
|
Recommended process time for Yams in a weighted-gauge pressure canner. |
||||
|
|
Canner Pressure (PSI) at Altitudes of |
|||
|
Style of Pack |
Jar Size |
Process Time |
0-1,000 ft |
Above 1,000 ft |
|
Hot |
Pints |
65 min |
10 lb |
15 lb |
|
Quarts |
90 |
10 |
15 |
|
Step 10 - Turn off the heat and let it cool down
When the processing time from the chart above is up, turn off the heat, and allow the pressure canner to cool and the pressure to drop to zero before opening the canner. Let the jars cool without being jostled. After the pressure drops to zero (usually, you can tell but the "click" sound of the safety release vents opening, as well as but the gauge. Let the pressure in the canner drop to zero by itself. This may take 45 minutes in a 16-quart canner filled with jars and almost an hour in a 22-quart canner. If the vent is opened before the pressure drops to zero OR if the cooling is rushed by running cold water over the canner, liquid will be lost from the jars. Too rapid cooling causes loss of liquid in the jars!
Step 11 - Remove the jars
Lift the jars out of the water and let them cool on a wooden cutting board or a towel, without touching or bumping them in a draft-free place (usually takes overnight), here they won't be bumped. You can then remove the rings if you like, but if you leave them on, at least loosen them quite a bit, so they don't rust in place due to trapped moisture. Once the jars are cool, you can check that they are sealed verifying that the lid has been sucked down. Just press in the center, gently, with your finger. If it pops up and down (often making a popping sound), it is not sealed. If you put the jar in the refrigerator right away, you can still use it. Some people replace the lid and reprocess the jar, then that's a bit iffy. If you heat the contents back up, re-jar them (with a new lid) and the full time in the canner, it's usually ok. You're done!
This document was adapted from the "Complete Guide to Home Canning,"
Agriculture Information Bulletin No. 539, USDA, revised 1994.
Reviewed June 2006.
Sweet potato facts
1 small, baked in skin ...............................141 calories
3 1/2 ounces, candied................................168 calories
3 1/2 ounces, canned, syrup pack.........114 calories
Sweet Potato recipes
Candied Yams
6 medium yams
1/2 cup sugar
1/4 cup water
3 tablespoons butter
Scrub yams thoroughly. Drop them in enough boiling salted water to cover yams. Cover pan. Lower heat and cook 15 to 20 minutes. Drain; peel yams and cut into 1/2 inch slices. Put into buttered baking dish. Combine sugar, water and butter. Boil 2-3 minutes, then pour over cooked, sliced yams. Bake at 350 degrees F. for about 30 minutes or until lightly brown. Spoon syrup over yams several times while baking. Lemon juice or lemon slices on top of yams while baking will improve flavor and help retain their bright color. Yield: 6 servings
Sweet Potato Pie, with a crushed pecan topping
(Makes one 9-inch pie)
1 (9 - inch) unbaked pastry shell
1 pound (2 medium) yams (yams!), cooked and peeled
1/4 cup margarine or butter
1 (14 - ounce) can Eagle Brand Sweetened Condensed Milk, (NOT evaporated
milk)
1 teaspoon grated orange rind
1 teaspoon vanilla extract
1 teaspoon ground cinnamon
teaspoon ground nutmeg
1/4 teaspoon salt
2 eggs
Pecan Topping
Preheat oven to 350 degrees F. In large mixer bowl, beat hot yams with margarine until smooth. Add remaining ingredients except pastry shell and Pecan Topping; mix well. Pour into pastry shell. Bake 30 minutes. Remove from oven; spoon Pecan Topping evenly over top. bake 20 to 25 minutes longer or until golden brown. Cool. Serve warm or chilled. Refrigerate leftovers.
Pecan Topping: In small mixer bowl, combine 1 egg, 3 tablespoons dark corn syrup, 3 tablespoons firmly packed light brown sugar, 1 tablespoon margarine or butter, melted, and teaspoon maple flavoring; mix well. Stir in 1 cup chopped pecans.
Related Autumn recipes
how about ...
-
How to make a yam pie (like a pumpkin pie) and How to make a flakey pie crust
Other Fall recipes
Canning Books, Supplies and Accessories
These are my favorite essential canning tools, books and supplies. I've been using many of these for over 50 years of canning! The ones below on this page are just the sampling of. my preferred tools. but you can find much more detailed and extensive selections on the pages that are linked below.
- Vacuum Foodsealers for freezing, dried foods, and refrigerated foods - the FoodSaver line
- Selecting a KitchenAid mixer and attachments for home canning
- Steam Juicers
- Strainers, pit removers, seed-skin-stem removers, jelly strainers, etc. All types, makes and prices (from $19 to $350)
- Cherry pitters reviews, prices and ordering
- Food dehydrators - easy and fast to dry your own fruits, veggies, sun-dried tomatoes, etc.
The All New Ball Book Of Canning And Preserving: Over 350 of the Best Canned, Jammed, Pickled, and Preserved Recipes Paperback
This is THE book on canning! My grandmother used this book when I was a child.; It tells you in simple instructions how to can almost anything; complete with recipes for jam, jellies, pickles, sauces, canning vegetables, meats, etc.
If it can be canned, this book likely tells you how! Click on the link below for more information and / or to buy (no obligation to buy)The New Ball Blue Book of Canning and Preserving
Canning and Preserving for Dummies by Karen Ward
This is another popular canning book. Click here for more information, reviews, prices for Canning and Preserving For Dummies
Of course, you do not need to buy ANY canning book as I have about 500 canning, freezing, dehydrating and more recipes all online for free, just see Easy Home Canning Directions.
Home Canning Kits
See here for related tools, equipment, supplies on Amazon See here for related tools, equipment, supplies on Amazon
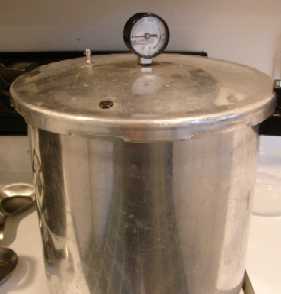
I have several canners, and my favorite is the stainless steel one at right. It is easy to clean and seems like it will last forever. Mine is 10 years old and looks like new.
The black ones are the same type of standard canner that my grandmother used to make everything from applesauce to jams and jellies to tomato and spaghetti sauce.
This complete kit includes everything you need and lasts for years: the canner, jar rack, Jar grabber tongs, lid lifting wand, a plastic funnel, labels, bubble freer, It's much cheaper than buying the items separately. It's only missing the bible of canning, the Ball Blue Book.
You will never need anything else except jars & lids (and the jars are reusable)!
The complete list of canners is on these pages:
- Water bath canners - Good for acidic foods, like applesauce, pickles, salsa, jams, jellies, most fruits
- Pressure canners - needed for low and non-acidic foods, like canned vegetables (corn, green beans, etc), and meats
- Canners for glass top stoves if you have a glass or ceramic stove
- Canners for induction stovetops

Pressure Canners
If you plan on canning non-acidic foods and low acid foods that are not pickled - this means: meats, seafood, soups, green beans corn, most vegetables, etc., then you ABSOLUTELY must use a Pressure Canner.
Of course, you can use a pressure canner as a water bath canner as well - just don't seal it up, so it does not pressurize. This means a Pressure Canner is a 2-in-1 device. With it, you can can almost ANYTHING.
There are also other supplies, accessories, tools and more canners, of different styles, makes and prices, click here!

Basic Canning Accessories
From left to right:
- Jar lifting tongs to pick up hot jars
- Lid sanitizer / lifter - to remove lids from the pot of boiling water (sterilizing )
- Lids- disposable - you may only use them once
- Ring - holds the lids on the jar until after the jars cool - then you remove them, save them and reuse them
- Canning Jar funnel - to fill the jars
FREE Illustrated Canning, Freezing, Jam Instructions and Recipes
Don't spend money on books. that you don't need to. Almost everything you can find in some book sold online or in a store is on my website here for free. Start with theEasy Home Canning Directions below. That is a master list of canning directions which are all based upon the Ball Bblue book, the National Center for Home Food Preservation and other reputable lab tested recipes. Almost every recipe I present in addition to being lab tested com. is in a step by step format with photos for each step and complete. explanations. that tell you how to do it, where to get the supplies and pretty much everything you need to know. In addition, there almost always in a PDF format so you can print them out and use them while you cook.
[ Easy Home Canning Directions]
[FAQs - Answers to common questions and problems]
[Recommended books about home canning, jam making, drying and preserving!]


Looking for canning equipment and supplies?
Water bath canner with a jar rack
Pressure canners for gas, electric and induction stoves: Presto 23Qt or T-fal 22Qt
Canning scoop (this one is PERFECT)
Ball Blue book (most recent version)
Jars: 8oz canning jars for jams
Find Other types of farms:
Farm markets and roadside stands
Road trips and camping resources
Local Honey, apiaries, beekeepers
Consumer fraud and scams information
Home canning supplies at the best prices on the internet!
Maple Syrup Farms, sugarworks, maple syrup festivals
Environmental information and resources
Farms For Your Event for birthday parties, weddings, receptions, business meetings, retreats, etc.
Festivals - local fruit and vegetable festivals
Get the
most recent version of
the Ball Blue Book
