Tomato Paste: How to make homemade canned tomato paste, from fresh tomatoes - easy and illustrated!
 How to Can Fresh Tomato Paste with a Water Bath Canner!
Click here for a PDF print version
Yield: About 9 half-pint jars
Making canned tomato paste is something easy to do and will make your tomato dishes taste so much better. Home-canned tomato paste have been a tradition for many generations. In the middle of the winter, you can use the tomato paste to make a fresh spaghetti sauce, lasagna, chili, or other tomato-based meals for that fresh garden taste.
Here's how to do it, in easy steps and completely illustrated. This method is so easy, ANYONE can do this! It's a great thing to do with your kids!
And if you'd rather can your tomatoes or freeze your tomatoes, see this page!
Ingredients
- Tomatoes - 8 quarts peeled, cored chopped tomatoes (about 4 dozen large tomatoes) - best to use Roma type / paste tomatoes
- Red peppers - 11/2 cups chopped sweet red peppers (about 3 whole peppers)
- Bay - 2 bay leaves
- Salt - 1 teaspoon canning or pickling salt (optional)
- Garlic - 1 clove garlic (optional)
- lemon juice - fresh or bottled, about 1/2 cup
Equipment
- 1 water bath canner (a huge pot to sanitize the jars after filling (about $30 to $35 - $30 at mall kitchen stores and local "big box" stores. Note: we sell many sizes and types of canners for all types of stoves and needs - see canning supplies). Tomatoes are on the border between the high-acid fruits that can be preserved in a boiling-water bath and the low-acid fruits, vegetables and meats that need pressure canning
- 1 large pot (to scald the tomatoes, step 3) and 1 small pot to sanitize the lids.
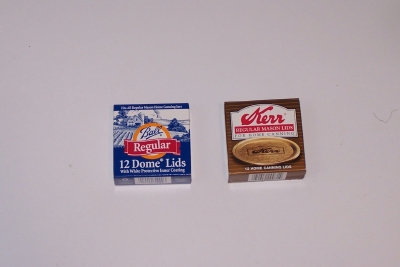
- 8 ounce (half pint) canning jars (Ball or Kerr jars can be found at Publix, Kroger, Safeway and local "big box" stores - about $13 per dozen 8-ounce jars, more for quilted design or larger jars, including the lids and rings). Be sure to get wide mouth jars to be able to get all of the paste out later! Half Pint size works best!
- Lids - thin, flat, round metal lids with a gum binder that seals them against the top of the jar. They may only be used once.
- Rings - metal bands that secure the lids to the jars. They may be reused many times.
- Jar grabber (to pick up the hot jars)
- Lid lifter (has a magnet to pick the lids out of the almost-boiling water where you sanitize them. ($4 at mall kitchen stores and local "big box" stores, but it's usually cheaper online from our affiliates)
- Jar funnel ($3-Grocery stores, like Publix, Kroger and Safeway and local "big box" stores; sometimes even hardware stores)
- Large spoons and ladles,
Process / Directions - How to Make Home Canned Tomato Paste from Fresh Tomatoes
 Step
1 - Selecting the tomatoes
Step
1 - Selecting the tomatoes
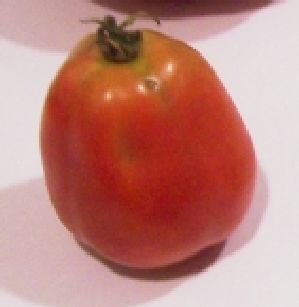
It's fun to go pick your own and you can obviously get better quality tomatoes!
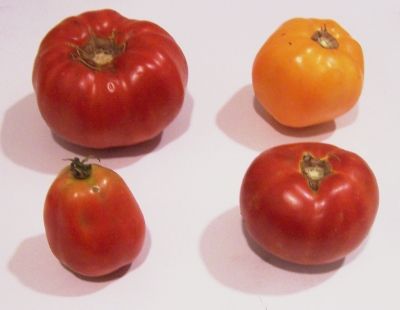
At right is a picture of tomatoes from my garden - they are so much better than anything from the grocery store. And if you don't have enough, a pick-your-own farm is the pace to go! At right are 4 common varieties that will work:
The picture at right shows the best variety of tomato to use, in the bottom left corner: Roma; also called paste tomatoes. They have fewer sides, thicker, meatier walls, and MUCH less water. And that means thicker paste in less cooking time!
| Top left: Beefsteak | Top right: Lemon Boy, yellow |
| Bottom left: Roma, paste-type | Bottom right: Better Boy |
Step 2 - Get the jars and lids sanitizing
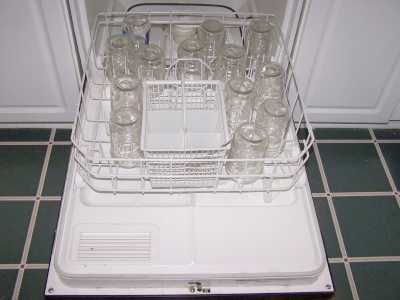 The
dishwasher is fine for the jars; especially if it has a "sanitize" cycle.
I get that going while I'm preparing everything else, so it's done by the
time I'm ready to fill the jars. If you don't have a dishwasher,
submerge the jars in a large pot (the canner itself) of water and bring it
to a boil.
The
dishwasher is fine for the jars; especially if it has a "sanitize" cycle.
I get that going while I'm preparing everything else, so it's done by the
time I'm ready to fill the jars. If you don't have a dishwasher,
submerge the jars in a large pot (the canner itself) of water and bring it
to a boil.
Be sure to let it go through the rinse cycle to get rid of any soap!
Get the canner heating up
 Fill
the canner about 1/2 full of water and start it heating (with the lid on).
Fill
the canner about 1/2 full of water and start it heating (with the lid on).
Start the water for the lids
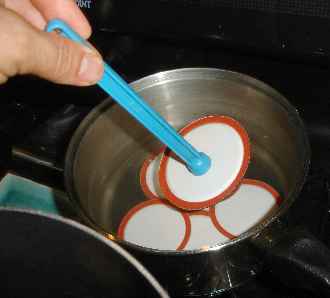
 Put
the lids into a pan of hot, but not quite boiling water for at least several minutes.
Note: everything gets sanitized in the water bath (step 7) anyway, so this just
helps to ensure there is no spoilage later!)
Put
the lids into a pan of hot, but not quite boiling water for at least several minutes.
Note: everything gets sanitized in the water bath (step 7) anyway, so this just
helps to ensure there is no spoilage later!)
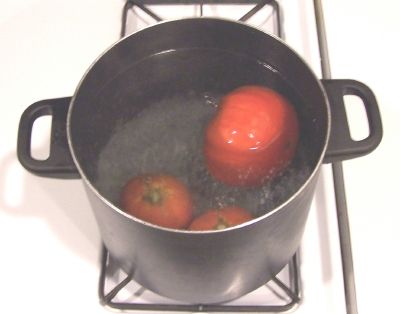
Step 3 - Removing the tomato skins
Here's a trick you may not know: put the tomatoes, a few at a time in a large pot of boiling water for no more than 1 minute (30 - 45 seconds is usually enough)
then....
Plunge them into a waiting bowl of ice water.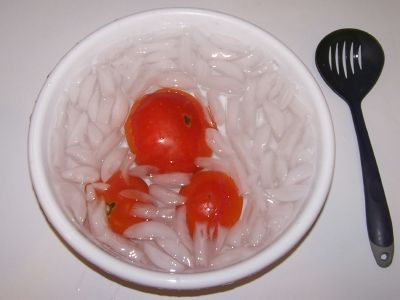
This makes the skins slide right off of the tomatoes! If you leave the skins in, they become tough and chewy in the paste, not very pleasant.
Step 4 - Removing the skins, bruises and tough parts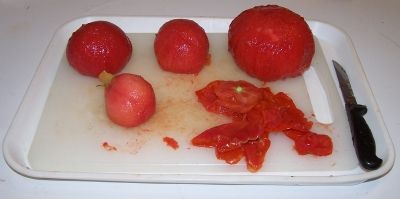
The skins should practically slide off the tomatoes. Then you can cut the tomatoes in quarters and remove the tough part around the stem and any bruised or soft parts.
Why remove the skins? They become tough when you cook them! Some people use a juicer or a blender to puree the whole tomatoes (minus stems) and then cook the resultant juice down. Due to the extra juice, it will take much longer to cook down to a thick paste, but there's nothing wrong with that approach.
Step 5 - Removing seeds and water
After you have peeled the skins off the tomatoes, cut the tomatoes in half. Now we need to remove the seeds and excess water.
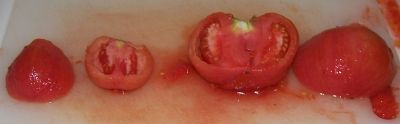 Step
6 - Squeeze of the seeds and water
Step
6 - Squeeze of the seeds and water
Just like it sounds: wash your hands then squeeze each tomato and use
your finger or a
![]() spoon
to scoop and shake out most of the seeds. You don't need to get
fanatical about it; removing just most will do. Another way to do it is to
cut each tomato in half, across it, instead of lengthwise. Then just shake
the seeds and juice out.
spoon
to scoop and shake out most of the seeds. You don't need to get
fanatical about it; removing just most will do. Another way to do it is to
cut each tomato in half, across it, instead of lengthwise. Then just shake
the seeds and juice out.
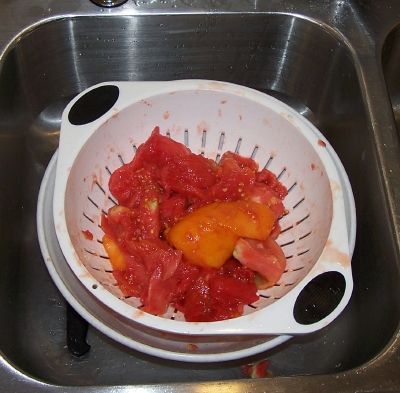 Step
7 - Drain the tomatoes
Step
7 - Drain the tomatoes
Toss the squeezed (Squozen? :) tomatoes into a colander or drainer, while you work on others. This helps more of the water to drain off.
Note You may want to save the liquid: if you then pass it through a sieve, screen or cheesecloth, you have fresh tomato juice; great to drink cold or use in cooking! By draining the water off now, you will end up with a thicker paste in less cooking time! And that preserves vitamins (and your sanity).
This is a good time to chop the red peppers!
Step 8 - Blend the tomatoes in a blender, food processor or chopper
If you want really smooth tomato paste, just pour the tomatoes into blender, food processor or even a chopper, and blend until it is smooth.
Step 9 - Combine and bring the paste to a gentle simmer
 Combine
the tomatoes and
Combine
the tomatoes and
- 11/2 cups chopped sweet red peppers
- 2 bay leaves
- 1 teaspoon canning or pickling salt (optional)
in a big pot. There's generally no need to add liquid, most types of tomatoes have so much water, we will need to boil it down to drive off much of the water to thicken the paste. Simmer slowly in large-diameter saucepan for 1 hour. (TIP: A crockpot set on "high" will work great and doesn't require constant attention- but be sure to verify it and stir every 15 minutes - or turn it to low and stir once every hour or so.). Press through a fine sieve. Add the garlic clove, if desired. Continue cooking slowly until thick enough to round up on a spoon, about 21/2 hours in MY crockpot (obviously, with the lid either off, or askew, so the steam can escape). I cannot tell you how long it will take in YOUR crockpot. Yours might be 40 years old and use a light bulb from an Easy Bake Oven to power it! (Can you tell I've had emails from people who said it took 10 hours in their crockpot?)
In any case, stir frequently to prevent sticking. Remove garlic clove and bay leaves. Add the lemon juice and stir in.
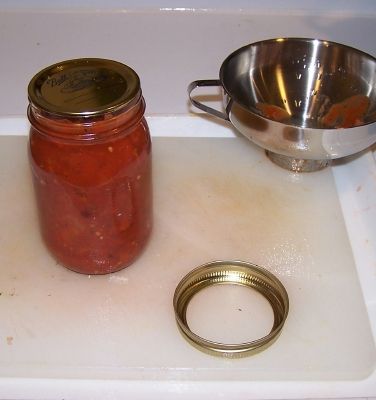
Step 10 - Fill the jars with paste
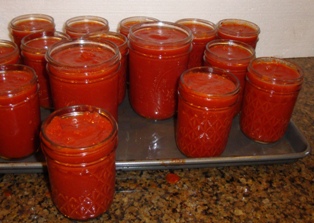 Fill
them to almost within 1/2-inch of the top.
Fill
them to almost within 1/2-inch of the top.
NOTE: if you want to freeze the paste instead, just let the paste cool to room temperature, then fill your freezer containers (I like Ziploc freezer bags in the quart size), fill them completely, eliminate air pockets, seal them and pop them in the freezer. You're done!
Step 11 - Add lemon juice and liquid
 After
you fill each jar with tomatoes, add 1 teaspoon of lemon juice per half pint jar
or 2 teaspoons of lemon juice per pint jar. This helps to reduce the odds
of spoilage and to retain color and flavor. Then make sure it is filled to
1/4-inch of the top with paste.
After
you fill each jar with tomatoes, add 1 teaspoon of lemon juice per half pint jar
or 2 teaspoons of lemon juice per pint jar. This helps to reduce the odds
of spoilage and to retain color and flavor. Then make sure it is filled to
1/4-inch of the top with paste.
Step 12 - Put the lids and rings on
 Just
screw them on snugly, not too tight. If the is any tomato on the surface
of the lip of the jar, wipe it off first with a clean dry cloth or paper towel.
Just
screw them on snugly, not too tight. If the is any tomato on the surface
of the lip of the jar, wipe it off first with a clean dry cloth or paper towel.
Be sure the contact surfaces (top of the jar and underside of the ring) are clean to get a good seal!
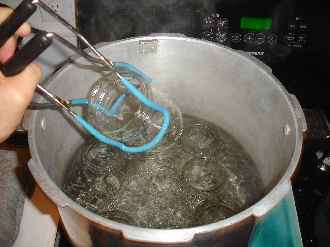
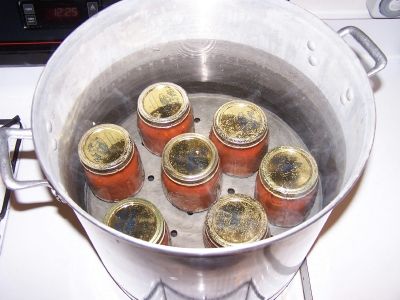 Step
13 - Boil the jars in the water bath canner
Step
13 - Boil the jars in the water bath canner
 Put
them in the canner and keep them covered with at least 1 inch of water.
Keep the water boiling. Process the jars in a boiling-water bath for 45
minutes for half-pint or pint jars. Larger jars are not recommended, but
you may use smaller jars at the same processing duration. Remember to
adjust the time if you are at a different altitude other than sea
level!
Put
them in the canner and keep them covered with at least 1 inch of water.
Keep the water boiling. Process the jars in a boiling-water bath for 45
minutes for half-pint or pint jars. Larger jars are not recommended, but
you may use smaller jars at the same processing duration. Remember to
adjust the time if you are at a different altitude other than sea
level!
When there is an equivalent pressure-canner tested recipe from an authoritative source (like Ball), I prefer a Pressure Canner as the higher temperatures and shorter cooking time result in better flavor and less spoilage. For more information or to order one, click on Pressure Canners. I have not yet found a tested pressure canner recipe for tomato paste. The recipe and directions for water bath canning tomatoes are coming.
|
Recommended process time for Tomato Paste in a boiling-water canner. |
|||||
| Process Time at Altitudes of | |||||
| Style of Pack | Jar Size | 0 - 1,000 ft | 1,001 - 3,000 ft | 3,001 - 6,000 ft | Above 6,000 ft |
| Hot | Half-pints (8 ounce) | 45 min | 50 | 55 | 60 |
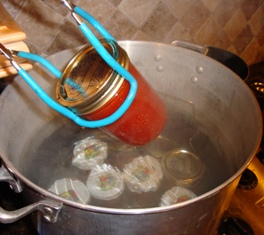
Step 14 - Done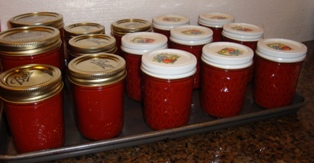
Lift the jars out of the water and let them cool without touching or bumping them in a draft-free place (usually takes overnight) You can then remove the rings if you like, but if you leave them on, at least loosen them quite a bit, so they don't rust in place due to trapped moisture. Once the jars are cool, you can check that they are sealed verifying that the lid has been sucked down. Just press in the center, gently, with your finger. If it pops up and down (often making a popping sound), it is not sealed. If you put the jar in the refrigerator right away, you can still use it. Some people replace the lid and reprocess the jar, then that's a bit iffy. If you heat the contents back up, re-jar them (with a new lid) and the full time in the canner, it's usually ok.
This document was adapted from the "Complete Guide to Home Canning," Agriculture Information Bulletin No. 539, USDA, revised 1994.
Other Equipment:
|
From left to right:
|
Canning Supplies Starter Kit - Canning Jar Lifter, Canning funnel, Scissor Tongs, more |
 |
| McSunley 21.5 quart Water Bath Canner, Stainless Steel See here for related tools, equipment, supplies on Amazon See here for related tools, equipment, supplies on Amazon See here for related tools, equipment, supplies on Amazon 
|
Home Canning KitsThis is the same type of standard canner that my grandmother used
to make everything from applesauce to jams and jellies to tomato and
spaghetti sauce. This complete kit includes everything you need and lasts
for years: the canner, jar rack, Jar grabber tongs, lid lifting wand, a
plastic funnel, labels, bubble freer, and the bible of canning, the Ball
Blue Book. It's much cheaper than buying the items separately. You will never need anything else except jars & lids! To see more canners, of different styles, makes and prices, click here!For
more information and current pricing: |
Summary - Cost of Making Homemade Tomato Paste - makes 14 half pint or 7 pint jars* |
||||
| Item | Quantity | Cost in 2025 | Source | Subtotal |
| Tomatoes | 20 - 25 lbs (to make about 16 cups of prepared tomato) | free from the garden, or $0.50 cents at a PYO | Garden | $0.00 |
| Canning jars (pint size, wide mouth), includes lids and rings (or 14 eight ounce jars) | 7 jars | $8.75/dozen | Grocery stores, like Publix, Kroger and Safeway and local "big box" stores; sometimes Big Lots and even hardware stores | $5.00 |
| Lemon juice | 7 Tablespoons (1 tablespoons per pint jar) | $0.50 per package | Grocery stores, Publix, Kroger |
$0.50 |
| Total | $5.50 total or about $0.79 per jar INCLUDING the jars - which you can reuse! |
|||
|
* - This assumes you already have the pots, pans, ladles,, and reusable equipment. Note that you can reuse the jars! Many products are sold in jars that will take the lids and rings for canning. For example, Classico Spaghetti sauce is in quart sized jars that work with Ball and Kerr lids and rings. Note that the Classico's manufacturer does not recommend reuse of their jars: see what they have to say on this page: |
||||
Answers to Common Questions
What did I do wrong if my jars spoil?
Tomatoes are a borderline acid / low acid fruit (see this page about tomato acidity for more information) - adding lemon juice helps, processing at least 35 minutes in the water bath canner, or better still, using a Pressure Canner almost eliminates spoilage. If you don't have a pressure canner, you must boost the acid level of the paste, by adding 2 tablespoons of lemon juice or 1/2 teaspoon of citric acid per quart of paste.
The question everyone asks: Can you add meat?
With a water bath canner, absolutely, definitely NOT. The temperatures do not get high enough to kill the type of bacteria that can attack meat and make you sick, or even kill you. However, with a Pressure Canner, it IS possible. I have complete directions here! I don't do it, simply because... have you ever tasted canned meat? Yes, it is called SPAM. My recommendation is to can without the meat and add fresh browned ground meat or meatballs when you use the sauce!
I have read in other homemade spaghetti sauce recipes that you need to cook the mixture for at least 4-5 hours. Is this necessary?
I suppose if you really want to make sure that absolutely no vitamins
survive, you could cook it that long! :) The only reason people used to cook
tomato paste that long was the Roma paste-type tomatoes, with thicker walls,
meatier with fewer seeds and less water didn't exist, so they had to cook it for
hours to get rid of water and thicken it. And of course, modern sauce mixes that
contain a little bit of corn starch as a thickener, also help shorten the time.
And for those who want to go strictly organic and au naturale, my method of
squeezing out the excess water and seeds eliminates much of the excess juice
(which you can save as tomato juice for drinking) and lets you start with a
thicker tomato pulp which means much shorter cooking time!
Illustrated Canning, Freezing, Jam Instructions and Recipes
[ Easy Home Canning Directions] [FAQs - Answers to common questions and problems] [Recommended books about home canning, jam making, drying and preserving!] [Free canning publications to download and print]


Looking for canning equipment and supplies?
Water bath canner with a jar rack
Pressure canners for gas, electric and induction stoves: Presto 23Qt or T-fal 22Qt
Canning scoop (this one is PERFECT)
Ball Blue book (most recent version)
Jars: 8oz canning jars for jams
Find Other types of farms:
Farm markets and roadside stands
Road trips and camping resources
Local Honey, apiaries, beekeepers
Consumer fraud and scams information
Home canning supplies at the best prices on the internet!
Maple Syrup Farms, sugarworks, maple syrup festivals
Environmental information and resources
Farms For Your Event for birthday parties, weddings, receptions, business meetings, retreats, etc.
Festivals - local fruit and vegetable festivals
Get the
most recent version of
the Ball Blue Book
