
Looking for How to Make Home-Canned Roasted Tomatoes - Easily! With Step-by-step Directions in 2025? Scroll down this page and follow the links. And if you bring home some fruit or vegetables and want to can, freeze, make jam, salsa or pickles, see this page for simple, reliable, illustrated canning, freezing or preserving directions. There are plenty of other related resources, click on the resources dropdown above. If you are having a hard time finding canning lids, I've used these, and they're a great price & ship in 2 days.
If you have questions or feedback, please let me know! There are affiliate links on this page. Read our disclosure policy to learn more.
How to Make Home-Canned Roasted Tomatoes - Easily! With Step-by-step Directions
Yield: 7 pint or quart jars per batch
Click here for a PDF print version
Making and canning your own roasted tomatoes is easy using this standard Ball/USDA recipe and processing times, just roasting the tomatoes first.
This version uses an ordinary boiling water bath canner, see this page for the pressure canner version.
So, here's how to can roasted tomatoes. The directions are complete with instructions in easy steps and illustrated. In the winter when you open a jar, the roasted tomatoes will taste MUCH better than any store-bought canned roasted tomatoes.
Prepared this way, the jars have a shelf life of about 12 months, and aside from storing in a cool, dark place, require no special attention.
Ingredients
- Tomatoes - You can use almost any quantity, to make 1 jar or more. An average of 21 pounds is needed per canner load of 7 quarts; an average of 13 pounds is needed per canner load of 9 pints. A bushel weighs 53 pounds and yields 15 to 21 quarts-an average of 3 pounds per quart.
- Lemon juice - bottled lemon juice (2 tablespoons per quart jar)
Equipment
- 1 water bath canner (a huge pot to sanitize the jars after filling (about $30 to $35 - $30 at mall kitchen stores and local "big box" stores. Note: we sell many sizes and types of canners for all types of stoves and needs - see canning supplies). Tomatoes are on the border between the high-acid fruits that can be preserved in a boiling-water bath and the low-acid fruits, vegetables and meats that need pressure canning
- Jar grabber (to pick up the hot jars)
- Jar funnel ($4 at mall kitchen stores and local "big box" stores, but it's usually cheaper online from our affiliates)
- At least 1 large pot
- Large spoons and ladles,
- Canning jars (often called Ball jars, Mason jars or Kerr jars) (Publix, Kroger, other grocery stores and some "big box" stores carry them - now about $12 per dozen quart jars (up 50% in 2 years!) including the lids and rings)
Directions - Step by Step
 Step 1 - Selecting the
tomatoes
Step 1 - Selecting the
tomatoes
It's fun to go pick your own and you can obviously get better quality tomatoes!
Wash, remove stems, and trim off bruised or discolored portions of the tomatoes. Generally, you will need about 2 quarts of raw tomatoes to make 1 quart of chopped, peeled tomatoes, and each quarts of the prepared tomatoes makes about 1 pint of soup. A bushel of tomatoes weighs 53 pounds.
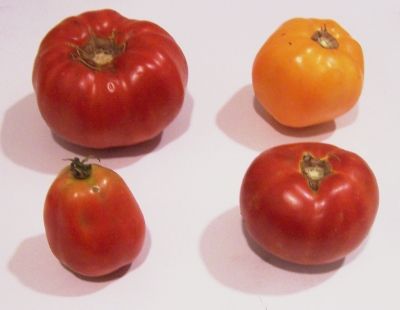
At right is a picture of tomatoes from my garden - they are so much better than anything from the grocery store. And if you don't have enough, a pick-your-own farm is the pace to go! At right are 4 common varieties that will work:
| Top left: Beefsteak | Top right: Lemon Boy, yellow |
| Bottom left: Roma, paste-type | Bottom right: Better Boy |
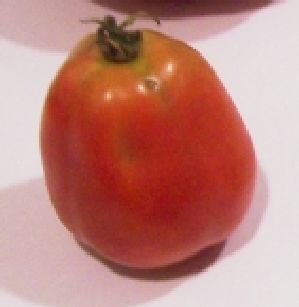 The
picture at right shows the best variety of tomato to use: Roma; also called
paste tomatoes. They have fewer sides, thicker, meatier walls, and
less water.
And that means thicker sauce in less cooking time!
The
picture at right shows the best variety of tomato to use: Roma; also called
paste tomatoes. They have fewer sides, thicker, meatier walls, and
less water.
And that means thicker sauce in less cooking time!
Also, you don't want mushy, bruised or rotten tomatoes!
Caution: Do not can tomatoes from dead or frost-killed vines. Green tomatoes are more acidic than ripened fruit and can be canned safely, also.
Step 2 - Wash the tomatoes and cut in half
Just wash them in cold water, and cut them in half, through the stem and bottom.
Step 3 -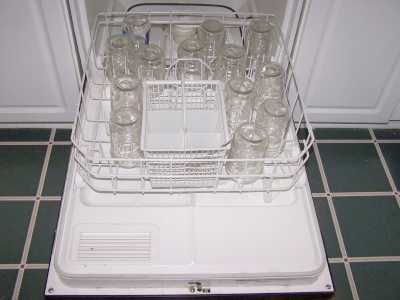 Prepare the jars,
oven and pressure canner
Prepare the jars,
oven and pressure canner
Get the oven heating to 450 F (220 C)
Wash the jars and lids
This is a good time to get the jars ready! The dishwasher is fine for the jars; especially if it has a "sanitize" cycle. Otherwise put the jars in boiling water for 10 minutes. I just put the lids in a small pot of almost boiling water for 5 minutes, and use the magnetic "lid lifter wand" (available from target, other big box stores, and often grocery stores; and available online - see this page) to pull them out.
Get a large pot of water boiling
We will use this water to pour over the beans and fill each jar with liquid, after we've packed them full of beans. I use the largest pot I have, so that there is plenty of clean, boiling water ready when I need it.
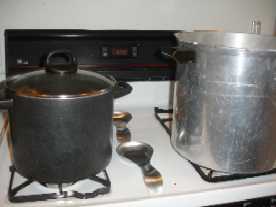
Get the canner heating up
 Fill
the canner about 1/2
full of water and start it heating (with the lid on).
Fill
the canner about 1/2
full of water and start it heating (with the lid on).
Step 4 - Put the tomatoes in the roasting pan
Arrange the tomato halves face down in a roasting pan. You ought to be able to fit about 5 pounds in a large roasting pan. If you like, you may sprinkle each pan with 1 tablespoon of dried, crushed herbs (typically rosemary, thyme and/or basil)
Step 5 - Roast the tomatoes
Roast the tomatoes at 450°F for about half an hour. Alternatively, you may cook them run them under the broiler for 3 to 5 minutes. Either way, cook them until they're wrinkled with only a few black spots. Most people prefer to peel the tomatoes and discard the skins, as the skins usually get tough.
Step 6 - Add lemon juice to each jar
Add two tablespoons of bottled lemon juice or 1/2 teaspoon of citric acid to each empty quart jar. For pints, use one tablespoon bottled lemon juice or 1/4 teaspoon citric acid. Acid can be added directly to the jars before filling with product. You can add 2 tablespoons of sugar to each quart jar (1 to each pint) to offset acid taste, if desired. Four tablespoons of a 5 percent acidity vinegar per quart may be used instead of lemon juice or citric acid. However, vinegar may cause undesirable flavor changes.. Add 1 teaspoon of salt per quart to the jars, if desired (I don't add any salt).
Step 7 - Fill the jars with the tomatoes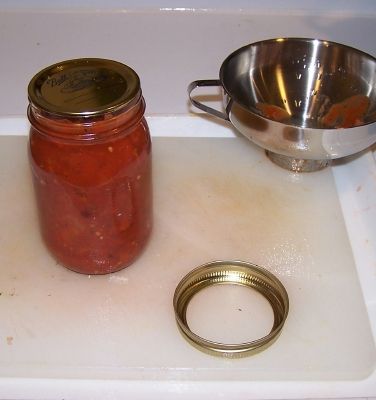
Fill jars with the roasted tomatoes, leaving 1/2-inch headspace. Press the tomatoes in the jars until spaces between them fill with juice. Leave 1/2-inch headspace.
Step 8 - Put the lids and rings on
Put the lids on each jar and seal them by putting a ring on and screwing it down snugly (but not with all your might, just "snug").
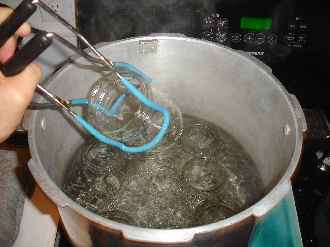
Step 9 - Boil the jars in the water bath canner
Put them in the canner and keep them covered with at least 1 to 2 inches of water. Keep the water boiling. Process the jars in a boiling-water bath for 85 minutes for pints and quart jars. Remember to adjust the time if you are at a different altitude other than sea level! Pressure canners work better for tomatoes and other low acid foods - you will get less spoilage with a Pressure Canner.
I prefer a Pressure Canner as the higher temperatures and shorter cooking time result in better flavor and less spoilage. For more information or to order one, click on Pressure Canners. The recipe and directions for pressure canning tomatoes are here.
| Recommended Process Time for Whole or Halved Tomatoes (packed raw without added liquid) in a Boiling-Water Canner | |||||
| Process Time at Altitudes of | |||||
| Style of Pack | Jar Size | 0 - 1,000 ft | 1,001 - 3,000 ft | 3,001 - 6,000 ft | Above 6,000 ft |
| Raw | Pints or Quarts | 85 min | 90 | 95 | 100 |
Step 10 - Done
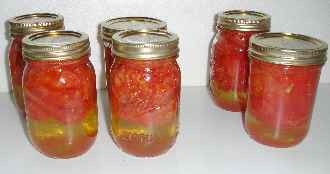 Lift the jars out of the water and let them cool without touching or
bumping them in a draft-free place (usually takes overnight) You can then remove the rings if you like, but if you leave them on, at least loosen them quite a bit, so they don't rust in place due to trapped moisture. Once the jars are cool, you can check that they are sealed verifying that the lid has been sucked down. Just press in the center, gently, with your finger. If it pops up and down (often making a popping sound), it is not sealed. If you put the jar in the refrigerator right away, you can still use it. Some people replace the lid and reprocess the jar, then that's a bit iffy. If you heat the contents back up, re-jar them (with a new lid) and the full time in the canner, it's usually ok. Don't worry if you see the
tomatoes floating above a layer of liquid; that's normal. tomatoes
have a lot of water in them and it separates a bit. If I had
packed the tomatoes in the jars a bit tighter or squeezed for of the
free liquid out of them before packing them in the jars, the water layer
would be reduced.
Lift the jars out of the water and let them cool without touching or
bumping them in a draft-free place (usually takes overnight) You can then remove the rings if you like, but if you leave them on, at least loosen them quite a bit, so they don't rust in place due to trapped moisture. Once the jars are cool, you can check that they are sealed verifying that the lid has been sucked down. Just press in the center, gently, with your finger. If it pops up and down (often making a popping sound), it is not sealed. If you put the jar in the refrigerator right away, you can still use it. Some people replace the lid and reprocess the jar, then that's a bit iffy. If you heat the contents back up, re-jar them (with a new lid) and the full time in the canner, it's usually ok. Don't worry if you see the
tomatoes floating above a layer of liquid; that's normal. tomatoes
have a lot of water in them and it separates a bit. If I had
packed the tomatoes in the jars a bit tighter or squeezed for of the
free liquid out of them before packing them in the jars, the water layer
would be reduced.
This document was adapted from the "Complete Guide to Home Canning,"
Agriculture Information Bulletin No. 539, USDA, revised 2006.
Reviewed May 2009.
Tips
Comments and Feedback
Illustrated Canning, Freezing, Jam Instructions and Recipes
[ Easy Home Canning Directions] [FAQs - Answers to common questions and problems] [Recommended books about home canning, jam making, drying and preserving!] [Free canning publications to download and print]


Looking for canning equipment and supplies?
Water bath canner with a jar rack
Pressure canners for gas, electric and induction stoves: Presto 23Qt or T-fal 22Qt
Canning scoop (this one is PERFECT)
Ball Blue book (most recent version)
Jars: 8oz canning jars for jams
Find Other types of farms:
Farm markets and roadside stands
Road trips and camping resources
Local Honey, apiaries, beekeepers
Consumer fraud and scams information
Home canning supplies at the best prices on the internet!
Maple Syrup Farms, sugarworks, maple syrup festivals
Environmental information and resources
Farms For Your Event for birthday parties, weddings, receptions, business meetings, retreats, etc.
Festivals - local fruit and vegetable festivals
Get the
most recent version of
the Ball Blue Book
