
Looking for How to can your own homemade canned greens, like spinach, kale, Swiss chard, collard greens or turnip greens (complete directions with photos ) in 2025? Scroll down this page and follow the links. And if you bring home some fruit or vegetables and want to can, freeze, make jam, salsa or pickles, see this page for simple, reliable, illustrated canning, freezing or preserving directions. There are plenty of other related resources, click on the resources dropdown above. If you are having a hard time finding canning lids, I've used these, and they're a great price & ship in 2 days.
If you have questions or feedback, please let me know! There are affiliate links on this page. Read our disclosure policy to learn more.
How to can your own homemade canned greens, like spinach, kale, Swiss chard, collard greens or turnip greens (complete directions with photos )
How to Make Homemade Canned Greens, like Spinach, Turnip Greens, Collards, Kale, Swiss Chard.
Photos coming soon
Now you can make your own canned spinach to eat like Popeye! You think making and canning your own greens, like spinach, kale, Swiss chard, collard greens or turnip greens is difficult or expensive? Not at all! The only trick is, you really do need a Pressure Canner. Every university food science department and the government will tell you that it just is not safe to use the water bath bath method; it takes the higher temperatures of the pressure canner to kill the botulism bacteria. The recipe below is an illustrated version of a USDA lab-tested recipe!
See this FAQ for details: Can I use a water-bath canner instead of a Pressure Canner for low acid foods like greens?
BUT, with a Pressure Canner it's easy. And although a Pressure Canner costs $100 to $200 (see this page for pressure canners models, makes and prices), they last a lifetime, and your children and grandchildren may be using it. You can also find free information from the USDA in this PDF file (it will take a while to load!) about selecting and using canners here!
So, here's how to can various types of greens! After this, I'll just refer to the greens as "greens". but the same instructions works for the other types of greens. The directions are complete with instructions in easy steps and completely illustrated. In the winter when you open a jar, the greens will taste MUCH better than any store-bought canned greens (although I think frozen greens will taste ten times better than canned).
Prepared this way, the jars have a shelf life of about 8 months, and aside from storing in a cool, dark place, require no special attention. If you'd rather freeze your fruit, see my page on how to freeze greens. Even easier than canning and they will taste just like fresh.. but it does take up space in the freezer.
Directions for Making Canned Greens
Ingredients and Equipment
|
|
Recipe and Directions
Step 1 - Selecting the greens
The most important step! You need greens that are FRESH and crisp. Limp, old greens will make nasty tasting canned greens. Guests will probably throw them at you.. Select filled but tender, firm, crisp greens. Discard any wilted, discolored, diseased, or insect- damaged leaves. Leaves should be tender and attractive in color.
How many greens and where to get them
You can grow your own, pick your own, or buy them at the grocery store. An average of 28 pounds is needed per canner load of 7 quarts; an average of 18 pounds is needed per canner load of 9 pints. A bushel weighs 18 pounds and yields 3 to 9 quarts - an average of 4 pounds per quart.
Step 2 - Prepare the jars and pressure canner
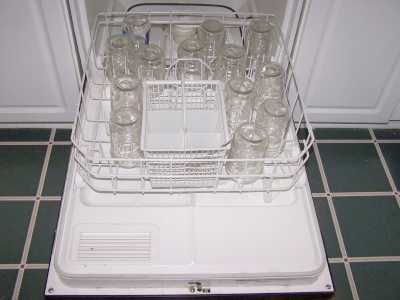
Wash the jars and lids
This is a good time to get the jars ready! The dishwasher is fine for the jars; especially if it has a "sanitize" cycle. Otherwise put the jars in boiling water for 10 minutes. I just put the lids in a small pot of almost boiling water for 5 minutes, and use the magnetic "lid lifter wand" (available from target, other big box stores, and often grocery stores; and available online - see this page) to pull them out.
Get a large pot of water boiling
We will use this water to pour over the greens and fill each jar with liquid, after we've packed them full of greens. I use the largest pot I have, so that there is plenty of clean, boiling water ready when I need it.
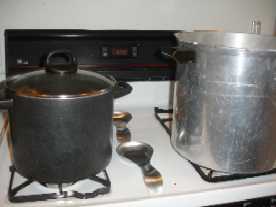
Get the pressure canner heating up
Rinse out your pressure canner, put the rack plate in the bottom, and fill it to a depth of 4 inches with hot tap water. (of course, follow the instruction that came with the canner, if they are different). Put it on the stove over low heat, with the lid OFF of it, just to get it heating up for later on.
Step 3 -Wash the greens!
I'm sure you can figure out how to rinse the greens in plain cold or lukewarm water. Wash only small amounts of greens at one time. Drain water and continue rinsing until water is clear and free of grit.
Step 4 - Trim the ends and cut out tough pieces
Cut out tough stems and midribs.
Step 5 - Blanching
Place 1 pound of greens at a time in cheesecloth bag or blancher basket and steam 3 to 5 minutes or until well wilted. This is blanching. It stops the bacteria and enzymes from degrading the quality during storage.
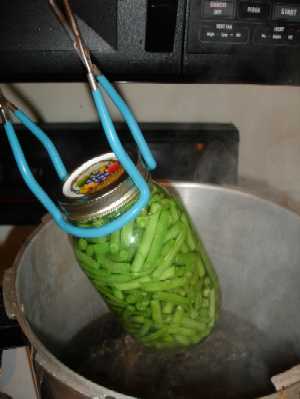
Step 6 - Packing the greens in the canning jars
Add 1/2 teaspoon of salt to each quart jar, if desired. Fill jars loosely with greens and add fresh boiling water, leaving 1-inch headspace. Pack the jars loosely and be sure to leave 1 inch of space at the TOP of the jar. That is called "headspace" and is needed for expansion during heading.
Step 7 - Pour fresh boiling water into each packed jar
Use a ladle or pyrex measuring cup to carefully fill each packed jar with water from pot of boiling water. Fill to within 1 inch of the top. The greens should be covered and there should still be 1 inch of airspace left in the top of each jar. Be careful not to burn yourself, (or anyone else - children should be kept back during this step!)
Step 8 - Put the lids and rings on
Put the lids on each jar and seal them by putting a ring on and screwing it down snugly (but not with all your might, just "snug").
Step 9 - Put the jars in the canner and the lid on the canner (but still vented)
 Using
the jar tongs, put the jars on the rack in the canner. By now the
water level has probably boiled down to 3 inches. If it is lower
than that, add more hot tap water to the canner. When all the jars that
the canner will hold are in, put on the lid and twist it into place, but
leave the weight off (or valve open, if you have that type of pressure
canner).
Using
the jar tongs, put the jars on the rack in the canner. By now the
water level has probably boiled down to 3 inches. If it is lower
than that, add more hot tap water to the canner. When all the jars that
the canner will hold are in, put on the lid and twist it into place, but
leave the weight off (or valve open, if you have that type of pressure
canner).
 Step
10 - Let the canner vent steam for 10 minutes
Step
10 - Let the canner vent steam for 10 minutes
Put the heat on high and let the steam escape through the vent for 10 minutes to purge the airspace inside the canner.
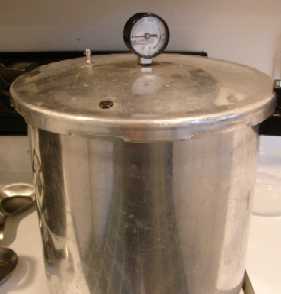
Step 11 - Put the weight on and let the pressure build
After 10 minutes of venting, put the weight on and close any openings to allow the pressure to build to 11 pounds.
Step 12 - Process for 70 minutes
Once the gauge hits 10 pounds, start your timer going - for 70 minutes. Adjust the heat, as needed, to maintain 10 pounds of pressure.
Note: the chart at right will help you determine the right processing time and pressure, if you have a different type of canner, or are above sea level.
It is important to learn how to operate your pressure canner by reading the owner's manual that came with your particular canner. If you cannot find your owner's manual, you can obtain find one online: Here is where to find some common manufacturer's manuals:
or by contacting the company that made your canner. Give the model number
to the manufacturer, and they will send you the right manual. Pressure Canner works and its components" longdesc="Diagram of how a Pressure Canner works and its components" style="float: right">
Click here for more information about pressure canners and a variety of models you can order.
Pressure Canner works and its components" longdesc="Diagram of how a Pressure Canner works and its components" style="float: right">
Click here for more information about pressure canners and a variety of models you can order.
|
Recommended process time for Spinach and Other Greens in a dial-gauge pressure canner. |
||||||
| Canner Pressure (PSI) at Altitudes of | ||||||
| Style of Pack | Jar Size | Process Time | 0 - 2,000 ft | 2,001 - 4,000 ft | 4,001 - 6,000 ft | 6,001 - 8,000 ft |
| Hot | Pints | 70 min | 11 lb | 12 lb | 13 lb | 14 lb |
| Quarts | 90 | 11 | 12 | 13 | 14 | |
|
Recommended process time for Spinach and Other Greens in a weighted-gauge pressure canner. |
||||
| Canner Pressure (PSI) at Altitudes of | ||||
| Style of Pack | Jar Size | Process Time | 0 - 1,000 ft | Above 1,000 ft |
| Hot | Pints | 70 min | 10 lb | 15 lb |
| Quarts | 90 | 10 | 15 | |
Step 13 - Turn off the heat and let it cool down
When the processing time from the chart above is up, turn off the heat, and allow the pressure canner to cool and the pressure to drop to zero before opening the canner. Let the jars cool without being jostled. After the pressure drops to zero (usually, you can tell but the "click" sound of the safety release vents opening, as well as but the gauge. Let the pressure in the canner drop to zero by itself. This may take 45 minutes in a 16-quart canner filled with jars and almost an hour in a 22-quart canner. If the vent is opened before the pressure drops to zero OR if the cooling is rushed by running cold water over the canner, liquid will be lost from the jars. Too rapid cooling causes loss of liquid in the jars!
Step 14 - Remove the jars
Lift the jars out of the water and let them cool on a wooden cutting board or a towel, without touching or bumping them in a draft-free place (usually takes overnight), here they won't be bumped. You can then remove the rings if you like, but if you leave them on, at least loosen them quite a bit, so they don't rust in place due to trapped moisture. Once the jars are cool, you can check that they are sealed verifying that the lid has been sucked down. Just press in the center, gently, with your finger. If it pops up and down (often making a popping sound), it is not sealed. If you put the jar in the refrigerator right away, you can still use it. Some people replace the lid and reprocess the jar, then that's a bit iffy. If you heat the contents back up, re-jar them (with a new lid) and the full time in the canner, it's usually ok. You're done!
Other Equipment:
From left to right:
- Jar lifting tongs to pick up hot jars
- Lid lifter - to remove lids from the pot of boiling water (sterilizing )
- Lids- disposable - you may only use them once
- Ring - holds the lids on the jar until after the jars cool - then you remove them, save them and reuse them
- Canning Jar funnel - to fill the jars
Frequently Asked Questions
Q. Cloudiness: When I can greens (or yellow) I seem to develop a cloudy murkiness in the jar. No one seems to know why this happens and it is very frustrating. I have tried both canning salt and table salt and it still seems to do this. This year I tried bottled water thinking there may be something in my cities water, but alas, I still have this cloudiness.
A. There are a number of potential causes to cloudiness:
1. First, the greens may be too mature which makes them too starchy. This starch settles out of the food during canning.
2. Be sure to use a NON-metal pot - or a coated metal (teflon, silverstone, enamel, etc.) without breaks in the coating. the metal reacts with acids (such as vinegar and natural acidity) and makes the solution turn cloudy. This is the most common cause of cloudy pickled vegetables.
3. Sometimes the fillers (anticaking agents) in regular table salt may cause slight cloudiness, so always use canning or pickling salt, which is better than kosher salt. It is available with the canning supplies in most large grocery stores.
4. Hard water might also cause cloudiness. Minerals in hard water can give a cloudy appearance. If soft water is not available, boil the hard water and let it sit undisturbed overnight. Pour off the top portion and use it in the solution.
The cloudiness caused by these first 4 conditions is not dangerous and usually doesn't affect the taste.
5. Finally, it could be spoilage due to improper processing. Do not consume them in this case. Check for spoilage using the usual methods (look for a leaking container, damaged lid, lid that is not sucked down (no vacuum), visible signs of growth, bad odors, etc.)
Q. Is it safe to can greens in a traditional water bath? If so how long do you do process them?
A. The answer, quite simply is no. This recipe was adapted from the "Complete Guide to Home Canning," Agriculture Information Bulletin No. 539, USDA, revised 1994, based on lab tested directions.
Quoting from the Ohio State University Extension's Fact Sheet:
"Pressure canning is the only safe method for home canning vegetables. Clostridium botulinum is the bacterium that causes botulism food poisoning in low-acid foods, such as vegetables. The bacterial spores are destroyed only when the vegetables are processed in a Pressure Canner at 240 degrees Fahrenheit (F) for the correct amount of time.Clostridium botulinum is the bacterium commonly found in vegetables and meats. It is harmless until it finds itself in a moist, low-acid, oxygen-free environment or a partial vacuum. Under these conditions, the bacterium can grow and produce toxins dangerous to people and animals.
Do not process (low acid) vegetables using the boiling water bath because the botulinum bacteria can survive that method.
Can fruits and vegetables be canned without heating if aspirin is used? No. Aspirin should not be used in canning. It cannot be relied on to prevent spoilage or to give satisfactory products. Adequate heat treatment is the only safe procedure.Is it safe to can greens in a boiling water bath if vinegar is used? No. Recommended processing methods must be used to assure safety. Recommended processing times cannot be shortened if vinegar is used in canning fresh vegetables. (This does not refer to pickled vegetables.)
Salt and sugar are not preservatives for vegetables: they are added to stabilize and improve flavor, but will not prevent spoilage.
Salicylic acid is also NOT a preservative. The University of Illinois reports:
Using Aspirin for Canning
Several years ago, a recipe circulated using aspirin to acidify tomatoes and greens for canning. Aspirin is not recommended for canning. While it contains salicylic acid, it does not sufficiently acidify tomatoes or greens for safe hot water bath canning. greens are low acid foods and may only be processed safely in a Pressure Canner. Lemon juice or vinegar is recommended to acidify tomato products for safe water bath processing.
Think of it like smoking. We all know someone who smoke their entire life and lived to be 90. But the cemeteries are filled with the vast majority who didn't. You will hear people say "my grandmother did it that way for 20 years". But of course, the people who died from food poisoning aren't around and often didn't have descendants to tell their tale...
Pressure canners!If you want to can low-acid foods such as red meats, sea food, poultry, milk, and all fresh vegetables with the exception of most tomatoes, you will need a Pressure Canner. These foods fit into the low acid group since they have an acidity, or pH level, of 4.6 or greater. The temperature which must be reached and maintained (for a specified amount of time) to kill the bacteria is 240 F. Pressure canning is the only canning method recommended safe by the U.S.D.A. for low-acid foods such as vegetables, meats, and fish. Ordinary water bath canners can only reach 212 F and cannot to kill the types of bacteria that will grow in low acid foods. This temperature can be reached only by creating steam under pressure as achieved in quality pressure canners. There are several manufacturers of pressure canners. The two leading ones are Presto and All American (Wisconsin Aluminum). They are more expensive than water bath canners, but extremely well built - I bought mine in 1988 and it still looks and works like new! |
|

|
Presto 01781 23-Quart Pressure Cooker/CannerThis is usually one of the best-priced pressure canners. They are reliable and inexpensive. I've had mine for 40 years. There is also a 16 quart version for even less. See the seller's website for more information, features, pricing and user reviews! |
|
|
Shown at left is the Presto 23 quart pressure canner. Features below and
click here for more information or to purchase from Target.
See the seller's website for more information, features, pricing and user reviews! |
| All-American 941 Pressure Canner All-American 930 Pressure Canner |
All American Pressure Canner and Cooker #921See the seller's website for more information, features, pricing and user reviews! |
| All-American 941 Pressure Canner All-American 930 Pressure Canner | All American Pressure Canner and Cookers - In 3 SizesSee the seller's website for more information, features, pricing and user reviews! |
|
Lids, Rings, Jars, mixes, pectin, etc.Need lids, rings and replacement jars? Or pectin to make jam, spaghetti sauce or salsa mix or pickle mixes? Get them all here, and usually at lower prices than your local store! Get them all here at the best prices on the internet! |
|
See here for related tools, equipment, supplies on Amazon
|
Bean "Frenchers"It is tiring and laborious to prepare greens for canning; there are so many of them and you do them all by hand. But wait there's a new device that makes it easy. Hmmm, actually, these devices have been around since our great-grandfather's day! Here are several different types and makes, some hand fed, some cranked: choose the one that meets your need and budget! For photos and features of the bean frenchers, click here!
|
| See here for related tools, equipment, supplies on Amazon |
Deluxe Food Strainer and Sauce Maker
|
|
|
BUT, with a Pressure Canner it's easy. And although a pressure canner costs $100 to $200 (see this page for pressure canners models, makes and prices), they last a lifetime, and your children and grandchildren may be using it. You can also find free information from the USDA in this PDF file (it will take a while to load!) about selecting and using canners here! |


Looking for canning equipment and supplies?
Water bath canner with a jar rack
Pressure canners for gas, electric and induction stoves: Presto 23Qt or T-fal 22Qt
Canning scoop (this one is PERFECT)
Ball Blue book (most recent version)
Jars: 8oz canning jars for jams
Find Other types of farms:
Farm markets and roadside stands
Road trips and camping resources
Local Honey, apiaries, beekeepers
Consumer fraud and scams information
Home canning supplies at the best prices on the internet!
Maple Syrup Farms, sugarworks, maple syrup festivals
Environmental information and resources
Farms For Your Event for birthday parties, weddings, receptions, business meetings, retreats, etc.
Festivals - local fruit and vegetable festivals
Get the
most recent version of
the Ball Blue Book
