
Looking for How to Test Home Canned Jars For Proper Sealing and Spoilage in 2024? Scroll down this page and follow the links. And if you bring home some fruit or vegetables and want to can, freeze, make jam, salsa or pickles, see this page for simple, reliable, illustrated canning, freezing or preserving directions. There are plenty of other related resources, click on the resources dropdown above. If you are having a hard time finding canning lids, I've used these, and they're a great price & ship in 2 days.
If you have questions or feedback, please let me know! There are affiliate links on this page. Read our disclosure policy to learn more.
How to Test Home Canned Jars For Proper Sealing and Spoilage
Post Canning Activities: Testing Home Canned Jars For Proper Sealing and Spoilage
How to Test Jar Seals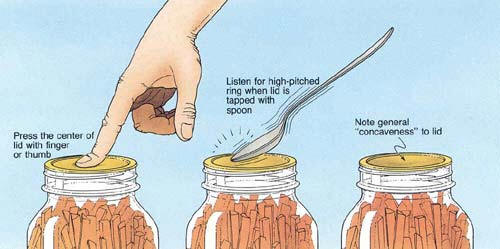
Most two-piece lids will seal with a "pop" sound while they're cooling, as the lid gets sucked down by the vacuum created by the contents cooling and contracting inside the jar. After cooling jars for 12 to 24 hours, remove the screw bands and test seals with one of the following options (do not test the jars while they are still hot!):
- Option 1: Press the middle of the lid with a
finger or thumb. If the lid springs up when you release your finger,
the lid is unsealed.
- Option 2: Tap the lid with the bottom of a
teaspoon. A clear ringing sound means a good seal. If it makes a
dull sound, the lid is not sealed. If food is in contact with the
underside of the lid, it will also cause a dull sound (that is not a
problem nor a sign of spoilage). If the jar is sealed correctly, it
will make a ringing, high-pitched sound.
- Option 3: Hold the jar at eye level and look across the lid. The lid should be concave (curved down slightly in the center). If center of the lid is either flat or bulging, it may not be sealed.
If a jar is not sealed, refrigerate it and use the unspoiled food within two to three days. Other options are to reprocess (see below) the food within 24 hours or to freeze it.
Reprocessing jars that have become unsealed
If, by the time that a home canned jar reaches room temperature (normally within 12 to 24 hours of canning), a lid fails to seal on the jar, remove the lid and check the jar-sealing surface for tiny nicks. If necessary, change the jar, add a new, properly prepared lid, and reprocess within 24 hours using the same processing time. Headspace in unsealed jars may be adjusted to 11/2 inches and jars could be frozen instead of reprocessed. Foods in single unsealed jars could be stored in the refrigerator and consumed within several days.
Storing Canned Foods
If lids are tightly vacuum sealed on cooled jars, remove screw bands, wash the lid and jar to remove food residue; then rinse and dry jars. Label and date the jars and store them in a clean, cool, dark, dry place. For best quality, store between 50 and 70 °F. Can no more food than you will use within a year.
Do not store jars above 95° F or near hot pipes, a range, a furnace, in an uninsulated attic, or in direct sunlight. Under these conditions, food will lose quality in a few weeks or months and may spoil. Dampness may corrode metal lids, break seals, and allow recontamination and spoilage.
Accidental freezing of canned foods will not cause spoilage unless jars become unsealed and recontaminated. However, freezing and thawing may soften food. If jars must be stored where they may freeze, wrap them in newspapers, place them in heavy cartons, and cover with more newspapers and blankets.
Identifying and Handling Spoiled Home-Canned Food
Do not taste food from a jar with an unsealed lid or food that shows signs of spoilage.
You can more easily detect some types of spoilage in jars stored with the rings (the screw bands that hold the lids down) removed. Growth of spoilage bacteria and yeast produces gas which pressurizes the food, swells lids, and breaks jar seals. As each stored jar is selected for use, examine its lid for tightness and vacuum. Lids with concave centers have good seals.
Next, while holding the jar upright at eye level, rotate the jar and examine its outside surface for streaks of dried food originating at the top of the jar. Look at the contents for rising air bubbles and unnatural color.
While opening the jar, smell for unnatural odors and look for spurting liquid and cotton-like mold growth (white, blue, black, or green) on the top food surface and underside of lid.
Spoiled low-acid foods, including tomatoes, may exhibit different kinds of spoilage evidence or very little evidence. Therefore, all suspect containers of spoiled low-acid foods, including tomatoes, should be treated as having produced botulinum toxin and handled carefully in one of two ways:
- If the swollen metal cans or suspect glass jars are still sealed, place them in a heavy garbage bag. Close and place the bag in a regular trash container or bury it in a nearby landfill.
- If the suspect cans or glass jars are unsealed, open, or leaking, they should be detoxified before disposal.
If you did not add any acid (lemon juice, vinegar, citric acid, etc.) to tomato products and you did not follow an approved recipe or process for the right amount of time, they may be contaminated. Outside of a lab test, there is no way to know with certainty.
See this page for more information about the Acid content of common fruits and vegetables.
Summary: Typical signs of spoilage
- A bulging lid or leaking jar is a sign of spoilage.
- When you open the jar, look for:
- spurting liquid,
- an off-odor or
- mold.
Special precautions for low-Acid and Non-Acidic Foods (most vegetables, tomatoes, meats, seafood, etc.)
Improperly canned low-acid foods can contain the toxin that causes botulism without showing signs of spoilage. Low-acid foods are considered improperly canned if any of the following are true:
- The food was NOT processed in a Pressure Canner.
- The canner's gauge was INACCURATE.
- Up-to-date researched processing times and pressures were NOT used for the size of the jar, style of pack and kind of food being processed.
- Ingredients were added that were NOT in an approved recipe.
- Proportions of ingredients were CHANGED from the original approved recipe.
- The processing time and pressure were NOT correct for the altitude at which the food was canned.
Because improperly canned low-acid foods can contain the toxin that causes botulism without showing signs of spoilage, they should also be detoxified as directed above and then discarded.
Surfaces that come in contact with spoiled or questionable food should be cleaned with a solution of one part chlorine bleach to five parts water. Wet the surface with this solution and let stand five minutes before rinsing.
For more information on canning foods at home, request HGIC 3040, Canning Foods at Home; HGIC 3051, Most Frequently Asked Canning Questions; HGIC 3020, Home Canning Equipment; or HGIC 3000, Preserving Foods.
Disposing of Spoiled Foods
Detoxification process:
This is what the USDA recommends:
- Carefully place the suspect containers and lids on their sides in an 8-quart volume or larger stock pot, pan, or boiling-water canner.
- Wash your hands thoroughly.
- Carefully add water to the pot. The water should completely cover the containers with a minimum of a 1-inch level above the containers. Avoid splashing the water.
- Place a lid on the pot and heat the water to boiling.
- Boil 30 minutes to ensure detoxifying the food and all container components.
- Cool and discard the containers, their lids, and food in the trash or bury in soil.
- Thoroughly scrub all counters, containers, and equipment including can opener, clothing, and hands that may have contacted the food or containers.
- Discard any sponges or wash cloths that may have been used in the cleanup. Place them in a plastic bag and discard in the trash.
Honestly, the USDA process above looks pretty darn rigorous and time-consuming for the home canner. I usually pour the contents down the garbage disposal, rinse the jars and boil them in water for 10 minutes. I then pour the boiling water into the sink, then spray the sink with a Clorox solution and let it stand for 10 minutes before wiping up with paper towels. I put the lids and rings in a sealed trash container where children and animals cannot come in contact with them.
Adapted from the "Complete Guide to Home Canning," Agriculture Information Bulletin No. 539, USDA (Revised 1994).


Looking for canning equipment and supplies?
Water bath canner with a jar rack
Pressure canners for gas, electric and induction stoves: Presto 23Qt or T-fal 22Qt
Canning scoop (this one is PERFECT)
Ball Blue book (most recent version)
Jars: 8oz canning jars for jams
Find Other types of farms:
Farm markets and roadside stands
Road trips and camping resources
Local Honey, apiaries, beekeepers
Consumer fraud and scams information
Home canning supplies at the best prices on the internet!
Maple Syrup Farms, sugarworks, maple syrup festivals
Environmental information and resources
Farms For Your Event for birthday parties, weddings, receptions, business meetings, retreats, etc.
Festivals - local fruit and vegetable festivals
Get the
most recent version of
the Ball Blue Book
