
Looking for How to can your own homemade canned pickled cabbage (complete directions with photos ) in 2025? Scroll down this page and follow the links. And if you bring home some fruit or vegetables and want to can, freeze, make jam, salsa or pickles, see this page for simple, reliable, illustrated canning, freezing or preserving directions. There are plenty of other related resources, click on the resources dropdown above. If you are having a hard time finding canning lids, I've used these, and they're a great price & ship in 2 days.
If you have questions or feedback, please let me know! There are affiliate links on this page. Read our disclosure policy to learn more.
How to can your own homemade canned pickled cabbage (complete directions with photos )
How to Make Homemade Canned Pickled Cabbage
Click here for a pdf print version
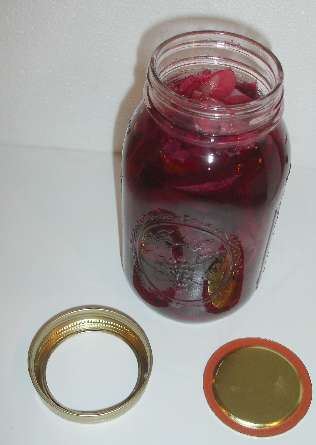
You think making and canning your own pickled cabbage is difficult or expensive? Not at all! You can do it with basic equipment already in your kitchen - you just need a canning pot. And thanks to the vinegar in pickled cabbage, you can use either a plain open water bath pot or a Pressure Canner (which will also let you can low acid vegetables!) You can use red or white cabbage (I prefer red, as shown, but many people prefer white!)
So, here's how to can pickled cabbage! The directions are complete with instructions in easy steps and completely illustrated. In the winter when you open a jar, the pickled cabbage will taste MUCH better than any store-bought canned pickled cabbage!
Prepared this way, the jars have a shelf life of about 12 months, and aside from storing in a cool, dark place, require no special attention.
Directions for Making Canned Pickled Cabbage
Ingredients
- 12 lbs of Cabbage, red or white (see step 1)
- 2 quarts (8 cups) of red wine vinegar (5% acidity)
- 1/2 cup canning or pickling salt - See this page for pickling supplies, equipment, books, crocks and additives.
- 1 cup brown sugar or Stevia (in a prepared form like Truvia, it measures same as sugar; if you use another form, you will need do your own conversion) - or Splenda, if you prefer,
- 2 cinnamon sticks
- 1/2 cup mustard seed
- 1/4 cup whole cloves - about 1 small package from the grocery store
- 1/4 cup mace
- 1/4 cup allspice (whole)
- 1/4 cup whole peppercorns
- 1/4 cup celery seed
Equipment
- Jar grabber (to pick up the hot jars)
- Jar funnel ($4 at mall kitchen stores and local "big box" stores, but it's usually cheaper online from our affiliates)
- At least 1 large pot (not exposed metal - either nonstick coated, ceramic, enamel or glass)
- Large spoons and ladles,
- Canning jars (often called Ball jars, Mason jars or Kerr jars) (Publix, Kroger, other grocery stores and some "big box" stores carry them - about $7 per dozen pint jars including the lids and rings)
- 1 Water Bath Canner OR a Pressure Canner (a large pressure pot with a lifting rack to sanitize the jars after filling about $75 to $200 at mall kitchen stores and "big box" stores, but it is cheaper online; see this page for more about pressure canners).
Recipe and Directions
Step 1 - Selecting the cabbage
The most important step! You need cabbage that are FRESH and crisp. Limp, old cabbage will make nasty tasting canned cabbage. Guests will probably throw them at you.. Select firm, crisp cabbage. Remove and discard any soft, diseased, spotted and chewed up cabbage.
How many cabbage and where to get them
You can grow your own, pick your own, or buy them at the grocery store. About 12 pounds of cabbage is typically about 3 or 4 heads and it makes about 5 quarts or 10 pints of pickled cabbage. I wouldn't use canned cabbage; what's the point: Most of the flavor is gone from them, and you can always get fresh cabbage.
Step 2 - Prepare the jars and canner
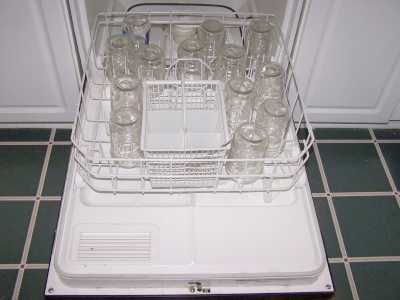 Wash
the jars and lids
Wash
the jars and lids
This is a good time to get the jars ready! The dishwasher is fine for the jars; especially if it has a "sanitize" cycle. Otherwise put the jars in boiling water for 10 minutes. I just put the lids in a small pot of almost boiling water for 5 minutes, and use the magnetic "lid lifter wand" (available from target, other big box stores, and often grocery stores; and available online - see this page) to pull them out.
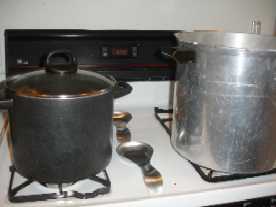
Get the canner heating up
Rinse out your canner, put the rack in the bottom, and fill it with hot tap water. (Of course, follow the instruction that came with the canner, if they are different). Put it on the stove over low heat just to get it heating up for later on.
Step 3 -Wash the cabbage!
Remove the tough outer leaves. I'm sure you can figure out how to scrub the cabbage in plain cold or lukewarm water using your hands.
Step 4 - Quarter and shred
Just take a sharp knife and cut the cabbage. in to 4 quarters, through the stem. That makes it easy to slice of the tough stem part.
Next take each quarter and either shred it in a food processor, or use a grater (or a knife) as you prefer.
Step 5 - Layer the cabbage with salt and let stand 24 hours
yep, that's right, you're going to layer the cabbage with the 1/2 cup salt (total) until both are gone, in a large bowl (preferably a glass or plastic bowl, but metal's ok, since the mixture is not acidic yet). Cover the bowl and let it stand at room temperature (unless it is a hot summer day, then use the fridge) for 24 hours.
Step 6 - Rinse and drain
Rinse the cabbage under cool water in a strainer.
Drain the shredded cabbage thoroughly on cloth or paper towel lined trays for 6 hours.
Step 7 - Combine the spices in a large pot
Mix the
- 2 quarts (8 cups vinegar) (5% acidity)
- 1 cup brown sugar (or Stevia (in a prepared form like Truvia, it measures same as sugar; if you use another form, you will need do your own conversion) - or Splenda, if you prefer, if you need a no-sugar version)
- 1/4 cup mace
- 1/2 cup mustard seed
together in a large pot, preferably a pot that does not have exposed metal (nonstick lined are ok). Don't turn the heat on yet.
Step 8 - tie the spices together in a spice bag
Using cheesecloth or a spice bag, put the
- 2 cinnamon sticks
- 1/4 cup whole cloves - about 1 small package from the grocery store
- 1/4 cup allspice (whole)
- 1/4 cup whole peppercorns
- 1/4 cup celery seed
in the bag and using a twist tie, close the bag. If you don't have cheesecloth or a spice bag, a piece of thin clean cotton, like an old tie shirt, works fine.
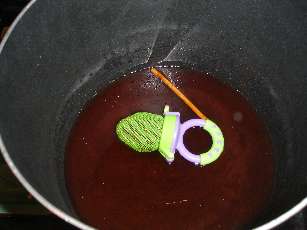 Here's
a great trick for the spices: get a baby food holder like this one,
available at Target and any baby supplies store. It is made of
plastic, and can hold the spices for easy removal later. It's
reusable and has no metal, so it won't react with the vinegar!
Here's
a great trick for the spices: get a baby food holder like this one,
available at Target and any baby supplies store. It is made of
plastic, and can hold the spices for easy removal later. It's
reusable and has no metal, so it won't react with the vinegar!
Step 9 - Cook for 5 minutes
Turn the heat on and cook it for 5 minutes from the point it starts to boil
Step 10 - Packing the cabbage in the canning jars
 Remove
the spice bag, then fill the jars. This is called "hot packing"! Fill
the jars with cabbage, leaving 1/4-inch headspace. Pack the jars fairly
tightly, but be sure to leave 1/4-inch of space at the TOP of the jar.
That is called "headspace" and is needed for expansion during heating in
the water bath.
Remove
the spice bag, then fill the jars. This is called "hot packing"! Fill
the jars with cabbage, leaving 1/4-inch headspace. Pack the jars fairly
tightly, but be sure to leave 1/4-inch of space at the TOP of the jar.
That is called "headspace" and is needed for expansion during heating in
the water bath.
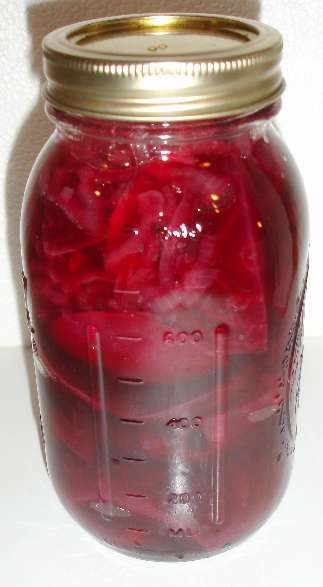
Step 11 - Pour boiling cooking liquid into each packed jar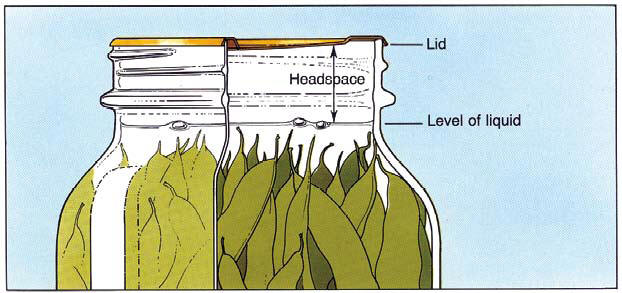
Use a ladle or pyrex measuring cup to carefully fill each packed jar with the hot vinegar solution, again allowing 1/2-inch headspace. The cabbage should be covered and there should still be 1/2 inch of airspace left in the top of each jar. Be careful not to burn yourself, (or anyone else - children should be kept back during this step!)
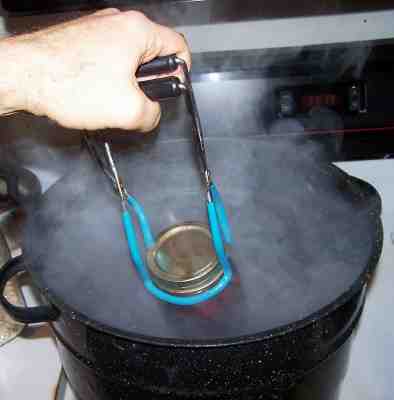
Step 12 - Put the lids and rings on
Put the lids on each jar and seal them by putting a ring on and screwing it down snugly (but not with all your might, just "snug").
Step 13 - Put the jars in the canner and the lid on the canner
Using the jar tongs, put the jars on the rack in the canner. Make sure the tops of the jars are covered by at least 1 inch of water.
Step 14 - Process for 20 minutes*
The chart below will help you determine the right processing time and pressure, if you have a different type of canner, or are above sea level. For most people, using a plain open water bath canner, the time will be 20 minutes. You can use either a plain water bath canner OR a pressure canner, since the vinegar adds so much acidity (if you can vegetables other than tomatoes without adding vinegar, you must use a pressure canner).
*Recommended Processing times For Pickled Cabbage in A Boiling Water (Open) Bath Canner |
||||||
|
PROCESS TIMES (MIN) AT ALTITUDES OF: |
||||||
| Canned Product | Style of Pack | Jar Size | 0-1000 ft. | 1001-3000 ft. | 3001-6000 ft. | Above 6000 ft. |
| Pickled Cabbage | Hot | Pints or Quarts | 20 | 25 | 30 | 35 |
|
Recommended process time for cabbage in a dial-gauge pressure canner. |
|||||
| Canner Pressure (PSI) at Various Altitudes for Dial-Type Pressure Canners | |||||
| Jar Size | Process Time | 0 - 2,000 ft | 2,001 - 4,000 ft | 4,001 - 6,000 ft | 6,001 - 8,000 ft |
| Pints | 20 min | 11 lb | 12 lb | 13 lb | 14 lb |
| Quarts | 25 | 11 | 12 | 13 | 14 |
Step 15 - Remove the jars
 Lift
the jars out of the water and let them cool on a wooden cutting board or
a towel, without touching or bumping them in a draft-free place
(usually takes overnight), here they won't be bumped. You can then
remove the rings if you like, but if you leave them on, at least loosen
them quite a bit, so they don't rust in place due to trapped moisture.
Once the jars are cool, you can check that they are sealed verifying
that the lid has been sucked down. Just press in the center, gently,
with your finger. If it pops up and down (often making a popping sound),
it is not sealed. If you put the jar in the refrigerator right away, you
can still use it. Some people replace the lid and reprocess the jar,
then that's a bit iffy. If you heat the contents back up, re-jar them
(with a new lid) and the full time in the canner, it's usually ok.
You're done!
Lift
the jars out of the water and let them cool on a wooden cutting board or
a towel, without touching or bumping them in a draft-free place
(usually takes overnight), here they won't be bumped. You can then
remove the rings if you like, but if you leave them on, at least loosen
them quite a bit, so they don't rust in place due to trapped moisture.
Once the jars are cool, you can check that they are sealed verifying
that the lid has been sucked down. Just press in the center, gently,
with your finger. If it pops up and down (often making a popping sound),
it is not sealed. If you put the jar in the refrigerator right away, you
can still use it. Some people replace the lid and reprocess the jar,
then that's a bit iffy. If you heat the contents back up, re-jar them
(with a new lid) and the full time in the canner, it's usually ok.
You're done!
Pickle Making Problems?
Some questions are answered at the bottom of this page. See this page for a more complete set of frequently asked pickling questions and answers
Other Equipment:
From left to right:
- Jar lifting tongs to pick up hot jars
- Lid lifter - to remove lids from the pot of boiling water (sterilizing )
- Lids- disposable - you may only use them once
- Ring - holds the lids on the jar until after the jars cool - then you remove them, save them and reuse them
- Canning Jar funnel - to fill the jars
Pickle Making Problems?
Frequently Asked Questions
See this page for MANY pickling questions and answers, such as reducing salt.
Q. Is it safe to can cabbage in a traditional water bath? If so how long do you do process them?
A. PICKLED cabbage, Yes! The vinegar adds the needed acidity to make it safe.
Non- pickled (i.e., no vinegar added), NO.. Quoting from the Ohio State University Extension's Fact Sheet:
"Pressure canning is the only safe method for home canning vegetables. Clostridium botulinum is the bacterium that causes botulism food poisoning in low-acid foods, such as vegetables. The bacterial spores are destroyed only when the vegetables are processed in a Pressure Canner at 240 degrees Fahrenheit (F) for the correct amount of time.Clostridium botulinum is the bacterium commonly found in vegetables and meats. It is harmless until it finds itself in a moist, low-acid, oxygen-free environment or a partial vacuum. Under these conditions, the bacterium can grow and produce toxins dangerous to people and animals.
Do not process (low acid) vegetables using the boiling water bath because the botulinum bacteria can survive that method.
Can fruits and vegetables be canned without heating if aspirin is used? No. Aspirin should not be used in canning. It cannot be relied on to prevent spoilage or to give satisfactory products. Adequate heat treatment is the only safe procedure.
Salt and sugar are not preservatives for vegetables: they are added to stabilize and improve flavor, but will not prevent spoilage.
Salicylic acid is also NOT a preservative. The University of Illinois reports:
Using Aspirin for Canning
Several years ago, a recipe circulated using aspirin to acidify tomatoes and cabbage for canning. Aspirin is not recommended for canning. While it contains salicylic acid, it does not sufficiently acidify tomatoes or cabbage for safe hot water bath canning. cabbage are low acid foods and may only be processed safely in a Pressure Canner. Lemon juice or vinegar is recommended to acidify tomato products for safe water bath processing.
Think of it like smoking. We all know someone who smoke their entire life and lived to be 90. But the cemeteries are filled with the vast majority who didn't. You will hear people say "my grandmother did it that way for 20 years". But of course, the people who died from food poisoning aren't around and often didn't have descendants to tell their tale...


Looking for canning equipment and supplies?
Water bath canner with a jar rack
Pressure canners for gas, electric and induction stoves: Presto 23Qt or T-fal 22Qt
Canning scoop (this one is PERFECT)
Ball Blue book (most recent version)
Jars: 8oz canning jars for jams
Find Other types of farms:
Farm markets and roadside stands
Road trips and camping resources
Local Honey, apiaries, beekeepers
Consumer fraud and scams information
Home canning supplies at the best prices on the internet!
Maple Syrup Farms, sugarworks, maple syrup festivals
Environmental information and resources
Farms For Your Event for birthday parties, weddings, receptions, business meetings, retreats, etc.
Festivals - local fruit and vegetable festivals
Get the
most recent version of
the Ball Blue Book
