
Looking for Canning Apples in 2025? Scroll down this page and follow the links. And if you bring home some fruit or vegetables and want to can, freeze, make jam, salsa or pickles, see this page for simple, reliable, illustrated canning, freezing or preserving directions. There are plenty of other related resources, click on the resources dropdown above. If you are having a hard time finding canning lids, I've used these, and they're a great price & ship in 2 days.
If you have questions or feedback, please let me know! There are affiliate links on this page. Read our disclosure policy to learn more.
How to Can Apples at Home - Easily
How to Can Apples at Home - Easily
Click here for a PDF print version
 You think making and canning your own
home-canned apple slices is
difficult or expensive? Not at all! Here's how to do it, complete instructions in easy steps and
completely illustrated. The canned apples will taste MUCH better than that
over-sugared tasteless glop in the can from the grocery store, and by selecting the right apples, it will be so
naturally-sweet that when you use them later in a recipe, you may not need to add any sugar at all.
Perfect to use in many recipes later!
You think making and canning your own
home-canned apple slices is
difficult or expensive? Not at all! Here's how to do it, complete instructions in easy steps and
completely illustrated. The canned apples will taste MUCH better than that
over-sugared tasteless glop in the can from the grocery store, and by selecting the right apples, it will be so
naturally-sweet that when you use them later in a recipe, you may not need to add any sugar at all.
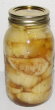
Perfect to use in many recipes later!Prepared this way, the jars have a shelf life of 18 months to 2 years, and require no special attention.
Now here's how you can, too!
Note: if, for some reason, you want to leave the peels on (generally NOT done, becaused the skins get tough, and unless the papples are organic, that's where the pesticide residues are accumulated)... but if you want to do can them with the peels on, see this page.
Ingredients
- Apples - An average of 19 pounds is needed per canner
load of 7 quart jars; an average of 12-1/4 pounds is needed per
canner load of 9 pints.
A bushel weighs 48 pounds and yields 16 to 19 quarts-an average of 2-3/4 pounds per quart. Of course, you can make fewer jars, or use pint jars instead. - Water, Sugar, apple juice or Stevia (in a prepared form like Truvia, it measures same as sugar; if you use another form, you will need do your own conversion) - or Splenda, if you prefer, (to make a solution to blanch the apples and fill around the apple slices in the jars
Equipment
- vegetable/apple peeler
- Jar grabber (to pick up the hot jars)
- Lid lifter (I like the lid rack that holds 12 lids or you can pull them out one at a time with the lid-lifter that has a magnet from the almost-boiling water where you sanitize them. ($4 at mall kitchen stores and local "big box" stores, but it's usually cheaper online from our affiliates)t)
- Jar funnel ($4 at mall kitchen stores and local "big box" stores, but it's usually cheaper online from our affiliates)t)
- At least 1 large pot
- Large spoons and ladles,
- Canning jars (often called Ball jars, Mason jars or Kerr jars) (Publix, Kroger, other grocery stores and some "big box" stores carry them - now about $12 per dozen quart jars (up 50% in 2 years!) including the lids and rings)
- 1 water bath canner (a huge pot with a lifting rack to sanitize the jars of apple pie filling after filling (about $30 to $35 at mall kitchen stores and local "big box" stores, but it's usually cheaper online from our affiliates) You CAN use a large pot instead, but the canners are deeper, and have a rack top make lifting the jars out easier. If you plan on canning every year, they're worth the investment.
Recipe and Directions
 Step 1 - Selecting the apples
The most important step! You need apples that are sweet - NOT something like Granny Smith's. Yeah, I know you like them to eat fresh, but you'd have to add a lot of sugar.
Instead, choose apples that are naturally sweet, like Gala, Fuji, Rome and always use a mixture - never just one type. This year I used 4 bushels of red delicious and one each of Fuji, Gala and Rome. This meant it was so sweet I did not need to add any sugar at all. And the flavor is great! The Fuji's and Gala's give it an aromatic flavor! Honeycrisp and Pink Lady are also excellent, sweet, flavorful apples. you may want to use firmer apples - Golden and Red delicious tend to be very soft
Step 2 - How many apples and where to get them
You can pick your own, or buy them at the grocery store. You can also get them in large quantities for prices (in 2005) in the $14 to $20 range at the real farmer's markets, like the Atlanta-Forest park Georgia State Farmer's Market and orchards in the southeast of the U.S. You will get about 14 to 18 quarts of apple pie filling per bushel of apples, depending upon bruises and size..
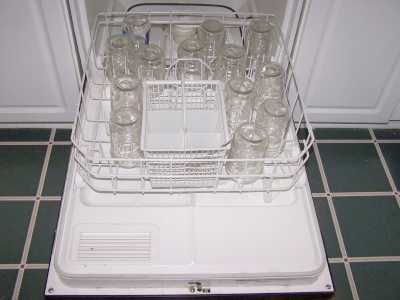 Step 3 - Wash the jars and lids
Now's a good time to get the jars ready, so you won't be rushed later. The dishwasher is fine for the jars; especially if it has a "sanitize" cycle, the water bath processing will sanitize them as well as the contents! If you don't have a dishwasher with a sanitize cycle, you can wash the containers in hot, soapy water and rinse, then sanitize the jars by boiling them 10 minutes, and keep the jars in hot water until they are used. Leave the jars in the dishwasher on "heated dry" until you are ready to use them. Keeping them hot will prevent the jars from breaking when you fill them with the hot apple pie filling.
Put the lids into a pan of hot, but not quite boiling water (that's what the manufacturer's recommend) for 10 minutes, and use the magnetic "lid lifter wand" to pull them out.
Step 4 -Wash the apples!
I'm sure you can figure out how to wash the apples in plain cold water.
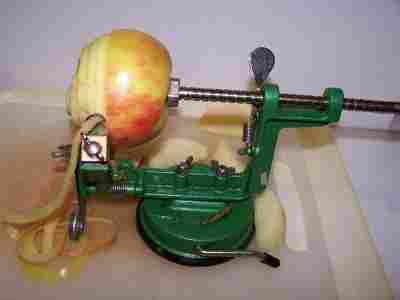 Step 5 - Peel the apples
The fastest way to peel the apples is one of these peelers! With firm apples, it takes about 20 seconds per apple. These apple peelers don't work well on soft, mushy apples or apples with soft spots on them. In that case your stuck with a hand peeler!
 Once
they're peeled, remove any remaining brown spots.
Once
they're peeled, remove any remaining brown spots.These apple peelers work absolutely great on firm apples, pears and potatoes. They don't work so well on apples that are mush or have soft spots. There are 2 types of peelers: those that have a suction base ("Back to Basics", below) and those that clamp on to the edge of a table ("Progressive" below"). I prefer the suction type as you can use it more places. Click on the links below for more info or to order one.
See here for related tools, equipment, supplies on Amazon See here for related tools, equipment, supplies on Amazon
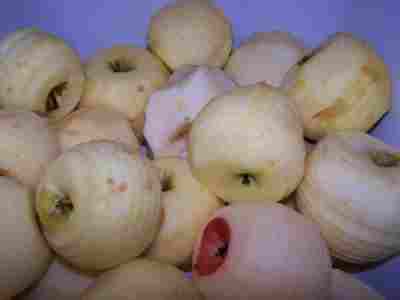
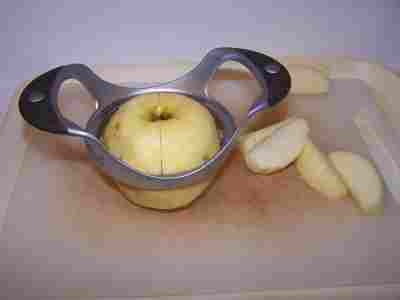 Step 6 - Core and Slice
You can use a knife, but the $5 corer/slicer you see in the photo is the easiest way to do it. The apple corer/slicer, available at almost any large grocery store, kitchen store, Bed Bath and Beyond, mall kitchen stores, Target and other local "big box" stores
With this or an ordinary knife, any slices that are between 1/4-inch and
1/2 inch thick will do.
Remove seeds, stems, any hard parts near the seeds and brown or soft
spots.
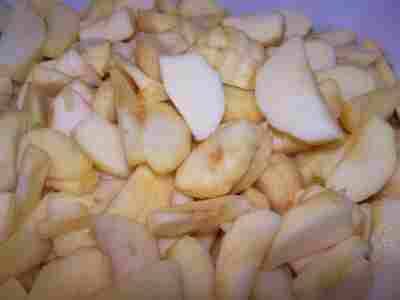
Here are the apple slices, ready for the pie filling!
These corer/slicers are fantastic. Think about it; it makes six slices in the time you can cut one with a knife AND it cores. The one sold here is better than any I've seen in the stores because it has tall handles (so you won't knock your knuckles) and is washable in the dishwasher. Click on the link below for more info or to order one.
See here for related tools, equipment, supplies on Amazon See here for related tools, equipment, supplies on Amazon See here for related tools, equipment, supplies on Amazon See here for related tools, equipment, supplies on Amazon
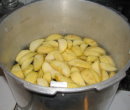 Step 7 - Blanch/cook the Apples
It's pretty simple: place 6 cups of sliced apples at a time in a large pot with 1 gallon of
- boiling water OR
- apple juice OR
- very light, light, or medium or sugar-free syrups (see this page for syrups).
Boil each batch for 5 minutes after the water returns to a boil. You're not really "cooking" the apples - just blanching and heating them. Blanching means heating the at high temperature for a brief time to stop the enzymes that can cause the flavor to degrade during storage. Raw packs (unblanched apples) make poor quality products.
Stir occasionally to prevent burning.
Step 8 - Drain
Drain
and keep the hot, cooked fruit in a covered bowl or pot.
Save
the liquid to use in step 10 to fill the void spaces in the jars!
Step 9 - Fill the jars with the apple slices
Pretty self explanatory. Fill jars with hot slices, leaving 1/2-inch headspace.
A Jar funnel helps. Gently jostle the jar and lightly press the slices to help them settle in the jar and reduce the amount of air space.
Step 10 - Pour the liquid over the apples in the jars
Fill them to within 1/2 inch of the top with hot syrup (see steps 7 and 8) or water. Wipe any spills
off of
the top, seat the lid and tighten the ring around them.
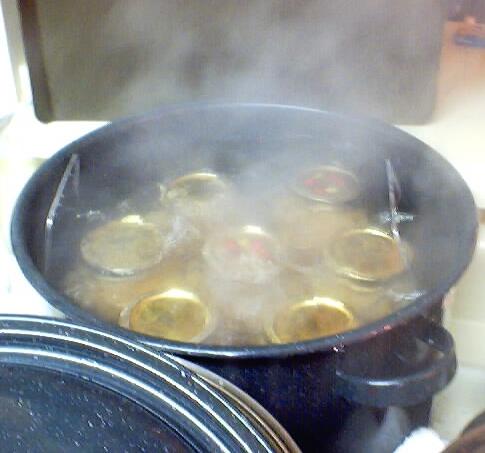 Step
11 - Process the filled jars in the water bath
Step
11 - Process the filled jars in the water bath
Put them in the canner and keep them cover with at least 1 or 2 inches of water and boiling. if you are at sea level (up to 1,000 ft) boil pint and/or quart jars for 20 minutes.
If you are at an altitude of 1,000 feet or more, or what to use a Pressure Canner, see the tables below.
Processing directions for canning sliced apples in a boiling-water, a dial, or a weighted-gauge canner are given in below
|
Table 1. Recommended process time for Apples, sliced in a boiling-water canner. |
||||
| Process Time at Altitudes of | ||||
| Jar Size | 0 - 1,000 ft | 1,001 - 3,000 ft | 3,001 - 6,000 ft | Above 6,000 |
| Pints or Quarts | 20 min | 25 | 30 | 35 |
|
Table 2. Process Times for Apples, sliced in a Dial-Gauge Pressure Canner. |
|||||
| Canner Pressure (PSI) at Altitudes of | |||||
| Jar Size | Process Time |
0 - 2,000 ft | 2,001 - 4,000 ft | 4,001 - 6,000 ft | 6,001 - 8,000 ft |
| Pints or Quarts | 8 minutes | 6 lbs/in2 | 7 lbs/in2 | 8 lbs/in2 | 9 lbs/in2 |
|
Table 3. Process Times for Apples, sliced in a Weighted-Gauge Pressure Canner. |
|||
| Canner Pressure (PSI) at Altitudes of | |||
| Jar Size | Process Time (Min) | 0 - 1,000 ft | Above 1,000 ft |
| Pints or Quarts |
8 minutes | 5 lbs/in2 | 10 bs/in2 |
This document was adapted from the "Complete Guide
to Home Canning," Agriculture Information Bulletin No. 539, USDA,
revised 1994.
Reviewed June 2006.
Other Equipment:
|
From left to right:
|
Canning kit with Stainless Steel Steam Rack,Canning Funnel, Jar Lifter, Jar Wrench, Lid Lifter, Canning Tongs, Bubble Remover Tool |
 |
Frequently Asked Questions
- Q. "I understand the entire process
with your well explained and illustrated directions. i have one question,
do i
discard the water i boil the apples in? or do i keep that water and use it to
fill the jars with after the apples are packed tightly? if i am to discard the
liquid the apples are cooked in, then do i just fill the jars with the apples
with tap water??? thanks for your help :)"
A. Step 7 tells you how to make a solution that you use to cook the apples in. Then in step 8 you drain the apples, and save the liquid to use in stee 10 to fill the air spaces around the apples in the jars! You could also use fresh water, which is boiling hot, but I can't image why anyone would want to as that would dilute the flavor.
Tips from Visitors
Preventing Browning: A visitor writes on October 11,
2016: "Hello, First off, I just came across your website, and I
think that it is great! Thank you for all of the useful information
:) I have a suggestion for your section on how to prevent sliced
apples from browning, which I learned from my aunt (I\'m not sure
where she got it from, but it works). Instead of coating them with
sugar, or dipping them in lemon juice (which can affect the flavor a
little), she stores them in pineapple juice. This prevents them from
browning, while maintaining a sweet flavor (don\'t worry, the
pineapple taste does not stand out over that of the apple). Thanks,
again, for all of the helpful information, Stephanie"
 Granite Ware 21 QT, 9 Piece Enamelware Water bath Canning Pot with Canning kit, Colander and Rack VKP Brands Water Bath AND Steam Canner, 20 Quart Stainless Steel, flat-bottomed Induction range compatible and safe for smooth top ranges. 
|
Home Canning KitsSee the seller's website for more information, features, pricing and user reviews! This is the same type of standard canner that my grandmother
used to make everything from apple pie filling to jams and jellies to tomato and
spaghetti sauce. This complete kit includes everything you need: the canner, jar rack, Jar grabber tongs,
lid lifting wand, a plastic funnel,
labels, bubble freer, and the bible of canning, the Ball Blue Book. You will never need anything else except more jars and lids! |
| See here for related tools, equipment, supplies on Amazon |
Norpro 1951 Manual Food Strainer, with optional motor; (almost identical to Victorio V250, Villaware and Roma models, all discontinued)
See the seller's website for more information, features, pricing and user reviews! |
| See here for related tools, equipment, supplies on Amazon |
Deluxe Food Strainer and Sauce Maker
|
|
|
Lids, Rings, Jars, mixes, pectin, etc.Need lids, rings and replacement jars? Or pectin to make jam, spaghetti sauce or salsa mix or pickle mixes? Get them all here, and usually at lower prices than your local store! |


Looking for canning equipment and supplies?
Water bath canner with a jar rack
Pressure canners for gas, electric and induction stoves: Presto 23Qt or T-fal 22Qt
Canning scoop (this one is PERFECT)
Ball Blue book (most recent version)
Jars: 8oz canning jars for jams
Find Other types of farms:
Farm markets and roadside stands
Road trips and camping resources
Local Honey, apiaries, beekeepers
Consumer fraud and scams information
Home canning supplies at the best prices on the internet!
Maple Syrup Farms, sugarworks, maple syrup festivals
Environmental information and resources
Farms For Your Event for birthday parties, weddings, receptions, business meetings, retreats, etc.
Festivals - local fruit and vegetable festivals
Get the
most recent version of
the Ball Blue Book
