
Looking for Apple Cider Vinegar Recipe - Make Your Own Vinegar in 2024? Scroll down this page and follow the links. And if you bring home some fruit or vegetables and want to can, freeze, make jam, salsa or pickles, see this page for simple, reliable, illustrated canning, freezing or preserving directions. There are plenty of other related resources, click on the resources dropdown above. If you are having a hard time finding canning lids, I've used these, and they're a great price & ship in 2 days.
If you have questions or feedback, please let me know! There are affiliate links on this page. Read our disclosure policy to learn more.
Apple Cider Vinegar Recipe - Make Your Own Vinegar
Apple Cider Vinegar Recipe - Make Your Own Vinegar
Yield: any quantity you want!
Click here for a PDF print version
Yes, you can make your own apple cider vinegar at home! This page shows you how. Homemade vinegar is excellent in salads, cooking, or freezer and refrigerator pickled products. Vinegar contains many vitamins and other compounds such as riboflavin, Vitamin B-1 and mineral salts from the starting material that impart vinegar with its distinct flavor. But because the acidity of homemade vinegars will vary, do not use them in foods to be canned or stored at room temperature.
Ingredients
- Apple juice or apple cider - You can make your own, or buy it ready made, fresh, bottled or frozen. You can use a mechanical or steam juicer to produce the juice / cider. To make your own juice (which is the same as plain unfermented apple cider), see this page. FYI: Apple cider is essentially apple juice that has not undergone a filtration process that removes coarse pulp or sediment." so you can use either to make apple cider vinegar. It's just semantics. You CAN make vinegar with pasteurized, commercial cider. Pasteurization kills the yeast but since we are adding new yeast anyway, it doesn't really make a difference. Just make sure your juice contains juice from apples and does not have any Potassium Sorbate added (since this stops yeast from producing).
- Yeast - Special cultivated yeasts are available for this purpose at wine-making shops and biological labs. You can use the wine/ cider yeasts sold online (click on the boxes at right--> )
Equipment
- Fermentation containers - You need very clean containers made of glass, plastic, wood, or enamel (if the enamel is without any chips or breaks in it), or stainless steel containers. Larger containers and ones that can be covered during fermentation. Some people use 5 or 10 gallon water bottles (carboys) made of glass or plastic (prefer glass), like the one shown at right. Others prefer wide mouthed 1 gallon glass jars (also shown at right) as they are easier to clean. Cylindrical shapes are recommended than a container with hard corners. Glass or ceramic containers are preferred. It is possible to use a plastic container, but some plastics can leach chemicals and are more prone to scratches and damage that can harbor harmful bacteria. If you do use a plastic container, be sure it is food-grade plastic and has not previously held non-food substances. Do not ferment in metallic containers (other than a high quality stainless steel) as they react with salt and the acids produced during fermentation.
- Cheesecloth - to cover the fermentation containers, to let air pass freely through, but to keep out insects. Yeast NEED OXYGEN so it is important not to seal the fermentation containers in a way that obstructs air in and out. Sauerkraut is sealed to keep air out during fermentation, but not vinegar - they uses different microorganisms!
- Filter media - Coffee filters or cheesecloth work fine.
Before you start, you need to know:
- All containers and tools used should be very clean!
- The temperature of fermenting cider should be kept between 60 and 80 degrees Fahrenheit (F). Temperatures below 60 F do not always produce a usable vinegar, and temperatures above 80 F interfere with the formation of the "mother of vinegar."
- Oxygen is important in the process. It is spread throughout the cider mixture by stirring the mix daily and by letting air reach the fluid through a cheesecloth filter (which is used in place of a regular lid).
- A sign of vinegar production is "Mother of vinegar"; a mat that forms on the bottom of fermenting wine (or cider). .
- Do not use a metal container when making vinegar; acid in the mixture will corrode metal or aluminum objects.
- Glass, plastic, wood, enamel (without any chips or breaks in it), or stainless steel containers should be used for making or storing vinegar.
- Vinegar is made by two distinct biological processes, both the result of the action of harmless microorganisms (yeast and "Acetobacter") that turn sugars (carbohydrates) into acetic acid
The overall process is:
- Make apple juice or apple cider.
- Ferment the juice or cider. This is called fermentation. The airborne yeasts convert the natural sugars into alcohol (hard cider). Hide this from your husband or you won't get to the vinegar stage! :) . Alcoholic fermentation occurs when yeasts change natural sugars to alcohol under controlled conditions.
- Convert the alcohol to acetic acid. This is called "acetic acid fermentation." In the second process, a group of bacteria (called "Acetobacter") converts the alcohol portion to acid. This is the acetic, or acid fermentation, that forms vinegar. Proper bacteria cultures are important; timing is important; and fermentation should be carefully controlled.
- Clarify the acetic acid to stop further fermentation and breakdown of the vinegar.
Directions - Step by Step
Step 1 - Make or buy your apple cider or apple juice
Apple juice or apple cider is the starting point for making apple cider vinegar. You can make your own, or buy it ready made, fresh, bottled or frozen. You can use a mechanical or steam juicer to produce the juice / cider. To make your own juice (which is the same as plain unfermented apple cider), see this page. Keep in mind that you want to select sweet apples, like Fuji, Delicious, Mutsu, Gala, etc. Green, unripe and unsweet apples (like Granny Smith) do not have enough sugar to make good cider vinegar.
Tips about selecting apples:
Apples used for cider don't have to be flawless. They do, however, have to be free from spoilage. You can use blemished apples and small sized apples. You can mix apple varieties together or use all one variety. The only rule is to cut out any spoilage areas on otherwise good apples. Spoiled areas will cause the juice to ferment too rapidly and will ruin the cider. Don't use apples that appear brown, decayed or moldy. Apples should be firm and ripe. Green, undermature apples cause a flat flavor when juiced. The best cider comes from a blend of sweet, tart and aromatic apple varieties. A bushel of apples yields about 3 gallons of juice.
Step 2 - Make your starter yeast
Adding yeast to activate fermentation is not essential, but will speed up the process and can produce a higher quality. Special cultivated yeasts are available for this purpose at wine-making shops and biological labs but bread yeasts are not recommended. To make a starter, crumble one cake of yeast into one quart of cider and mix. This makes enough starter for 5 gallons of cider; double the recipe proportionately when making more.
Steps 3 - Making Alcohol and Acetic Acid
Pour all of the juice or cider into one or more containers to about three-quarters capacity; do not close the lids on the containers. Instead, cover the openings with cheesecloth secured with a rubber band or string.
Step 4 - Store out of direct light, but some place with constant temperature
Stir the mixtures daily, making sure the cheesecloth is put back in place. Keep the containers away from direct sunlight and maintain the temperature at 60 to 80 degrees F.
Step 5 - Keep stirring daily, monitoring and tasting for the next 3 to 4 weeks
Full fermentation will take about 3 to 4 weeks. Near the end of this period, you should notice a vinegar-like smell. Taste samples daily until the desired strength is reached.
Step 4 - Filter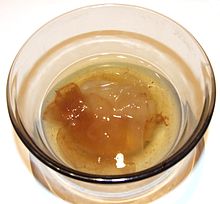
When the vinegar is fully fermented, filter the liquid through several layers of fine cheesecloth or filter paper; a coffee filter works well for this. This removes the mother of vinegar, shown at right, preventing further fermentation or spoilage of the product. Mother of vinegar is completely harmless and the surrounding vinegar does not have to be discarded because of it. It can be filtered out using a coffee filter, used to start a bottle of vinegar, or simply left in and ignored.
Step 6 - Done! Storing Your Vinegar
The vinegar is now ready for storage in separate, capped containers. Stored vinegar will stay in excellent condition almost indefinitely if it is pasteurized. To pasteurize, heat the vinegar before pouring it into sterilized bottles, or bottle, then place in a hot water bath. In both cases, the temperature of the vinegar must reach at least 140 degrees F to pasteurize the product, and should not exceed 160 degrees F. Use a cooking thermometer to ensure the correct temperature is met. Cool the containers and store at room temperature out of direct sunlight.
Want Flavored Vinegar?
Flavoring can be added to homemade vinegar just before bottling. Good examples of additives include green onions, garlic, ginger, or any combination of dried or fresh herbs. To make flavoring, place material in a small cheesecloth bag and suspend in the vinegar until desired strength is reached. This will take about 4 days, except for garlic, which takes only 1 day.
For every 2 cups of vinegar, use ONE of the following:
- 1/2 cup crushed fresh herbs,
- 1 tablespoon of dried herbs,
- 2 large cloves of garlic, or
- 8 small green onions.
Other good flavorings include:
- tarragon,
- basil,
- nasturtium,
- chives,
- mint,
- chervil,
- borage,
- hot chilies, and
- raspberries (my favorite).
Flavoring Points to Remember
Adjust the amounts to taste, but be careful not to overload the vinegar. Too much vegetable matter can destroy the acid and ruin the preservative quality of the vinegar.
Some flavorings may not go well with cider vinegar's distinct taste and color. When flavoring store-bought vinegar, use more delicate or decorative flavors. When flavoring store-bought vinegar, you will still need to pasteurize it and use sterile bottles.
Flavored vinegars taste great and have a beautiful color, making them excellent for use in salads. You will be tempted to display flavored vinegar; however, be sure to keep your bottles out of direct sunlight, which will destroy the flavor, acidity, and color of the vinegar.
References:
This recipe is based on a recipe developed by Ohio State University Extension Service,
Other Equipment:
|
From left to right:
|
See here for related tools, equipment, supplies on Amazon |
 |


Looking for canning equipment and supplies?
Water bath canner with a jar rack
Pressure canners for gas, electric and induction stoves: Presto 23Qt or T-fal 22Qt
Canning scoop (this one is PERFECT)
Ball Blue book (most recent version)
Find Other types of farms:
- Easter egg hunts
- Children's consignment sales
- Farm markets and roadside stands
- Road trips and camping resources
- Local Honey, apiaries, beekeepers
- Local Meat, Milk and Eggs
- Consumer fraud and scams information
- Home canning supplies at the best prices on the internet!
- Maple Syrup Farms, sugarworks, maple syrup festivals
- Environmental information and resources
- Farms For Your Event for birthday parties, weddings, receptions, business meetings, retreats, etc.
- Festivals - local fruit and vegetable festivals
- Pumpkin patches and corn mazes
- Christmas Tree Farms and lots
Get the
most recent version of
the Ball Blue Book
Get the
most recent version of
the Ball Blue Book of Home Canning
Find other types of farms:
- Easter egg hunts
- Children's consignment sales
- Farm markets and roadside stands
- Local Honey
- Local Meat, Milk and Eggs
- Road trip and camping
- Pumpkin patches and corn mazes
- Christmas Tree Farms and lots
- Maple Syrup farms and sugarworks
Highly rated canning supplies:
- Regular Mouth Canning Lids with food-grade with BPA Free Silicone seals for Ball, Kerr Jars for Canning
- Canning accessories kit: funnel, jar tongs, lid lifter, etc
- Food Dehydrator, 400W Electric with 8 Trays, 48 hour Timer and Temperature Control 95-176℉, BPA-Free
- Water Bath Canner, 21 Qts with lid, Jar Rack, Speckled Black, cans 7 quart jars, 9 pint jars or 13 half-pint jars
- Air Fryer: Instant Pot Instant Vortex Plus XL 8QT Clear Windows, Custom Programming, 8-in-1 Functions that Crisps, Broils, Roasts, Dehydrates, Bakes, Reheats
- Pressure canner: All American 921, 21.5qt Pressure Cooker/Canner, never needs gaskets, Great for Gas, Electric or Flat Top Stoves - Made in the USA
- The Backyard Homestead:a guide to homesteading , on 1/4 acre, how to raise grains and vegetables; raise animals for meat, eggs, and dairy; and keep honey bees
- Smart silent HEPA Air Purifiers for Home, Large Rooms for Allergies, Smoke, Pets. Eliminates 99.97% of Dust, Pet Hair, Odors
