Looking for Vegetable Stocks and Broths: Canning at home - easily! With step by step photos, recipe ingredients and costs in 2025? Scroll down this page and follow the links. And if you bring home some fruit or vegetables and want to can, freeze, make jam, salsa or pickles, see this page for simple, reliable, illustrated canning, freezing or preserving directions. There are plenty of other related resources, click on the resources dropdown above. If you are having a hard time finding canning lids, I've used these, and they're a great price & ship in 2 days.
If you have questions or feedback, please let me know! There are affiliate links on this page. Read our disclosure policy to learn more.
Vegetable Stocks and Broths: Canning at home - easily! With step by step photos, recipe ingredients and costs
How to Make Vegetable Stocks and Broths Canning at home - easily!
Canning Homemade Vegetable Stocks and Broths - Easily!
Click here for a PDF print version (coming soon!)
Making and canning your own vegetable stocks and broths is also quite easy. Just scroll down this page to see how to do it, in easy steps and completely illustrated. These directions work equally well for a variety of vegetables, dried bean or pea broth soups can all be canned. The only special equipment you need is a Pressure Canner and canning jars with new lids. Caution: Do not add noodles or other pasta, rice, flour, cream, milk or other thickening agents to home canned soups. And if dried beans or peas are used, they must be fully rehydrated first. If you want to can soups that contain only vegetables or vegetables with meat broth, see this page. Also see this page for how to can tomato soup or tomato-basil soupIngredients and Equipment
|
Optional stuff:
|
Step 1 - Collect and wash your ingredients
Select, wash, and prepare vegetables, meat and seafoods as appropriate for each type; generally just washing under running cool water.
Step 2 - Wash the jars and lids
 Now's
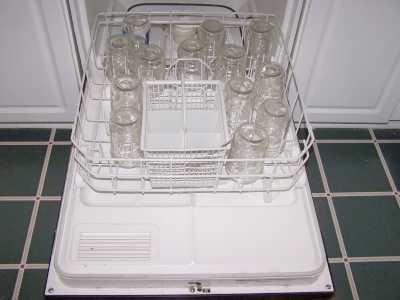
a good time to get the jars ready, so you won't be rushed later. The
dishwasher is fine for the jars; especially if it has a "sanitize" cycle,
the water bath processing will sanitize them as well as the contents! If you
don't have a dishwasher with a sanitize cycle, you can wash the containers
in hot, soapy water and rinse, then sanitize the jars by boiling them 10
minutes, and keep the jars in hot water until they are used.
NOTE: If a canning recipe calls for 10 minutes or more of process time in the canner, then the jars do not need to be "sanitized" before filling them. But really, sanitizing them first is just good hygeine and common sense! See this page for more detail about cleaning and sanitizing jars and lids.
Put the lids into a pan of hot, but not quite boiling water (that's what the manufacturer's recommend) for 10 minutes, and use the magnetic "lid lifter wand" to pull them out. Leave the jars in the dishwasher on "heated dry" until you are ready to use them. Keeping them hot will prevent the jars from breaking when you fill them with the hot jam.
Step 3 - Cook the vegetables
Cook the vegetables (simmer until soft in boiling water, or steam). For each cup of dried beans or peas, add 3 cups of water, boil 2 minutes, remove from heat, soak 1 hour, and heat to boil; drain.
Step 4 - Combine
Combine the solid ingredients (meat and vegetables) with meat broth, tomato juice, tomatoes, or water to cover.
Step 5 - Get the lids warming in hot (but not boiling) water
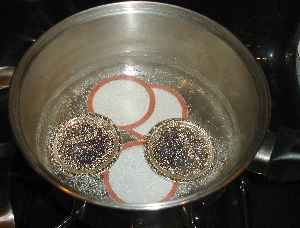 Lids:
put the lids into a pan of hot water for at least several minutes; to soften
up the gummed surface and clean the lids.

Need lids, rings and replacement jars?

Get them all here, delivered direct to your home, at the best prices on the internet!
Step 6 - Boil for 5 minutes
Boil the combined mix for 5 minutes. Caution: Do not thicken with any starch, flour or other thickeners.
Salt to taste, if desired.
Step 7 - Fill the jars and put the lid and rings on
Fill jars halfway with the solid mixture (the bottom of the pan). Add remaining liquid, leaving 1-inch headspace. . Then put the filled jars into the canner!
This is where the jar tongs come in really handy!
Step 8 - Let the canner vent steam for 10 minutes
Put the heat on high and let the steam escape through the vent for 10 minutes to purge the airspace inside the canner.
Step 9 - Put the weight on and let the pressure build
After 10 minutes of venting, put the weight on and close any openings to allow the pressure to build to 11 pounds.
Step 10 - Process the jars in the pressure canner (NOT a standard water bath canner)
Once the gauge hits 10 pounds, start your timer going - for the time in the charts below, generally 60 or 75 minutes. Adjust the heat, as needed, to maintain 10 - 14 pounds of pressure, again, as appropriate for your type of canner. You absolutely may NOT use a water bath canner . It MUST be a Pressure Canner.
Note: the charts below will help you determine the right processing time and pressure, if you have a different type of canner, or are above sea level.
Adjust lids and process following the recommendations below according to the method of pressure canner you have.
| Recommended process time for Vegetable Broths, Stocks and Soups in a dial-gauge pressure canner. | ||||||
| Canner Pressure (PSI) at Altitudes | ||||||
| Style of Pack | Jar Size | Process Time | 0 - 2,000 ft | 2,001 - 4,000 ft | 4,001 - 6,000 ft | 6,001 - 8,000 ft |
| Hot | Pints | 60* min | 11 lb | 12 lb | 13 lb | 14 lb |
| Quarts | 75* | 11 | 12 | 13 | 14 | |
| Recommended process time for Vegetable Broths, Stocks and Soups in a weighted-gauge pressure canner | ||||
| Canner Pressure (PSI) at Altitudes of | ||||
| Style of Pack | Jar Size | Process Time | 0 - 1,000 ft | Above 1,000 ft |
| Hot | Pints | 60* min | 10 lb | 15 lb |
| Quarts | 75* | 10 | 15 | |
This document was adapted from the "Complete Guide to Home Canning," Agriculture Information Bulletin No. 539, USDA, revised 2009. Reviewed November 2009.
. The Ball Blue Book uses longer processing times, but this is the most recent recipe from the USDA National Center for Home Food Preservation, while the Ball Blue Book appears not to have been recently updated.
It is important to learn how to operate your pressure canner by reading the owner's manual that came with your particular canner. If you cannot find your owner's manual, you can obtain find one online: Here is where to find some common manufacturer's manuals:
or by contacting the company that made your canner. Give the model number to the manufacturer, and they will send you the right manual. Click here for more information about pressure canners and a variety of models you can order.
Step 11 - Turn off the heat and let it cool down
When the processing time from the chart above is up, turn off the heat, and allow the pressure canner to cool and the pressure to drop to zero before opening the canner. Let the jars cool without being jostled. After the pressure drops to zero (usually, you can tell but the "click" sound of the safety release vents opening, as well as but the gauge. Let the pressure in the canner drop to zero by itself. This may take 45 minutes in a 16-quart canner filled with jars and almost an hour in a 22-quart canner. If the vent is opened before the pressure drops to zero OR if the cooling is rushed by running cold water over the canner, liquid will be lost from the jars. Too rapid cooling causes loss of liquid in the jars!
Step 12 - Remove the jars
Lift the jars out of the water and let them cool on a wooden cutting board or a towel, without touching or bumping them in a draft-free place (usually takes overnight), here they won't be bumped. You can then remove the rings if you like, but if you leave them on, at least loosen them quite a bit, so they don't rust in place due to trapped moisture. Once the jars are cool, you can check that they are sealed verifying that the lid has been sucked down. Just press in the center, gently, with your finger. If it pops up and down (often making a popping sound), it is not sealed. If you put the jar in the refrigerator right away, you can still use it. Some people replace the lid and reprocess the jar, then that's a bit iffy. If you heat the contents back up, re-jar them (with a new lid) and the full time in the canner, it's usually ok. You're done!
Once cooled, they're ready to store. I find they last up to 12 months. But after about 6 to 8 months, they get darker in color and start to get runny. They still are safe to eat, but the flavor and texture aren't as good. So eat them in the first 6 months after you prepare them!
This document was adapted from the "Complete Guide to Home Canning,"
Agriculture Information Bulletin No. 539, USDA, revised 1994.
Canning Books, Supplies and Accessories
These are my favorite essential canning tools, books and supplies. I've been using many of these for over 50 years of canning! The ones below on this page are just the sampling of. my preferred tools. but you can find much more detailed and extensive selections on the pages that are linked below.
- Vacuum Foodsealers for freezing, dried foods, and refrigerated foods - the FoodSaver line
- Selecting a KitchenAid mixer and attachments for home canning
- Steam Juicers
- Strainers, pit removers, seed-skin-stem removers, jelly strainers, etc. All types, makes and prices (from $19 to $350)
- Cherry pitters reviews, prices and ordering
- Food dehydrators - easy and fast to dry your own fruits, veggies, sun-dried tomatoes, etc.
The All New Ball Book Of Canning And Preserving: Over 350 of the Best Canned, Jammed, Pickled, and Preserved Recipes Paperback
This is THE book on canning! My grandmother used this book when I was a child.; It tells you in simple instructions how to can almost anything; complete with recipes for jam, jellies, pickles, sauces, canning vegetables, meats, etc.
If it can be canned, this book likely tells you how! Click on the link below for more information and / or to buy (no obligation to buy)The New Ball Blue Book of Canning and Preserving
Canning and Preserving for Dummies by Karen Ward
This is another popular canning book. Click here for more information, reviews, prices for Canning and Preserving For Dummies
Of course, you do not need to buy ANY canning book as I have about 500 canning, freezing, dehydrating and more recipes all online for free, just see Easy Home Canning Directions.
Home Canning Kits
See here for related tools, equipment, supplies on Amazon See here for related tools, equipment, supplies on Amazon
I have several canners, and my favorite is the stainless steel one at right. It is easy to clean and seems like it will last forever. Mine is 10 years old and looks like new.
The black ones are the same type of standard canner that my grandmother used to make everything from applesauce to jams and jellies to tomato and spaghetti sauce.
This complete kit includes everything you need and lasts for years: the canner, jar rack, Jar grabber tongs, lid lifting wand, a plastic funnel, labels, bubble freer, It's much cheaper than buying the items separately. It's only missing the bible of canning, the Ball Blue Book.
You will never need anything else except jars & lids (and the jars are reusable)!
The complete list of canners is on these pages:
- Water bath canners - Good for acidic foods, like applesauce, pickles, salsa, jams, jellies, most fruits
- Pressure canners - needed for low and non-acidic foods, like canned vegetables (corn, green beans, etc), and meats
- Canners for glass top stoves if you have a glass or ceramic stove
- Canners for induction stovetops
Pressure Canners
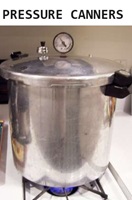
If you plan on canning non-acidic foods and low acid foods that are not pickled - this means: meats, seafood, soups, green beans corn, most vegetables, etc., then you ABSOLUTELY must use a Pressure Canner.
Of course, you can use a pressure canner as a water bath canner as well - just don't seal it up, so it does not pressurize. This means a Pressure Canner is a 2-in-1 device. With it, you can can almost ANYTHING.
There are also other supplies, accessories, tools and more canners, of different styles, makes and prices, click here!
Basic Canning Accessories
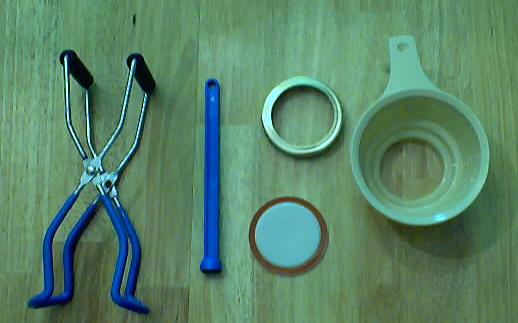
From left to right:
- Jar lifting tongs to pick up hot jars
- Lid sanitizer / lifter - to remove lids from the pot of boiling water (sterilizing )
- Lids- disposable - you may only use them once
- Ring - holds the lids on the jar until after the jars cool - then you remove them, save them and reuse them
- Canning Jar funnel - to fill the jars
FREE Illustrated Canning, Freezing, Jam Instructions and Recipes
Don't spend money on books. that you don't need to. Almost everything you can find in some book sold online or in a store is on my website here for free. Start with theEasy Home Canning Directions below. That is a master list of canning directions which are all based upon the Ball Bblue book, the National Center for Home Food Preservation and other reputable lab tested recipes. Almost every recipe I present in addition to being lab tested com. is in a step by step format with photos for each step and complete. explanations. that tell you how to do it, where to get the supplies and pretty much everything you need to know. In addition, there almost always in a PDF format so you can print them out and use them while you cook.
[ Easy Home Canning Directions]
[FAQs - Answers to common questions and problems]
[Recommended books about home canning, jam making, drying and preserving!]
Looking for canning equipment and supplies?
Water bath canner with a jar rack
Pressure canners for gas, electric and induction stoves: Presto 23Qt or T-fal 22Qt
Canning scoop (this one is PERFECT)
Ball Blue book (most recent version)
Jars: 8oz canning jars for jams
Find Other types of farms:
Farm markets and roadside stands
Road trips and camping resources
Local Honey, apiaries, beekeepers
Consumer fraud and scams information
Home canning supplies at the best prices on the internet!
Maple Syrup Farms, sugarworks, maple syrup festivals
Environmental information and resources
Farms For Your Event for birthday parties, weddings, receptions, business meetings, retreats, etc.
Festivals - local fruit and vegetable festivals
Get the
most recent version of
the Ball Blue Book
With this Presto 23 quart pressure canner and pressure cooker, you can "can" everything, fruits, vegetables, jams, jellies, salsa, applesauce, pickles, even meats, soups, stews. Model 01781

You can make jams, jellies, can fruit, applesauce, salsa and pickles with water bath canners, like this Granite Ware 12-Piece Canner Kit, Jar Rack, Blancher, Colander and 5 piece Canning Tool Set

