Looking for How to Make Home Canned Nuts (all types: peanuts, walnuts, pecans, almonds, etc.) - Easily in 2025? Scroll down this page and follow the links. And if you bring home some fruit or vegetables and want to can, freeze, make jam, salsa or pickles, see this page for simple, reliable, illustrated canning, freezing or preserving directions. There are plenty of other related resources, click on the resources dropdown above. If you are having a hard time finding canning lids, I've used these, and they're a great price & ship in 2 days.
If you have questions or feedback, please let me know! There are affiliate links on this page. Read our disclosure policy to learn more.
How to Make Home Canned Nuts (all types: peanuts, walnuts, pecans, almonds, etc.) - Easily
Yield: as many pint jars or half-pints, as you like
NOTE: Since I first published this recipe several years ago, the USDA's National Center for Home Food Preservation has taken their directions down. They provided the following explanation as a question and answer:
Q. There are no recommendations for canning nutmeats by themselves, but
is it okay to include nuts in conserves?
A. Yes, if processing
recommendations for recipes containing nuts have been properly developed
and tested as a safe canned product, there is no reason to worry about
them containing nuts as one ingredient. Nuts are a common component of
conserves, including our canned conserve recipes. Overall product and
recipe characteristics affect those canning recommendations. Although we
do not have a recommendation for canning jars of only shelled nutmeats,
we still recommend our recipes that contain nuts as one ingredient.
BOTTOM LINE: I don't think I would can nuts; I'd freeze them. If you do choose to use this recipe, you assume the risk!
Alternatively, you can store nuts in sterilized canning jars without putting them through a canning process. To store nuts this way, it's important that you heat and dry them first. Shell the nuts and spread them in a single layer on baking pans. Then place them in a 250°F oven until they are dry, but not brown or scorched, stirring occasionally. Allow them to cool at room temperature and simply put them in sterilized canning jars, covering with lids and ring bands.
Other recommendations
Sterilizing jars provides
extra protection against mold spores that could be on the jars. To sterilize
jars, submerge them in boiling water for 10 minutes. Remove them from the
water and sit them with open end down to allow them completely dry before
filling with nuts.
Be aware that with any nuts, rancidity will
eventually develop, making the product unappealing though not unsafe.
Rancidity occurs in foods when fats or oils are exposed to oxygen over time,
causing oxidation which leads to that yucky off-flavor. You might want to
buy oxygen absorber packets to put in the jars. They will get rid of some of
the oxygen, increasing their shelf-life. These packets are widely used in
the food industry in products like bacon bits, jerky, etc. Multiple sources
can be found on the Internet.
Ingredients
- Nuts - any type: peanuts, almonds, walnuts, pecans, hazelnuts, etc., and quantity.
Equipment
- 1 Water Bath Canner (a huge pot to sanitize the jars after filling (about $30 to $35 at mall kitchen stores, sometimes at big box stores and grocery stores.). Note: we sell canners and supplies here, too - at excellent prices - and it helps support this web site!
- Half pint canning jars (Grocery stores, like Publix, Kroger, Safeway carry them, as do some big box stores - about $7 per dozen 8 ounce jars including the lids and rings)
- Lids - thin, flat, round metal lids with a gum binder that seals them against the top of the jar. They may only be used once.
- Rings - metal bands that secure the lids to the jars. They may be reused many times.
- Jar grabber (to pick up the hot jars)- Big box stores and grocery stores sometimes carry them; and it is available online - see this page. It's a tremendously useful to put jars in the canner and take the hot jars out (without scalding yourself!). The kit sold below has everything you need, and at a pretty good price:
See here for related tools, equipment, supplies on Amazon
Directions - Step by Step
Step 1 - Prepare the jars and water bath canner
Wash the jars and lids
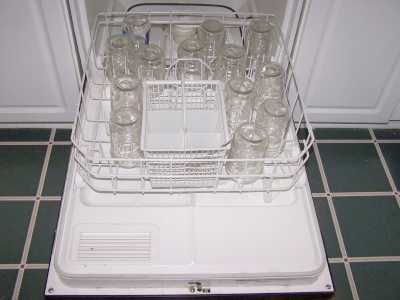
This is a good time to get the jars ready! The dishwasher is fine for the jars; especially if it has a "sanitize" cycle. Otherwise put the jars in boiling water for 10 minutes. I just put the lids in a small pot of almost boiling water for 5 minutes, and use the magnetic "lid lifter wand" (available from target, other big box stores, and often grocery stores; and available online - see this page) to pull them out.
Get the water bath canner filled and heating
Fill your water bath canner about 2/3 to 3/4 full of water and get it heating on the stove.
Start heating the oven
This is also a good time to get the oven preheating to 250°F (120°C)
Step 2 - Shell the nuts.
Perhaps it isn't obvious, but yes, you do need to shell the nuts and discard the shells (the shells make great mulch in your garden).
Step 3 - Bake the nuts
Spread a single layer of nut meats on baking pans and place in a 250°F oven. Stir the nuts occasionally, heating only until the nut meats are dry but not browned. Watch carefully that they don't scorch.
Step 4 - Pack the nuts into the jars
Pack hot nuts into half pint or pint jars, leaving 1/2 inch headspace. Do not add any liquid to the jars. Wipe jar rims. Adjust lids and process.
Step 5 - Processing the jars in the water bath canner
Process (i.e., heat sanitize the jars and their contents) in a Boiling Water Canner with the water in the canner 1 to 2 inches above the tops of the jars:
Recommended process time for Nut Meats in a boiling-water canner. |
||||
|
|
Process Time at Altitudes of |
|||
|
Jar Size |
0 - 1,000 ft |
1,001 - 3,000 ft |
3,000 - 6,000 ft |
Above 6,000 ft |
|
Half-pints or Pints |
30 min |
35 |
40 |
45 |
Step 6 - Remove the jars
Lift the jars out of the water and let them cool on a wooden cutting board or a towel, without touching or bumping them in a draft-free place (usually takes overnight), here they won't be bumped. You can then remove the rings if you like, but if you leave them on, at least loosen them quite a bit, so they don't rust in place due to trapped moisture. Once the jars are cool, you can check that they are sealed verifying that the lid has been sucked down. Just press in the center, gently, with your finger. If it pops up and down (often making a popping sound), it is not sealed. If you put the jar in the refrigerator right away, you can still use it. Some people replace the lid and reprocess the jar, then that's a bit iffy. If you heat the contents back up, re-jar them (with a new lid) and the full time in the canner, it's usually ok. You're done!
The jars of nuts are safe to store on the shelf, preferably a cool, dark
place, for 1 to 2 years.
This document was extracted from "So Easy to Preserve", 5th ed. 2006. Bulletin 989, Cooperative Extension Service, The University of Georgia, Athens. Revised by Elizabeth L. Andress. Ph.D. and Judy A. Harrison, Ph.D., Extension Foods Specialists.
Tips
Comments and Feedback:
USDA recommendation about not canning nuts:
The following is from the USDA website:
In light of recent research looking at survival of Salmonella bacteria in
low moisture foods, our concern has arisen about canning processes for nuts.
Even after drying, the nuts may be exposed to moisture during canning
processes. Although it is not likely that your particular batch of nuts is
contaminated with Salmonella, the risk is present and exposure to moisture
could be an issue.
Therefore Cooperative Extension, University of
Georgia and the National Center for Home Food Preservation no longer offer a
procedure for canning nut meats, with the single exception of our current
procedure for green peanuts. USDA canning recommendations are unaffected, as
they have no recommendations for canning nuts of any kind.
Looking for canning equipment and supplies?
Water bath canner with a jar rack
Pressure canners for gas, electric and induction stoves: Presto 23Qt or T-fal 22Qt
Canning scoop (this one is PERFECT)
Ball Blue book (most recent version)
Jars: 8oz canning jars for jams
Find Other types of farms:
Farm markets and roadside stands
Road trips and camping resources
Local Honey, apiaries, beekeepers
Consumer fraud and scams information
Home canning supplies at the best prices on the internet!
Maple Syrup Farms, sugarworks, maple syrup festivals
Environmental information and resources
Farms For Your Event for birthday parties, weddings, receptions, business meetings, retreats, etc.
Festivals - local fruit and vegetable festivals
Get the
most recent version of
the Ball Blue Book
With this Presto 23 quart pressure canner and pressure cooker, you can "can" everything, fruits, vegetables, jams, jellies, salsa, applesauce, pickles, even meats, soups, stews. Model 01781

You can make jams, jellies, can fruit, applesauce, salsa and pickles with water bath canners, like this Granite Ware 12-Piece Canner Kit, Jar Rack, Blancher, Colander and 5 piece Canning Tool Set

