Looking for How to Make Ellijay Apple Bread at Home, with yeast in 2025? Scroll down this page and follow the links. And if you bring home some fruit or vegetables and want to can, freeze, make jam, salsa or pickles, see this page for simple, reliable, illustrated canning, freezing or preserving directions. There are plenty of other related resources, click on the resources dropdown above. If you are having a hard time finding canning lids, I've used these, and they're a great price & ship in 2 days.
If you have questions or feedback, please let me know! There are affiliate links on this page. Read our disclosure policy to learn more.
How to Make Ellijay Apple Bread at Home, with yeast
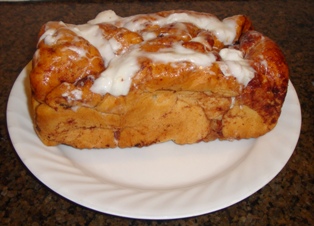 How to Make "Ellijay Apple Bread" at Home!
Blake's Ellijay Apple Bread
Click here for a PDF print version
This recipe lets you make your own apple bread that tastes just like the Ellijay apple bread, with the dough raised by yeast... without the long drive at today's gas prices to get it! (why don't they sell it in Atlanta, Chattanooga, Nashville, Charlotte and other Southern cities?)
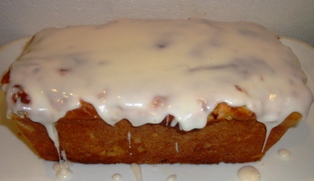
If you prefer the cake-type quick bread click here. The yeast type uses yeast to raise the dough; the quick type uses baking powder. The consensus among my group of tasters is that the yeast variety is substantially better!
The quick types are definitely faster and easier to make, but most people do prefer the yeast types. It's up to you to choose!
Plus, I've eliminated the trans-fats and much of the fat I saw listed on the ingredients on the packages of Ellijay Apple breads that I tasted, so this version ought to be healthier than anything you can buy!
Let me know which you like and any tips and tricks you learn and I'll share them here! I keep tweaking and improving the recipe each time I make, so it always gets a little better. But the version below is better than any I've had in Ellijay!
Blake's Yeast Apple Bread
Revised January 2021
Ingredients
- 1/2 cup warm water (to start the yeast)
- 2 packets of dry yeast (Fleischman's instant works best, or whichever you prefer; you will find it near the baking supplies, like baking powder and spices in the grocery store). Instant yeast will help the dough rise faster. You can also use active dry yeast, it just rises slower. Active dry yeast also must be dissolved in the milk first to activate it.
- 1 teaspoon of salt (optional)
- 2 Tablespoons Cinnamon
- 1/2 cup of sugar OR 1/2 cup of of honey or agave (for sweetness AND the yeast needs it!) I presume that diabetics could make a solution of an equvalent amount of Splenda or Stevia with a 1/2 cup of water, but I have not tried that.
- 1/3 cup of vegetable shortening (I use coconut oil; others use the trans-fat-free version of Crisco - in the green label)
- 1 and 2/3 cups of hot water
- 3/4 cup applesauce
- 2 medium sweet apples (Red Delicious, Fuji, Gala, etc.), peeled, cored, sliced and diced to yeild 1/2 cup finely sliced, chopped apples (about ⅛ inch thick, and 1/3 to 1/2 inch across; in other words, about the same size and thickness of a nickel)
- 2/3 cup of powdered milk (I use nonfat dry milk)
 (lactose intolerant? Almond milk adds nice flavor)
 - 7 to 8 cups of all-purpose flour or bread flour (but NOT self-rising flour!) White whole wheat flour works, and I would guess whole wheat does, too. I haven't yet tried a gluten-free flour like oat flour or rice flour.
Icing ingredients
- 1 cup powdered sugar (aka, confectioner's sugar), Again, diabetics might want to skip ther icing or make a sugar-free version with milk and vannila extract.
- 1 to 2 tablespoons of milk
- 1/4 teaspoon of vanilla extract

Directions
Step 1 - Activate the yeast
Dissolve the yeast in the 1/2 cup of warm water and set it aside in a warm place (room temperature is fine, unless your room is below 60 F (15 C) ), to activate the yeast.
Step 2 - Make the dough
Combine the salt, cinnamon, sugar (or honey; I prefer honey) shortening and hot water in a large bowl and mix them well with a large spoon and/or your hands.
Step 3 - Add the applesauce, dry milk and yeast mixture
 Stir in the applesauce, next the powdered milk, then the yeast/water
mixture. It will obviously be pretty soupy!
Stir in the applesauce, next the powdered milk, then the yeast/water
mixture. It will obviously be pretty soupy!

Step 4 - Gradually add the flour
Slowly add the flour, about 1 cup at a time, pausing to mix well, until it forms a stiff dough. It will start out wet, then get sticky. You want to add just enough flour to get barely get to the "sticky" stage. It will probably take about 6.5 to 7 cups of flour.
Step 5 - Knead the dough
On a lightly floured board, or countertop, knead the dough for about 10 minutes. Of course, if you have a KitchenAid (Sunbeam, or equivalent) with a dough hook, you can use that to knead the dough (much easier!)
Step 6 - Peel the apples
Peel and core 2 medium to large apples.
The fastest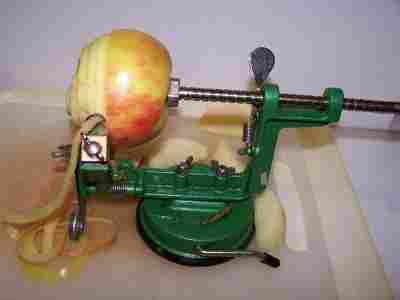 way to peel the apples is one of these peelers! If you use
the blade up (on the end of it), it also slices and cores the apples, in
addition to peeling! With firm
apples, it takes about 20 seconds per apple. These apple peelers don't work
well on soft, mushy apples or apples with soft spots on them. In that case
your stuck with a hand peeler!
way to peel the apples is one of these peelers! If you use
the blade up (on the end of it), it also slices and cores the apples, in
addition to peeling! With firm
apples, it takes about 20 seconds per apple. These apple peelers don't work
well on soft, mushy apples or apples with soft spots on them. In that case
your stuck with a hand peeler!
Step 7 - Dice the apples
I like pieces that are about 1/8 inch thick and 1/4 to 1/2 inch across. Mix the apple pieces into the dough.
Step 8 - Let the dough rise until doubled in size
 Put the dough in a large bowl covered with cling film (plastic wrap) and set it in a warm place (80 F to 110 F) to rise.
(covering it with cloth doesn't work well, the dough gets stuck in the cloth forever!) I turn the
oven on for 5 minutes at 200 F to get it warm, then turn it off and put
the bowl of dough in there.
Put the dough in a large bowl covered with cling film (plastic wrap) and set it in a warm place (80 F to 110 F) to rise.
(covering it with cloth doesn't work well, the dough gets stuck in the cloth forever!) I turn the
oven on for 5 minutes at 200 F to get it warm, then turn it off and put
the bowl of dough in there.
Step 9 - Punch the dough down
When the dough has rise to about double in size, uncover the dough and with your fists, punch it down. You can shape the dough into a likeness of your mother-in-law before you punch it down, but that is strictly optional.
Step 10 - Let the dough rise again
 Cover the bowl again and put it back in the warm place (80 F to 110
F) to rise again, until it has doubled in size.
Cover the bowl again and put it back in the warm place (80 F to 110
F) to rise again, until it has doubled in size.

Step 11 - Grease the bread loaf pans
While the dough is rising, take 2 standard bread loaf pans (9" x 5") and lightly grease (using shortening or butter) and then "flour" (put 3 tablespoons of lour in and shake it around, then dump the excess out) them.
Step 12 - Make the loaves
Split the dough into 2 equal halves, then shape each half into a bread loaf that will fit in the pan (i.e., make an oblong/rectangle shape)
Step 13 - Let the loaves rise
 Put the two loaves back in the warm place (80 F to 110 F) to rise
until they are just 1/2 inch to 1 inch above the top of the pans. This usually takes about
30 minutes. If you have two ovens, get the other oven heating to 350 F.
Put the two loaves back in the warm place (80 F to 110 F) to rise
until they are just 1/2 inch to 1 inch above the top of the pans. This usually takes about
30 minutes. If you have two ovens, get the other oven heating to 350 F.
Step 14 - Make the icing
Do this while the loaves are rising. This is easy! Just put 1 cup of powdered sugar in a bowl, add 1/4 teaspoon vanilla extract and then 1 tablespoon milk. If it it still too thick, add just a teaspoon of milk. It takes very little milk to liquefy the sugar!
Step 15 - Back until golden brown
 Some
people like to put thinly sliced pieces of apples on top of the loaves
just before baking them.
Some
people like to put thinly sliced pieces of apples on top of the loaves
just before baking them.
Bake in the 350 F oven for about 25 to 35 minutes. The crust should be golden brown and a thermometer inserted should read between 185 F and 200 F. A convection oven is ideal for bread since there are no hot spots, otherwise put it in the center of the oven and check on it so you can pull it out when it hits a nice golden brown.
Step 16 - Turn out on a cooling rack

Turn the loaf out of the pan and rest it on its side on a cooling rack for 45 minutes to 1 hour.
Step 17 - Icing
While it is cooling you can spoon the icing over the top!


Looking for canning equipment and supplies?
Water bath canner with a jar rack
Pressure canners for gas, electric and induction stoves: Presto 23Qt or T-fal 22Qt
Canning scoop (this one is PERFECT)
Ball Blue book (most recent version)
Jars: 8oz canning jars for jams
Find Other types of farms:
Farm markets and roadside stands
Road trips and camping resources
Local Honey, apiaries, beekeepers
Consumer fraud and scams information
Home canning supplies at the best prices on the internet!
Maple Syrup Farms, sugarworks, maple syrup festivals
Environmental information and resources
Farms For Your Event for birthday parties, weddings, receptions, business meetings, retreats, etc.
Festivals - local fruit and vegetable festivals
Get the
most recent version of
the Ball Blue Book
