
Looking for How to Make Homemade Reduced Sodium, No Sugar Kosher Dill Pickles - Easily! in 2024? Scroll down this page and follow the links. And if you bring home some fruit or vegetables and want to can, freeze, make jam, salsa or pickles, see this page for simple, reliable, illustrated canning, freezing or preserving directions. There are plenty of other related resources, click on the resources dropdown above. If you are having a hard time finding canning lids, I've used these, and they're a great price & ship in 2 days.
If you have questions or feedback, please let me know! There are affiliate links on this page. Read our disclosure policy to learn more.
How to Make Homemade Reduced Sodium, No Sugar Kosher Dill Pickles - Easily!
How to Make Homemade Reduced Sodium, No Sugar Kosher Dill Pickles - Easily! With Step-by-step Directions, Photos, Ingredients, Recipe s
Yield: 6 quart jars
Click here for a PDF print version
Making and canning your own reduced sodium low calorie kosher dill pickles is one of the easiest things you can do with your cucumbers! If you are on a restricted salt diet, this is the recipe for you. Here's how to do it, in easy steps and completely illustrated. It is much faster than the old method your grandmother used with tons of pickling salt and de-scumming the brine! Ugh! This method is so easy, ANYONE can do this! It's a great thing to do with your kids!
The only downside to low-salt pickles is the salt brining process typically adds crispness. So, the way around this is to make these as refrigerator pickles. Instead of processing them in the canner, just pop them into the fridge.
I've added free labels for your jars here, in a Word format! Just download, edit, and print in label paper.
Ingredients
- Cucumbers - 4 or 5 lbs of fresh, crisp pickling cucumbers - not wilted, soft or overripe!
- Sweetener - OPTIONAL -sweetener does not provide preserving capability in this recipe - 1 cups -of Stevia (in a prepared form like Truvia, it measures same as sugar; if you use another form, you will need do your own conversion) - or Splenda, if you prefer)
- Pickling salt - 2 tablespoons - (available at most grocery stores)
- 2 tbsp whole mixed "pickling spice" (again, it's available from
Kroger
 , Publix, local "big box" stores and large grocery stores).
This is NOT a Mrs Wages or Ball packet, it is natural pickling spices,
just pre-mixed.
, Publix, local "big box" stores and large grocery stores).
This is NOT a Mrs Wages or Ball packet, it is natural pickling spices,
just pre-mixed. - 7 heads of fresh dill (1 head per pint jar) or, if you can't get fresh dill (it's SO easy to grow, plant it next to your cucumbers) just use 2 tbsp dill seed per pint jar.
- 7 teaspoons dill seed
- 3 clove purred garlic (about a 1/2 teaspoon),
- 1 teaspoon red pepper flakes
- Cheesecloth or a spice bag, or even a small piece of a old, but clean cotton shirt - to hold the spices
- Clear vinegar - 6 cups of 5% vinegar, apple cider vinegar works well. Store brand is about $1.25 for a 64 oz bottle.
Equipment
- Jar grabber (to pick up the hot jars)
- Lid lifter (I like the lid rack that holds 12 lids or you can pull them out one at a time with the lid-lifter that has a magnet from the almost-boiling water where you sanitize them. ($4 at Target, other big box stores, and often grocery stores; and available online - see this page)
- Large spoons and ladles,
- Jar funnel ($5 at Target, other big box stores, and often grocery stores; and available online - see this page)
- 1 large pot; Nonstick ceramic coated pots for easy cleanup.
- 1 Water Bath Canner (a huge pot to sanitize the jars after filling (about $30 to $35 at mall kitchen stores, sometimes at big box stores and grocery stores.). Note: we sell many sizes and types of canners for all types of stoves and needs - see canning supplies
- Pint canning jars (Ball or Kerr jars can be found at grocery stores, like Safeway, Publix, Kroger, grocery stores, even online - about $13 per dozen 8-ounce jars, more for quilted design or larger jars, including the lids and rings). Be sure to get wide mouth jars to fit the pickles in! Pint size works best!
- Lids - thin, flat, round metal lids with a gum binder that seals them against the top of the jar. They may only be used once.
- Rings - metal bands that secure the lids to the jars. They may be reused many times.
- See this page for pickling supplies, equipment, books, crocks and additives. If you want to make your own seasoning see this page!
Directions - How to Make Pickles
Step 1 - Selecting the cucumbers
 It's fun to go pick your own and you can obviously get better
quality cucumbers!
It's fun to go pick your own and you can obviously get better
quality cucumbers!
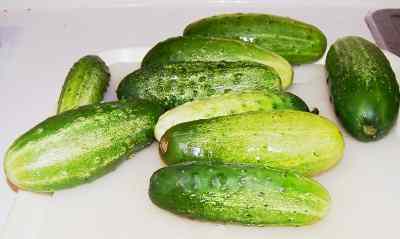
At right is a of picture cucumbers from my garden - they are SO easy to grow. But be sure to grow the varieties that are labeled "pickling cucumbers" - they will be much more crisp!
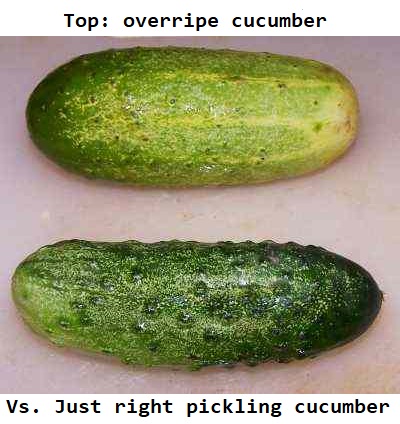 The
picture at right shows a good cucumber for pickling (bottom) and a bad one
(top). The good one is dark green, firm, and not bloated. It
has lots of warts!
The
picture at right shows a good cucumber for pickling (bottom) and a bad one
(top). The good one is dark green, firm, and not bloated. It
has lots of warts!
The bad one is overripe, it has yellow or white areas in the skin, and the warts are almost all gone. If you cut it open, you will see developed seeds. You don't want seeds!
For cucumber pickles, use cucumbers intended for pickling that are no more then 2 inches in diameter. Start with crisp raw vegetable varieties to get crisp pickled vegetables.
The most important factor in getting crisp pickled vegetables is to start with fresh, just-picked vegetables. Overripe cucumbers make mushy pickles. Vegetables become soft as their pectin structure changes due to microbial activity, excess heat or improper handling. As each day passes, vegetables lose crispness. Once a vegetable is soft it cannot be made firm again.
Step 2 - How many cucumbers?
It takes about 3 or 4 cucumbers to fill a pint jar. Each cucumber is about 4 - 5 inches long and you will cut off the ends so they will fit with 1/4-inch to spare..
Step 3 -Wash and cut the vegetables!
 I'm sure you can figure out how to wash the fruit in plain
cold water.
I'm sure you can figure out how to wash the fruit in plain
cold water.
You will need to cut the ends off (about 1/4-inch, the blossom harbors microbes that can cause softening) and then slice them lengthwise if you like spears.
You can also leave them whole or cut them cross-wise for bread-and-butter pickles.
Set them aside for use in step 8.
Step 4 - Get the
jars and lids sanitizing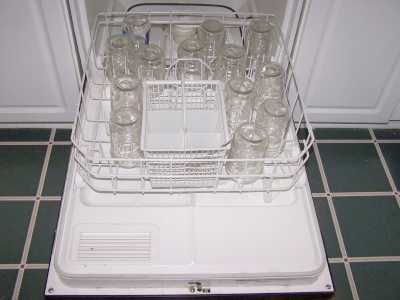
The dishwasher is fine for the jars; especially if it has a "sanitize" cycle.
I get that going while I'm preparing everything else, so it's done by the
time I'm ready to fill the jars. If you don't have a
dishwasher, submerge the jars in a large pot (the canner itself) of
water and bring it to a boil.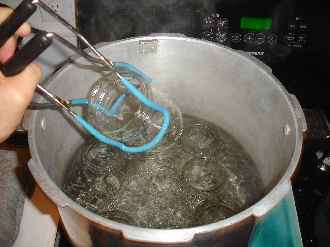
Be sure to let it go through the rinse cycle to get rid of any soap!
Get the canner heating up
Fill the canner about 1/2 full of water and start it heating (with the lid on).
Start the water for the lids
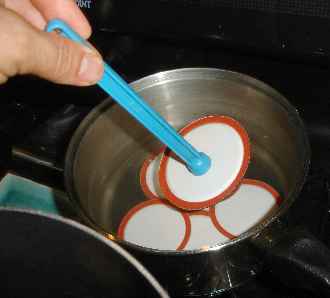 Put the lids into a pan of hot, but not quite boiling water for at least
several minutes. Note: everything gets
sanitized in the water
bath (step 7)
anyway, so this just helps to ensure
there is no spoilage later!)
Put the lids into a pan of hot, but not quite boiling water for at least
several minutes. Note: everything gets
sanitized in the water
bath (step 7)
anyway, so this just helps to ensure
there is no spoilage later!)
 Need lids, rings and replacement jars?
Get them all here, delivered direct to your home, at the best prices on the internet!
Step 5 - Mix the salt, water and vinegar in a pot and bring to a boil
Combine the
- Sweetener - OPTIONAL - the sweetener does not provide preserving capability in this recipe - 1 cups -of Stevia (in a prepared form like Truvia, it measures same as sugar; if you use another form, you will need do your own conversion) - or Splenda, if you prefer)
- Pickling salt - 2 tablespoons - (available at most grocery stores)
- 2 tbsp whole mixed "pickling spice" (again, it's available from
Kroger, Publix, local "big box" stores and large grocery stores).
This is NOT a Mrs Wages or Ball packet, it is natural pickling spices,
just pre-mixed.
- 7 heads of fresh dill (about 1 head per pint jar) or, if you can't get fresh dill (it's SO easy to grow, plant it ne
- Clear vinegar - 6 cups of 5% vinegar, apple cider vinegar works well. Store brand is about $1.25 for a 64 oz bottle
in a pot and bring to a boil. Be sure to use a NON-metal pot - or a coated metal (teflon, silverstone, enamel, etc.) without breaks in the coating. the metal reacts with the vinegar and makes the pickle solution turn cloudy.
Note: If more brine is needed, mix in same proportion. If brine is too tart, add sugar. Do not add water
Step 6 - Pack the sliced cucumbers into the jars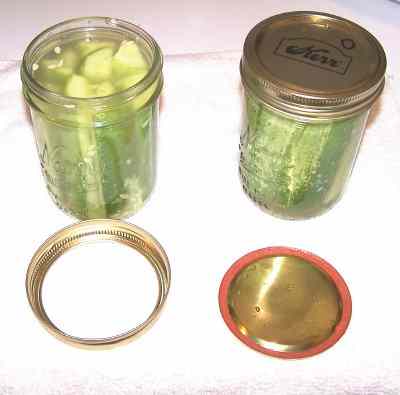
Pack cucumbers into the clean quart canning jars. For extra flavor and appearances, to each jar, add
- 1 small heads fresh dill,
- 1 teaspoon dill seed,
- 1/2 clove purred garlic (about a 1/2 teaspoon), and
- 1/8 teaspoon red pepper.
Step 7 - Fill the jars with cucumbers and put the lid and rings on
Pour boiling solution of vinegar and spices over cucumbers in sterile jars, leaving 1/2 inch headspace.
Seat the lid and hand-tighten the ring around them.
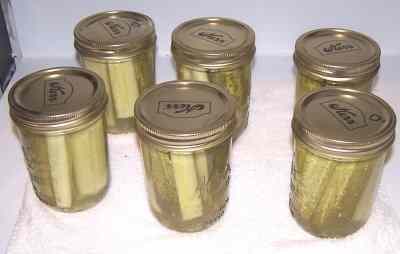
Step 8 - Boil the jars in the canner
Or just put them in the fridge and they will keep for months. To can them as shelf-stable jars, put them in the canner and keep them covered with at least 1 inch of water. Keep the water boiling. Once the water returns to a boil, boil the jars for 15 minutes.
|
Type of pickling method |
Jar size | 0 to 1,000 ft above sea level | 1,001 to 6,000 ft above sea level |
| Quick process, (raw cucumbers put in the jar, hot liquid poured over them)- | pint | 15 min | 20 min |
Step 9 - Done
After processing, take canner off heat. Remove lid. Wait 5 minutes before removing jars.
 Lift the jars out of the water and let them cool without touching or
bumping them in a draft-free place (usually takes overnight) You can then remove the rings if you like, but if you leave them on, at least loosen them quite a bit, so they don't rust in place due to trapped moisture. Once the jars are cool, you can check that they are sealed verifying that the lid has been sucked down. Just press in the center, gently, with your finger. If it pops up and down (often making a popping sound), it is not sealed. If you put the jar in the refrigerator right away, you can still use it. Some people replace the lid and reprocess the jar, then that's a bit iffy. If you heat the contents back up, re-jar them (with a new lid) and the full time in the canner, it's usually ok.
Lift the jars out of the water and let them cool without touching or
bumping them in a draft-free place (usually takes overnight) You can then remove the rings if you like, but if you leave them on, at least loosen them quite a bit, so they don't rust in place due to trapped moisture. Once the jars are cool, you can check that they are sealed verifying that the lid has been sucked down. Just press in the center, gently, with your finger. If it pops up and down (often making a popping sound), it is not sealed. If you put the jar in the refrigerator right away, you can still use it. Some people replace the lid and reprocess the jar, then that's a bit iffy. If you heat the contents back up, re-jar them (with a new lid) and the full time in the canner, it's usually ok.
When can you start eating the pickles? Well, it takes some time for the seasonings to be absorbed into the pickles. Pickles should be ready to eat in 6 weeks or so.
Reference: University of Oregon Extension Service
Pickle Making Problems?
See this page for a more complete set of frequently asked pickling questions and answers
Home Canning Kits
This is the same type of standard canner that my grandmother used to make everything from applesauce to jams and jellies to tomato and spaghetti sauce. This complete kit includes everything you need and lasts for years: the canner, jar rack, Jar grabber tongs, lid lifting wand, a plastic funnel, labels, bubble freer, and the bible of canning, the Ball Blue Book. It's much cheaper than buying the items separately. You will never need anything else except jars & lids (and the jars are reusable)! There is also a simple kit with just the canner and rack, and a Pressure Canner, if you want to do vegetables (other than tomatoes). To see more canners, of different styles, makes and prices, click here!
Summary - Cost of Making Homemade Pickles - makes 6 pint jars, 16 oz each* |
||||
| Item | Quantity | Cost in 2024 | Source | Subtotal |
| Cucumbers | 4 lbs - about 3 or 4 per pint jar) | free from the garden, or $3.00 at a PYO | Pick your own | $3.00 |
| Canning jars (pint size, wide mouth), includes lids and rings | 6 pint jars | $7.00/dozen | Grocery stores (Publix, Kroger, Safeway, etc.) | $3.50 |
| Vinegar | 6 cups | $1.50 | Safeway, Publix, Kroger, grocery stores |
$1.50 |
| Sugar | 2 cups | $4.00 per 5 lb bag | Safeway, Publix, Kroger, grocery stores |
$1.00 |
| Dill | 6 heads | free or $2.00 | Your garden or grocery store | $2.00 |
| Pickle spice | 2 tablespoons | $3.00 per package | Grocery stores (Publix, Kroger, Safeway, etc.) | $0.50 |
| Total | $11.00 total or maximum of $1.83 per jar INCLUDING the jars - which you can reuse! |
|||
|
* - This assumes you already have the pots, pans, ladles,, and reusable equipment. Note that you can reuse the jars! Many products are sold in jars that will take the lids and rings for canning. For example, Classico Spaghetti sauce is in quart sized jars that work with Ball and Kerr lids and rings. Note that the Classico's manufacturer does not recommend reuse of their jars: see what they have to say on this page: |
||||
How to make other pickles - recipes and instructions:
- Refrigerator pickles (no canning required)
- Cucumber pickle relish
- Pickled beets
- Pickled green beans
- Pickled dilled okra
Can't find the equipment? We ship to all 50 states! Use our Feedback form!
Answers to Common Questions
Click here for the page of frequently asked questions (with answers) about making pickles.
Canning Books, Supplies and Accessories
These are my favorite essential canning tools, books and supplies. I've been using many of these for over 50 years of canning! The ones below on this page are just the sampling of. my preferred tools. but you can find much more detailed and extensive selections on the pages that are linked below.
- Vacuum Foodsealers for freezing, dried foods, and refrigerated foods - the FoodSaver line
- Selecting a KitchenAid mixer and attachments for home canning
- Steam Juicers
- Strainers, pit removers, seed-skin-stem removers, jelly strainers, etc. All types, makes and prices (from $19 to $350)
- Cherry pitters reviews, prices and ordering
- Food dehydrators - easy and fast to dry your own fruits, veggies, sun-dried tomatoes, etc.
The All New Ball Book Of Canning And Preserving: Over 350 of the Best Canned, Jammed, Pickled, and Preserved Recipes Paperback
This is THE book on canning! My grandmother used this book when I was a child.; It tells you in simple instructions how to can almost anything; complete with recipes for jam, jellies, pickles, sauces, canning vegetables, meats, etc.
If it can be canned, this book likely tells you how! Click on the link below for more information and / or to buy (no obligation to buy)The New Ball Blue Book of Canning and Preserving
Canning and Preserving for Dummies by Karen Ward
This is another popular canning book.
Click
here for more information, reviews, prices for Canning and Preserving For Dummies
Of course, you do not need to buy ANY canning book as I have about 500 canning, freezing, dehydrating and more recipes all online for free, just see Easy Home Canning Directions.
Home Canning Kits
I have several canners, and my favorite is the stainless steel one at right. It is easy to clean and seems like it will last forever. Mine is 10 years old and looks like new.
The black ones are the same type of standard canner that my grandmother used to make everything from applesauce to jams and jellies to tomato and spaghetti sauce.
This complete kit includes everything you need and lasts for years: the canner, jar rack, Jar grabber tongs, lid lifting wand, a plastic funnel, labels, bubble freer, It's much cheaper than buying the items separately. It's only missing the bible of canning, the Ball Blue Book.
You will never need anything else except jars & lids (and the jars are reusable)!
The complete list of canners is on these pages:
- Water bath canners - Good for acidic foods, like applesauce, pickles, salsa, jams, jellies, most fruits
- Pressure canners - needed for low and non-acidic foods, like canned vegetables (corn, green beans, etc), and meats
- Canners for glass top stoves if you have a glass or ceramic stove
- Canners for induction stovetops
Pressure Canners
If you plan on canning non-acidic foods and low acid foods that are not pickled - this means: meats, seafood, soups, green beans corn, most vegetables, etc., then you ABSOLUTELY must use a Pressure Canner.
Of course, you can use a pressure canner as a water bath canner as well - just don't seal it up, so it does not pressurize. This means a Pressure Canner is a 2-in-1 device. With it, you can can almost ANYTHING.
There are also other supplies, accessories, tools and more canners, of different styles, makes and prices, click here!

Basic Canning Accessories
From left to right:
- Jar lifting tongs to pick up hot jars
- Lid lifter - to remove lids from the pot of boiling water (sterilizing )
- Lids- disposable - you may only use them once
- Ring - holds the lids on the jar until after the jars cool - then you remove them, save them and reuse them
- Canning Jar funnel - to fill the jars
FREE Illustrated Canning, Freezing, Jam Instructions and Recipes
Don't spend money on books. that you don't need to. Almost everything you can find in some book sold online or in a store is on my website here for free. Start with theEasy Home Canning Directions below. That is a master list of canning directions which are all based upon the Ball Bblue book, the National Center for Home Food Preservation and other reputable lab tested recipes. Almost every recipe I present in addition to being lab tested com. is in a step by step format with photos for each step and complete. explanations. that tell you how to do it, where to get the supplies and pretty much everything you need to know. In addition, there almost always in a PDF format so you can print them out and use them while you cook.
[ Easy Home Canning Directions]
[FAQs - Answers to common questions and problems]
[Recommended books about home canning, jam making, drying and preserving!]


Looking for canning equipment and supplies?
Water bath canner with a jar rack
Pressure canners for gas, electric and induction stoves: Presto 23Qt or T-fal 22Qt
Canning scoop (this one is PERFECT)
Ball Blue book (most recent version)
Find Other types of farms:
- Easter egg hunts
- Children's consignment sales
- Farm markets and roadside stands
- Road trips and camping resources
- Local Honey, apiaries, beekeepers
- Local Meat, Milk and Eggs
- Consumer fraud and scams information
- Home canning supplies at the best prices on the internet!
- Maple Syrup Farms, sugarworks, maple syrup festivals
- Environmental information and resources
- Farms For Your Event for birthday parties, weddings, receptions, business meetings, retreats, etc.
- Festivals - local fruit and vegetable festivals
- Pumpkin patches and corn mazes
- Christmas Tree Farms and lots
Get the
most recent version of
the Ball Blue Book
Get the
most recent version of
the Ball Blue Book of Home Canning
Find other types of farms:
- Easter egg hunts
- Children's consignment sales
- Farm markets and roadside stands
- Local Honey
- Local Meat, Milk and Eggs
- Road trip and camping
- Pumpkin patches and corn mazes
- Christmas Tree Farms and lots
- Maple Syrup farms and sugarworks
Highly rated canning supplies:
- Regular Mouth Canning Lids with food-grade with BPA Free Silicone seals for Ball, Kerr Jars for Canning
- Canning accessories kit: funnel, jar tongs, lid lifter, etc
- Food Dehydrator, 400W Electric with 8 Trays, 48 hour Timer and Temperature Control 95-176℉, BPA-Free
- Water Bath Canner, 21 Qts with lid, Jar Rack, Speckled Black, cans 7 quart jars, 9 pint jars or 13 half-pint jars
- Air Fryer: Instant Pot Instant Vortex Plus XL 8QT Clear Windows, Custom Programming, 8-in-1 Functions that Crisps, Broils, Roasts, Dehydrates, Bakes, Reheats
- Pressure canner: All American 921, 21.5qt Pressure Cooker/Canner, never needs gaskets, Great for Gas, Electric or Flat Top Stoves - Made in the USA
- The Backyard Homestead:a guide to homesteading , on 1/4 acre, how to raise grains and vegetables; raise animals for meat, eggs, and dairy; and keep honey bees
- Smart silent HEPA Air Purifiers for Home, Large Rooms for Allergies, Smoke, Pets. Eliminates 99.97% of Dust, Pet Hair, Odors
