
Looking for How to can Mixed fruit in 2024? Scroll down this page and follow the links. And if you bring home some fruit or vegetables and want to can, freeze, make jam, salsa or pickles, see this page for simple, reliable, illustrated canning, freezing or preserving directions. There are plenty of other related resources, click on the resources dropdown above. If you are having a hard time finding canning lids, I've used these, and they're a great price & ship in 2 days.
If you have questions or feedback, please let me know! There are affiliate links on this page. Read our disclosure policy to learn more.
How to can Mixed fruit
How to Make Homemade Canned Mixed Fruit, using any combination of Peaches, Plums, Pears, Plums, Nectarines and Cherries
Click here for a PDF print version
You can make your own homemade, home-canned fruit cup mixture. No chemical additives, no preservatives, shelf stable for a couple of years, and using any proportion you like of apricots, cherries, grapefruit, grapes, peaches, pears, pineapple, plums, and/or nectarines! Not at all! Here's how to do it, complete instructions in easy steps and completely illustrated. In the winter when you open a jar, the peaches will taste MUCH better than anything you've ever had from a store, and by selecting the right fruit, it will use less sugar than store-bought canned fruit cup mixtures and it can be packed in very light, light or medium sugar syrup. They can also be packed in water, apple juice or white grape juice.
Prepared this way, the jars have a shelf life of about 12 to 24 months, and aside from storing in a cool, dark place, require no special attention. If you'd rather freeze your fruit, see my page on how to freeze peaches, plums, nectarines, figs and cherries. Even easier than canning and they will taste just like fresh.. but it does take up space in the freezer. You may want to make make your own home canned peach pie filling to use in the winter, too.
And here are some great and easy peach desert recipes!
Directions for Making Home-Canned Mixed Fruit or Fruit Cup; using apricots, cherries, grapefruit, grapes, peaches, pears, pineapple, plums, and/or nectarines
Ingredients
- Fruit (see step 1) 2 - 4 lbs (after removing pits, stones, skins, stems, etc.) of any mix of apricots, cherries, grapefruit, grapes, peaches, pears, pineapple, plums, and/or nectarines
- Sugar (or fruit juice, or Stevia; or if you prefer, Splenda), or just water!) see step 3
Equipment
-
1 water bath canner (a huge pot with a lifting rack to sanitize the jars of peaches after filling (about $30 to $35 at mall kitchen stores and local "big box" stores, but it's usually cheaper online from our affiliates) You CAN use a large pot instead, but the canners are deeper, and have a rack top make lifting the jars out easier. If you plan on canning every year, they're worth the investment.;
OR
a Pressure Canner
You can use either with this recipe. The processing times for each are given in the recipe. - Jar grabber (to pick up the hot jars)
- Lid lifter (I like the lid rack that holds 12 lids or you can pull them out one at a time with the lid-lifter that has a magnet from the almost-boiling water where you sanitize them. ($4 at mall kitchen stores and local "big box" stores, but it's usually cheaper online from our affiliates)
- Jar funnel ($4 at mall kitchen stores and local "big box" stores, but it's usually cheaper online from our affiliates)
- At least 1 large pot
- Large spoons and ladles,
- Canning jars (often called Ball jars, Mason jars or Kerr jars) (Publix, Kroger, other grocery stores and some "big box" stores carry them - now about $12 per dozen quart jars (up 50% in 2 years!) including the lids and rings)
Recipe and Directions
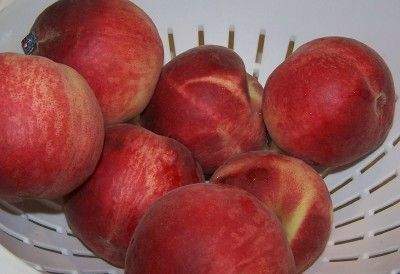
Step 1 - Selecting the apricots, cherries, grapefruit, grapes, peaches, pears, pineapple, plums, and/or nectarines
 The
most important step! You need fruit that are ripe, but not overripe; and to make
the work easier, cling-free (also called freestone) peaches, nectarines,
etc.. This means that
the peach separates easily from the pit! Same with nectarines, and
this doesn't apply to cherries or plums. Don't miss the peach picking tips page!
The
most important step! You need fruit that are ripe, but not overripe; and to make
the work easier, cling-free (also called freestone) peaches, nectarines,
etc.. This means that
the peach separates easily from the pit! Same with nectarines, and
this doesn't apply to cherries or plums. Don't miss the peach picking tips page!
Choose ripe, mature fruit of ideal quality for eating fresh or cooking. They should not be mushy, but they also should not be rock hard: just as ripe as you would eat them fresh.
After this step, I'll just refer to "peaches" or "fruit" but it applies to apricots, cherries, grapefruit, grapes, peaches, pears, pineapple, plums, and/or nectarines.
Step 2 - How much fruit and where to get it
You can pick your own, or buy them at the grocery store. But for large quantities, you will find that real* farmer's markets, like the Farmer's Market in Forest Park, Georgia have them at the best prices.
It takes about 5 good sizes peaches or nectarines (or about 10 plums) to fill one quart jar. An average of 171/2 pounds is needed per canner load of 7 quarts; an average of 11 pounds is needed per canner load of 9 pints. A bushel weighs 48 pounds and yields 16 to 24 quarts ; an average of 21/2 pounds per quart.
* - not the cutesy, fake farmer's markets that are just warehouse grocery stores that call themselves farmer's markets.
Step 3 - Prepare the sugar (or other sweetener)
solution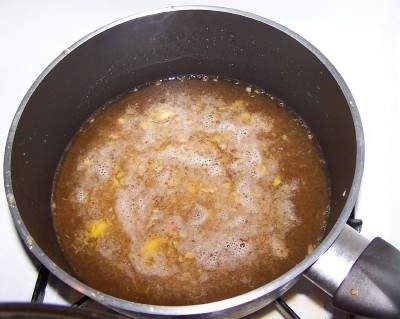
Fruit must be packed in a solution of water and sugar or fruit juice. It's up to you which to use. Sugar is added to improve flavor, help stabilize color, and retain the shape of the fruit. It is not added as a preservative. Sugar solution is much less expensive (unless you have a supply of cheap grape juice), so I usually use a light solution to keep sugar (and the added calories) to a minimum.
| Sugar Syrup | |||
| Syrup | Sugar | Water | Yield |
| Light | 2 cups | 6 cups | 7 cups |
|---|---|---|---|
| Medium | 3 cups | 6 cups | 6 1/2 cups |
| Heavy | 4 cups | 6 cups | 7 cups |
NOTE: you can ALSO use fruit juice (if you want a natural alternative) or water or artificial sweetener (Stevia (in a prepared form like Truvia, it measures same as sugar; if you use another form, you will need do your own conversion) - or Splenda, if you prefer, , but NOT Nutrasweet; if you want a low calorie alternative). click here for instruction about how to prepare these sugarless, fruit juice, or Stevia (in a prepared form like Truvia, it measures same as sugar; if you use another form, you will need do your own conversion) - or Splenda, if you prefer, solutions!
To prepare syrup, while heating water, add sugar slowly, stirring constantly to dissolve. Bring to a gentle boil and keep it simmering. After preparing the liquid syrup, keep it hot (but not boiling).
How much solution to make? That is hard to say. Everyone packs the fruit in the jars a bit differently and that obviously and directly affects the amount of solution needed. You can store any unused solution in the fridge or freezer, and boil it again for use in the next batch.
Step 4 - Wash the jars and lids
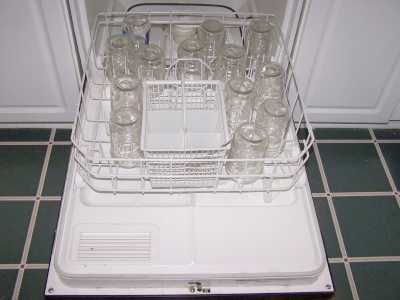 This
is a good time to get the jars ready! The dishwasher is fine for the jars;
especially if it has a "sanitize" cycle. Otherwise put the jars in boiling
water for 10 minutes. I just put the lids in a small pot of almost boiling
water for 5 minutes, and use the magnetic "lid lifter wand" (available
from target, other big box stores, and often grocery stores; and available
online - see this page) to pull them out.
This
is a good time to get the jars ready! The dishwasher is fine for the jars;
especially if it has a "sanitize" cycle. Otherwise put the jars in boiling
water for 10 minutes. I just put the lids in a small pot of almost boiling
water for 5 minutes, and use the magnetic "lid lifter wand" (available
from target, other big box stores, and often grocery stores; and available
online - see this page) to pull them out.
Step 5 -Wash the fruit!
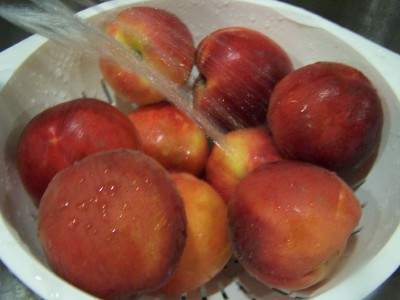 I'm
sure you can figure out how to wash the fruit in plain cold or lukewarm
water
I'm
sure you can figure out how to wash the fruit in plain cold or lukewarm
water
Step 6 - Peeling the Peaches, plums, nectarines, apricots
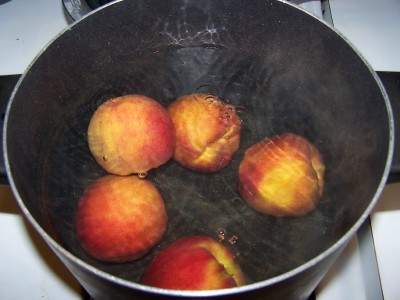
Nope, we're not going to peel them by hand; that's way too much work. Instead, here's a great trick that works with many fruits and vegetables with skins (like tomatoes): just dip the fruit in boiling water for 20 to 45 seconds.
NOTE: this works GREAT on ripe peaches, but if the beaches are rock hard, not so well. Best to let the peaches soften for a day or two first!
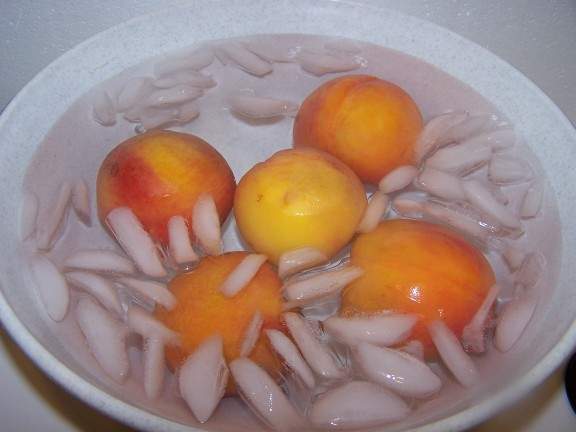
Remove from the boiling water using a slotted spoon and put into a large bowl or pot of cold water and ice for several minutes
 The
skins will easily slide off now!
The
skins will easily slide off now!
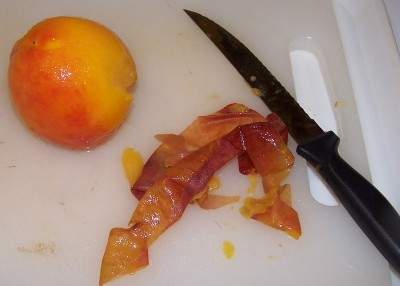
Nectarines do not need to be peeled, if you don't mind the skins. Neither do peaches, but most people prefer them with skins off - they tend to be slimy after all this.
SAVE THE PEELINGS in the fridge - to make peach honey!
Note: one visitor reports she has good success using a potato peeler on unblanched peaches.
Step 7 - Cut up the fruit
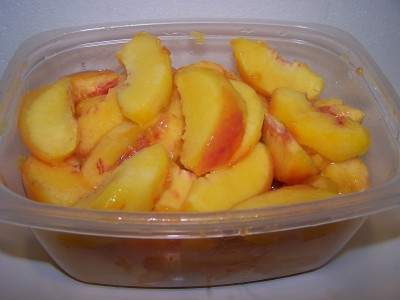 Cut
out any brown spots and mushy areas. Cut the fruit in half, or quarters
or slices, as you prefer! Remove pits!
Cut
out any brown spots and mushy areas. Cut the fruit in half, or quarters
or slices, as you prefer! Remove pits!
Step 8 - Prevent the fruit from darkening!
Most fruit will turn brown when exposed to air, even air in a sealed,
sterile jar. To keep the fruit from turning brown, when you get a
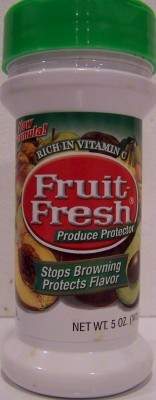
bowlful, sprinkle 1/4 cup lemon juice or Fruit-Fresh (which is just a
mix of citric acid and vitamin C, perfectly natural). Then stir
the fruit to make sure all the surfaces have been coated.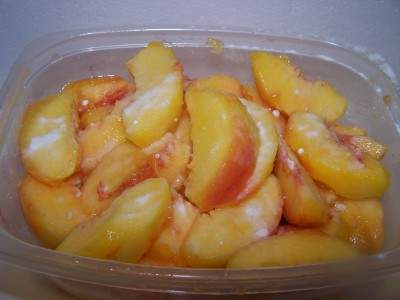
Step 9 - For a Hot Pack
Hot
packing is recommended for all fruits because it is a bit safer and
makes fruit easier to pack in jars. Hot packed fruit are also less
likely to float than fruit canned by the raw-pack method. Just put the
cut fruit into the barely boiling syrup solution for 5 minutes, which is
just enough to make the fruit hot throughout, the Ball Blue Book's
recommendation..
Hot packing also helps top reduce air entrapment (bubbles) as the cell structure of fruit tends to retain air; which is released during the heating prior to the jars being filled. Hot packing also tends to produce brighter colors.
Step 10 - Fill the jars
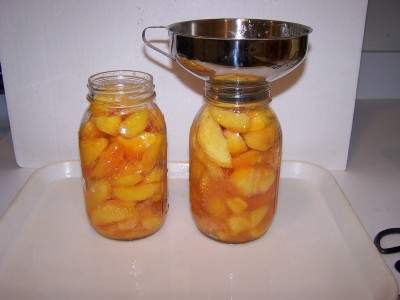 Pack
the fruit into sanitized jars (leaving 1/2 to 1 inch space at the top)
and cover with boiling sugar syrup leaving 1/2 inch head space. (if you
don't cook or heat the peaches first, this is called "cold packing"). Run
a rubber spatula or table knife gently between peaches and jar to release
trapped air bubbles. To do this more effectively, tilt the jar slightly
while running the tool between the fruit and the edge of the jar and also
pressing inward against the fruit a few times.
Pack
the fruit into sanitized jars (leaving 1/2 to 1 inch space at the top)
and cover with boiling sugar syrup leaving 1/2 inch head space. (if you
don't cook or heat the peaches first, this is called "cold packing"). Run
a rubber spatula or table knife gently between peaches and jar to release
trapped air bubbles. To do this more effectively, tilt the jar slightly
while running the tool between the fruit and the edge of the jar and also
pressing inward against the fruit a few times.
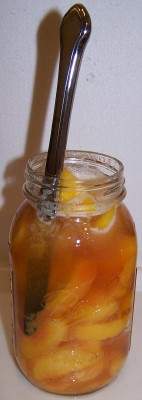
After packing the fruit in the jar, pour the sugar solution up to 1/2 inch (1 cm) from the top. the fruit should be covered completely. If you have problems with fruit darkening (turning brown) later, then sprinkle 1/2 teaspoon of FruitFresh or ascorbic acid into the top of the jar before you seal it.
Wipe rim and screw threads with a clean damp cloth. Add lid, screw band and tighten firmly and evenly. Do not over tighten. See here for related tools, equipment, supplies on Amazon
Tips!
 Canned
fruits often will float if the sugar syrup is too heavy, if jars are
packed too loosely or if air remains in the tissues of the fruit after
processing. To avoid this use a light or medium sugar syrup, make sure
fruit is firm and ripe and pack fruit tightly in jars without crushing.
Canned
fruits often will float if the sugar syrup is too heavy, if jars are
packed too loosely or if air remains in the tissues of the fruit after
processing. To avoid this use a light or medium sugar syrup, make sure
fruit is firm and ripe and pack fruit tightly in jars without crushing.
If fruit is not covered by liquid it may darken during storage (but does
not necessarily mean it is spoiled, as all fruits will darken somewhat).
To avoid this be sure fruit is covered by removing air bubbles from jars
liquid while still leaving the recommended head space. Also be sure to
remove trapped air bubbles as described earlier.
Peaches, pears and apples may also show a blue, red or pink color change
after canning. This is the result of natural chemical changes that
sometimes occur as fruits are heated. It is harmless and won't affect
flavor!
Also, avoid storing canned food near heat sources such as a furnace,
water heater, hot water or sunny areas. Jars need to be kept cool and
dark for longer storage life and to protect against spoilage. Be sure to
store in a dry place. If the lid or band rusts, that can cause the seal
to break.
Step 11 - Process the jars in the water bath (or pressure canner - see the table)
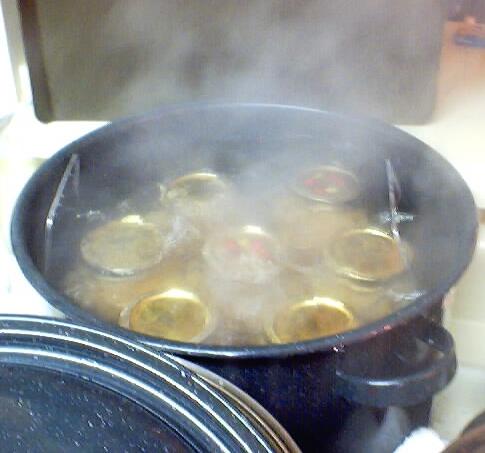 Put
the sealed jars in the canner and keep them cover with at least 1 inch
of water and boiling. In general, if you are at sea level, boil them for
at least 20 minutes (and no more than 30 min).
Put
the sealed jars in the canner and keep them cover with at least 1 inch
of water and boiling. In general, if you are at sea level, boil them for
at least 20 minutes (and no more than 30 min).
Here are more specific guidelines from the USDA for canning peaches in a boiling-water canner.
If you have a Pressure Canner; either a dial or a weighted-gauge canner, you can use that. The times for pressure canners are given below, also.
|
Recommended process time for mixed fruit in a boiling-water canner. (Ball) |
||||||
| - |
Process Time at Altitudes of
|
|||||
| Style of Pack | Jar Size | 0 - 1,000 ft | 1,001 - 3,000 ft | 3,001 - 6,000 ft | Above 6,000 ft | |
| Hot |
Pints Quarts |
20 min 25 |
25 30 |
30 35 |
35 40 |
|
| Raw |
Pints Quarts |
25 30 |
30 35 |
35 40 |
40 45 |
|
|
Table 2. Process Times for mixed fruit in a Dial-Gauge Pressure Canner. |
||||||
| Canner Pressure (PSI) at Altitudes of | ||||||
| Style of Pack | Jar Size | Process Time (Min) | 0 - 2,000 ft | 2,001 - 4,000 ft | 4,001 - 6,000 ft | 6,001 - 8,000 ft |
| Hot and Raw |
Pints or Quarts |
10 | 6 | 7 | 8 | 9 |
|
Table 3. Process Times for mixed fruit in a Weighted-Gauge Pressure Canner. |
||||
| Canner Pressure (PSI) at Altitudes of | ||||
| Style of Pack | Jar Size | Process Time (Min) | 0 - 1,000 ft | Above 1,000 ft |
| Hot and Raw |
Pints or Quarts |
10 | 5 | 10 |
Step 12 - Remove and cool
 Lift
the jars out of the water and let them cool without touching or bumping
them in a draft-free place (usually takes overnight), here they won't be
bumped. You can the
Lift
the jars out of the water and let them cool without touching or bumping
them in a draft-free place (usually takes overnight), here they won't be
bumped. You can the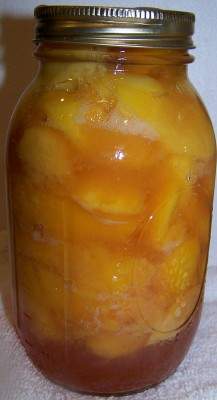 n
remove the rings if you like, but if you leave them on, at least loosen them quite a bit, so they don't rust in place due to trapped moisture.
n
remove the rings if you like, but if you leave them on, at least loosen them quite a bit, so they don't rust in place due to trapped moisture.
Once the jars are cool, you can check that they are sealed verifying that the lid has been sucked down. Just press in the center, gently, with your finger.
If it pops up and down (often making a popping sound), it is not sealed. If you put the jar in the refrigerator right away, you can still use it. Some people replace the lid (with a new lid) and reprocess the jar, while it's still hot for the full time in the canner - that's acceptable!
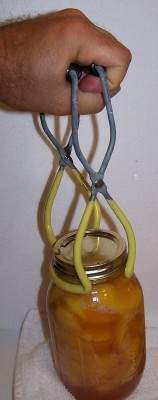
Other Equipment:
From left to right:
- Jar lifting tongs
helpful to pick up hot jars
- Lid lifter
- to remove lids from the pot
of hot water - Lids
- disposable - you may only
use them once - Ring
- holds the lids on the jar until after
the jars cool - then you remove them, save them and reuse them - Canning Jar funnel
- to fill the jars
Frequently asked questions!
- Is it safe to can unpeeled peaches? I've spent hours on
websites and read several books on canning - to no avail. This is the
second year I've canned unpeeled peaches in a 5 to 1 water to sugar
syrup (we're still alive). All my friends, their mothers and everything
I've read says to peel and I'm beginning to buckle under all the finger
wagging!!!
Answer: Buckle not! It is perfectly safe to can peaches with the skins on! Most people don't because some folks think it feels like they're swallowing a cat (short hair, not Persian) when they eat a peach with the fuzzy skin still on! :) But it is perfectly safe! (canning unskinned peaches, not cats, that is! :) ..I'm gonna get letters on this one, for sure...
- I just canned mixed fruit for the first time. The seal seams good but
I have air bubbles in my jars. Is this OK?"
Answer:
Yes, that's common. Some of the air came from bubbles trapped between the pieces of fruit you put in the jar. Other bubbles came from air trapped within the fruit itself. As long as the jar was processed according to the directions and it sealed properly, it is perfectly safe to eat! - Peeling peache, nectarines, plums, apricots, etc: I just finished canning a 1/2 bushel of peaches. Followed your
instructions to the T. But had a very difficult time peeling the peaches
.Put them in boiling water for a minute, shocked them in ice water, but
the skin would not come off. Set them again in boiling water for 2
minutes, same shock treatment, only about 10 out of the approx.110
peaches were as easy to peel as you described. What am I doing wrong. I
want to can the second 1/2 bushel with less peeling effort.
Answer: Ah, that usually means they weren't ripe. I'll bet they were rock hard, or close to it. Not much to do about that other than let the ripen (soften) first OR peel them hard with a vegetable peeler. If you let the remaining peaches sit at room temperature for 2 or 3 days, they will soften and it will work!
- Pressure canner pressure: I was reading the
directions for pressure canning mixed fruit versus water bath, and you give
the time but the amount of pressure was omitted in the directions. Could
you include that as well?
Ah! The USDA assumes a standard pressure of 10 or 11 lbs, as is normal for your canner. If you have various weights or settings, go with 11 lbs!
- Shelf life / Modern peach varieties: When living with my grandmother 2 years ago we ate canned peaches which she canned in 1983. They tasted amazing. Was the process different back in the day which created a longer shelf life? Everything I see on the internet states a maximum shelf life of two years. I would like carry the same process if I could. Please advise. Love your site by the way Thank you ! Kelley
Grandma was right. As long as a lab-tested recipe and process was followed, and the jars remain sealed, technically, they're safe to eat for a lifetime. Usually, the quality declines substantially after 2 years (color, text, taste). Peaches WERE different back then! Most of the peaches sold in stores today were bred to be very hard to hold up better in shipping. I hate them! To me, a peach should be soft and juice, not hard and crunchy! That's why I grow my own, or go to an orchard to pick older varieties!
Comments and Feedback
- A visitor writes on September 01, 2013: "I am in my 2nd year of canning peaches, thanks to your website! regarding peeled or unpeeled--I have done my 2nd batch of unpeeled peaches. You know why? I get juice running down my elbows and up the other side again.. My kitchen is way too hot to stand over boiling water and have an ice water bath nearby. I also have very little usable counter space for this....My peaches are still looking good in the jars, we're still alive. Your instructions are PERFECT! I'm a bare bones, no nonsense kind of gal, so I just cut the peaches in quarters and fit them tightly into the jar, then add the hot honey syrup. I pressure can also, because it's a LOT easier than that water bath process and a lot neater and dryer. I have lost so many jars of product in water baths, never mind how much I've scalded myself. So I went right to the pressure canner.. I don't know why people make it sound so hard! Thank you so much for your great service. I have referred friends to this site also."
- A visitor writes on July 22, 2013: "Made this recipe for my
first canning experience. I used nectarines. I appreciated your step by
step instructions and that you broke it down to the simplest elements. I
followed step by step exactly and I'm confident that they will turn out
beautifully. I'm listening to the tops popping as I type this. Thank you
for giving me the confidence to can and I'm pretty sure I'm hooked. I'm
already planning my next canning probably this afternoon after i run to
the farmer's market and get some fresh peaches."


Looking for canning equipment and supplies?
Water bath canner with a jar rack
Pressure canners for gas, electric and induction stoves: Presto 23Qt or T-fal 22Qt
Canning scoop (this one is PERFECT)
Ball Blue book (most recent version)
Find Other types of farms:
- Easter egg hunts
- Children's consignment sales
- Farm markets and roadside stands
- Road trips and camping resources
- Local Honey, apiaries, beekeepers
- Local Meat, Milk and Eggs
- Consumer fraud and scams information
- Home canning supplies at the best prices on the internet!
- Maple Syrup Farms, sugarworks, maple syrup festivals
- Environmental information and resources
- Farms For Your Event for birthday parties, weddings, receptions, business meetings, retreats, etc.
- Festivals - local fruit and vegetable festivals
- Pumpkin patches and corn mazes
- Christmas Tree Farms and lots
Get the
most recent version of
the Ball Blue Book
Get the
most recent version of
the Ball Blue Book of Home Canning
Find other types of farms:
- Easter egg hunts
- Children's consignment sales
- Farm markets and roadside stands
- Local Honey
- Local Meat, Milk and Eggs
- Road trip and camping
- Pumpkin patches and corn mazes
- Christmas Tree Farms and lots
- Maple Syrup farms and sugarworks
Highly rated canning supplies:
- Regular Mouth Canning Lids with food-grade with BPA Free Silicone seals for Ball, Kerr Jars for Canning
- Canning accessories kit: funnel, jar tongs, lid lifter, etc
- Food Dehydrator, 400W Electric with 8 Trays, 48 hour Timer and Temperature Control 95-176℉, BPA-Free
- Water Bath Canner, 21 Qts with lid, Jar Rack, Speckled Black, cans 7 quart jars, 9 pint jars or 13 half-pint jars
- Air Fryer: Instant Pot Instant Vortex Plus XL 8QT Clear Windows, Custom Programming, 8-in-1 Functions that Crisps, Broils, Roasts, Dehydrates, Bakes, Reheats
- Pressure canner: All American 921, 21.5qt Pressure Cooker/Canner, never needs gaskets, Great for Gas, Electric or Flat Top Stoves - Made in the USA
- The Backyard Homestead:a guide to homesteading , on 1/4 acre, how to raise grains and vegetables; raise animals for meat, eggs, and dairy; and keep honey bees
- Smart silent HEPA Air Purifiers for Home, Large Rooms for Allergies, Smoke, Pets. Eliminates 99.97% of Dust, Pet Hair, Odors
