
Looking for How to Make Your Own Home Canned Potatoes (complete directions with photos) in 2024? Scroll down this page and follow the links. And if you bring home some fruit or vegetables and want to can, freeze, make jam, salsa or pickles, see this page for simple, reliable, illustrated canning, freezing or preserving directions. There are plenty of other related resources, click on the resources dropdown above. If you are having a hard time finding canning lids, I've used these, and they're a great price & ship in 2 days.
If you have questions or feedback, please let me know! There are affiliate links on this page. Read our disclosure policy to learn more.
How to Make Your Own Home Canned Potatoes (complete directions with photos)
How to Make Homemade Canned Potatoes
 Canning
your own potatoes is easy to do at home! The only trick is, you really do
need a Pressure Canner. You might ask why can them, since potatoes are readily
available year round, but if you grow your own organic potatoes, don't have a
cold cellar to store them, or simply want potatoes that are ready to use in
cooking (like mash potatoes, scalloped potatoes, etc.) then this is the way to
go. So, here's how to can potatoes! The directions are complete with
instructions in easy steps and completely illustrated. In the winter when you
open a jar, the potatoes will taste MUCH better than any store-bought canned
potatoes.
Canning
your own potatoes is easy to do at home! The only trick is, you really do
need a Pressure Canner. You might ask why can them, since potatoes are readily
available year round, but if you grow your own organic potatoes, don't have a
cold cellar to store them, or simply want potatoes that are ready to use in
cooking (like mash potatoes, scalloped potatoes, etc.) then this is the way to
go. So, here's how to can potatoes! The directions are complete with
instructions in easy steps and completely illustrated. In the winter when you
open a jar, the potatoes will taste MUCH better than any store-bought canned
potatoes.
Prepared this way, the jars have a shelf life of about 12 months, and aside from storing in a cool, dark place, require no special attention.
Directions for Making Canned Potatoes
Ingredients
- Potatoes (see step 1)
- Lemon juice or Fruit Fresh
Equipment
- Jar grabber (to pick up the hot jars)
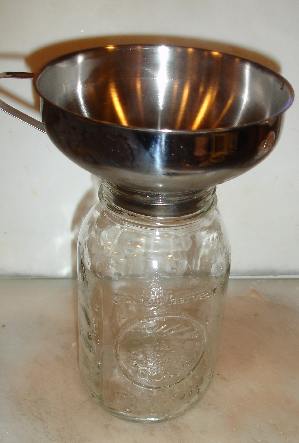
- Jar funnel ($4 at mall kitchen stores and local "big box" stores, but it's usually cheaper online from our affiliates)
- At least 1 large pot
- Large spoons and ladles,
- Canning jars (often called Ball jars, Mason jars or Kerr jars) (Publix, Kroger, other grocery stores and some "big box" stores carry them - now about $12 per dozen quart jars (up 50% in 2 years!) including the lids and rings)
- Salt (optional - I don't use any)
- One 6 - 8 quart pot or saucepan
- 1 Pressure Canner (a large pressure pot with a lifting rack to sanitize the jars after filling (about $75 to $200 at mall kitchen stores and "big box" stores, but it is cheaper online; see this page for more information). For low acid foods (most vegetables, you can't use an open water bath canner, it has to be a pressure canner to get the high temperatures to kill the bacteria. If you plan on canning every year, they're worth the investment.
Recipe and Directions
Step 1 - Selecting the potatoes
The most impor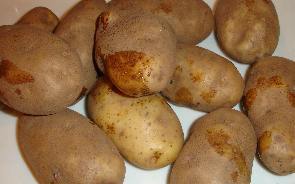 tant
step! Select small to medium-size mature potatoes of ideal quality for
cooking. Tubers stored below 45ºF may discolor when canned. Choose
potatoes 1 to 2 inches in diameter if they are to be packed whole.
tant
step! Select small to medium-size mature potatoes of ideal quality for
cooking. Tubers stored below 45ºF may discolor when canned. Choose
potatoes 1 to 2 inches in diameter if they are to be packed whole.
You can use red, white, yellow potatoes of any variety. Boiling potatoes tend to can better than bakers.
How many potatoes and where to get them
You can grow your own, pick your own, or buy them at the grocery store. It takes about 10 to 14 pounds of potatoes to make 7 quarts; OR 5 to 8 pounds to make 9 pints. This works out to an average of 1 to 2 pounds per quart. But it can vary a lot, depending upon the shape, depth of the eyes, bruises, how deeply you peel, etc.
Step 2 - Prepare the jars and pressure canner
Wash the jars and lids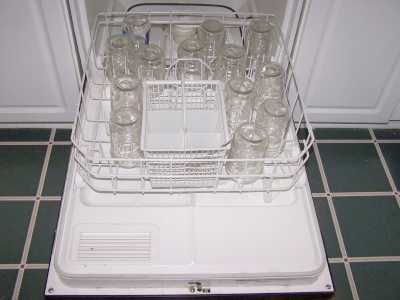
This is a good time to get the jars ready! The dishwasher is fine for the jars; especially if it has a "sanitize" cycle. Otherwise put the jars in boiling water for 10 minutes. I just put the lids in a small pot of almost boiling water for 5 minutes, and use the magnetic "lid lifter wand" (available from target, other big box stores, and often grocery stores; and available online - see this page) to pull them out.
Get a large pot of water boiling over low heat
We will use this water to pour over the potatoes and fill each jar with liquid, after we've packed them full of potatoes. I use the large sauce pan or 10 qt pot, so that there is plenty of clean, boiling water ready when I need it.
Get the pressure canner heating up
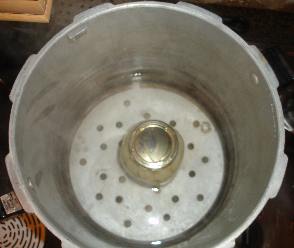
Rinse out your pressure canner (at right in the picture), put the
rack plate in the bottom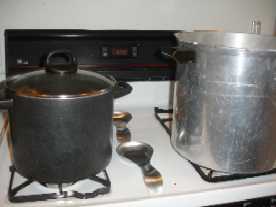 ,
and fill it to a depth of 4 inches with hot tap water. (of course,
follow the instruction that came with the canner, if they are
different). Put it on the stove over low heat, with the lid OFF of it,
just to get it heating up for use later on.
,
and fill it to a depth of 4 inches with hot tap water. (of course,
follow the instruction that came with the canner, if they are
different). Put it on the stove over low heat, with the lid OFF of it,
just to get it heating up for use later on.
Get 1 more pot going on the stove over high heat
You will need one large pot (12 quarts or larger, at left in the photo above) 3/4 filled with water, in which you will blanch the potatoes.Step 3 -Wash the potatoes!
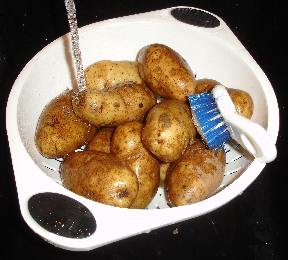 I'm
sure you can figure out how to rinse the potatoes in plain cold or
lukewarm water and a vegetable scrubber
I'm
sure you can figure out how to rinse the potatoes in plain cold or
lukewarm water and a vegetable scrubber
Step 4 - Peel thee potatoes, and remove any soft or discolored spots
Just like when you were in the army! And if you weren't, just use a paring knife or peeler to peel them and cut out eyes and any soft or discolored areas.
NOTE: According the North Carolina Cooperative Extension Service at NC State University, to Potatoes must be peeled before canning. Potato skins contain a high bacteria count increasing the chance of botulinum toxin formation.
Step 5 - Cut the potatoes into cubes
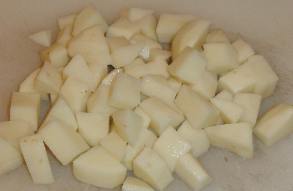 Small
potatoes (2 inches or less) may be left whole. Larger potatoes should be
cubed, cut into 1/2 inch cubes. If you are unsure which to do, the
uniform size of the cubed potatoes produces a higher quality finished
product.
Small
potatoes (2 inches or less) may be left whole. Larger potatoes should be
cubed, cut into 1/2 inch cubes. If you are unsure which to do, the
uniform size of the cubed potatoes produces a higher quality finished
product.
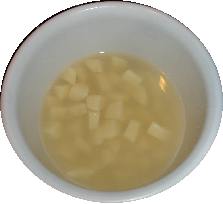 Step
6 - Soak in Lemon Juice Solution or Ascorbic Acid or Fruit Fresh solution
Step
6 - Soak in Lemon Juice Solution or Ascorbic Acid or Fruit Fresh solution
Place in ascorbic acid solution (1 cup lemon juice to 1 gallon of water, or 2 tablespoons of fruit Fresh to a gallon of water) to prevent darkening; until you get the jars filled. How long is pretty much immaterial; your are trying to keep the potatoes from being exposed to air until you can get them sealed in the jars. The ascorbic acid / lemon juice prevents oxygen dissolved in the water from browning the cut potatoes, too!
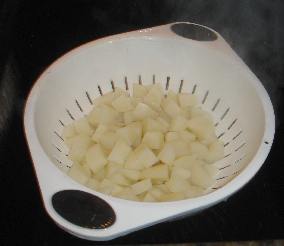
Step 7 - Drain
Just pour off the water and discard it. Obviously, KEEP the potatoes...
 Step
8 - Cook the potatoes
Step
8 - Cook the potatoes
Cook cubed potatoes for 2 minutes in the large pot of boiling water and drain again. For whole potatoes, boil for 10 minutes and drain. Actually, this is more of a blanching step than fully cooking, and it helps to release some of the free starch and keep down the swelling and resultant water loss in the jars.
You will see videos on YouTube where people complain of their potatoes being mushy after cooking for 10 minutes, but I guess they didn't read the part about cooking the cut up potatoes for only 2 minutes!
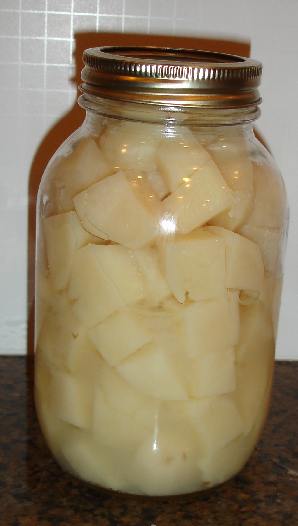
Step 9 - Drain the potatoes, and pack the jars
 Fill
jars, leaving a full 1-inch of headspace. You may add 1 teaspoon of salt
to each quart jar, if desired, for taste (it is not a preservative - it
is only for taste. I omit it).
Fill
jars, leaving a full 1-inch of headspace. You may add 1 teaspoon of salt
to each quart jar, if desired, for taste (it is not a preservative - it
is only for taste. I omit it).
Fill jars loosely with potatoes. Be sure to leave 1 inch of space at the TOP of the jar. That is called "headspace" and is needed for expansion during heating.
Step 10 - Fill the jars with boiling water
 Fill
the jars up to 1 inch from the top with clean boiling water.
Fill
the jars up to 1 inch from the top with clean boiling water.
Use a ladle or pyrex measuring cup to carefully fill each packed jar with water from pot of boiling water. The potatoes should be covered and there should still be 1 inch of airspace left in the top of each jar. Be careful not to burn yourself, (or anyone else - children should be kept back during this step!)
Step 11 - Put the lids and rings on
Put the lids on each jar and seal them by putting a ring on and screwing it down snugly (but not with all your might, just "snug").
 Step
12 - Put the jars in the pressure canner and the lid on the canner (but
still vented)
Step
12 - Put the jars in the pressure canner and the lid on the canner (but
still vented)
Using the jar tongs, put the jars on the rack in the canner. By now the water level has probably boiled down to 3 inches. If it is lower than that, add more hot tap water to the canner. When all the jars that the canner will hold are in, out on the lid and twist it into place, but leave the weight off (or valve open, if you have that type of pressure canner).
Step 13 - Let the canner vent steam for 10 minutes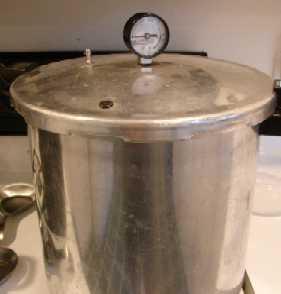
Put the heat on high and let the steam escape through the vent for 10 minutes to purge the airspace inside the canner.
Step 14 - Put the weight on and let the pressure build
After 10 minutes of venting, put the weight on and close any openings to allow the pressure to build to 11 pounds.
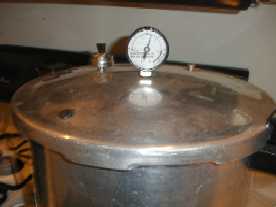
Step 15 - Process for 35 minutes
If you have a dial-type pressure canner like I do, once the gauge hits 11 pounds, start your timer going - for 35 minutes. Adjust the heat, as needed, to maintain 11 pounds of pressure.
Note: the charts at right will help you determine the right processing time and pressure, if you have a different type of canner, or are above sea level.
|
Recommended process time for Potatoes in a dial-gauge pressure canner. |
|||||
| Canner Pressure (PSI) at Altitudes of | |||||
| Jar Size | Process Time | 0 - 2,000 ft | 2,001 - 4,000 ft | 4,001 - 6,000 ft | 6,001 - 8,000 ft |
| Pints | 35 min | 11 lb | 12 lb | 13 lb | 14 lb |
| Quarts | 40 | 11 | 12 | 13 | 14 |
|
Recommended process time for Potatoes in a weighted-gauge pressure canner. |
|||
| Canner Pressure (PSI) at Altitudes of | |||
| Jar Size | Process Time | 0 - 1,000 ft | Above 1,000 ft |
| Pints | 35 min | 10 lb | 15 lb |
| Quarts | 40 | 10 | 15 |
It is important to learn how to operate your pressure canner by reading the owner's manual that came with your particular canner. If you cannot find your owner's manual, you can obtain find one online: Here is where to find some common manufacturer's manuals:
or by contacting the company that made your canner. Give the model number to the manufacturer, and they will send you the right manual. Click here for more information about pressure canners and a variety of models you can order.
Step 16 - Turn off the heat and let it cool down
 When
the processing time from the chart above is up, turn off the heat, and
allow the pressure canner to cool and the pressure to drop to zero
before opening the canner. Let the jars cool without being
jostled. After the pressure drops to zero (usually, you can tell but the
"click" sound of the safety release vents opening, as well as but the
gauge. Let the pressure in the canner drop to zero by itself. This
may take 45 minutes in a 16-quart canner filled with jars and almost an
hour in a 22-quart canner. If the vent is opened before the pressure
drops to zero OR if the cooling is rushed by running cold water over the
canner, liquid will be lost from the jars. Too rapid cooling causes loss
of liquid in the jars!
When
the processing time from the chart above is up, turn off the heat, and
allow the pressure canner to cool and the pressure to drop to zero
before opening the canner. Let the jars cool without being
jostled. After the pressure drops to zero (usually, you can tell but the
"click" sound of the safety release vents opening, as well as but the
gauge. Let the pressure in the canner drop to zero by itself. This
may take 45 minutes in a 16-quart canner filled with jars and almost an
hour in a 22-quart canner. If the vent is opened before the pressure
drops to zero OR if the cooling is rushed by running cold water over the
canner, liquid will be lost from the jars. Too rapid cooling causes loss
of liquid in the jars!
Step 17 - Remove the jars
Lift
the jars out of the water and let them cool on a wooden cutting board or a
towel, without touching or bumping them in a draft-free place
(usually takes overnight), here they won't be bumped. You can then remove
the rings if you like, but if you leave them on, at least loosen them
quite a bit, so they don't rust in place due to trapped moisture. Once the
jars are cool, you can check that they are sealed verifying that the lid
has been sucked down. Just press in the center, gently, with your finger.
If it pops up and down (often making a popping sound), it is not sealed.
If you put the jar in the refrigerator right away, you can still use it.
Some people replace the lid and reprocess the jar, then that's a bit iffy.
If you heat the contents back up, re-jar them (with a new lid) and the
full time in the canner, it's usually ok. You're done!
Comments and Tips
Q. I am wondering if the potatoes have to be peeled? I have always just left the skins on when cooking and would rather can them that way if possible?
A. According the North Carolina Cooperative Extension Service at NC State University, to Potatoes must be peeled before canning. Potato skins contain a high bacteria count increasing the chance of botulinum toxin formation.
Other Equipment:
See the canning supplies page if you need any of these.
From left to right:
- Jar lifting tongs
helpful to pick up hot jars - Lid lifter
- to remove lids from the pot
of hot water - Lids
- disposable - you may only
use them once - Ring
- holds the lids on the jar until after
the jars cool - then you remove them, save them and reuse them - Canning Jar funnel
- to fill the jars
Pressure canners!If you want to can low-acid foods such as red meats, sea food, poultry, milk, and all fresh vegetables with the exception of most tomatoes, you will need a Pressure Canner. These foods fit into the low acid group since they have an acidity, or pH level, of 4.6 or greater. The temperature which must be reached and maintained (for a specified amount of time) to kill the bacteria is 240 F. Pressure canning is the only canning method recommended safe by the U.S.D.A. for low-acid foods such as vegetables, meats, and fish. Ordinary water bath canners can only reach 212 F and cannot to kill the types of bacteria that will grow in low acid foods. This temperature can be reached only by creating steam under pressure as achieved in quality pressure canners. There are several manufacturers of pressure canners. The two leading ones are Presto and All American (Wisconsin Aluminum). They are more expensive than water bath canners, but extremely well built - I bought mine in 1988 and it still looks and works like new! Click here for my page about pressure canners, models and prices.
|
|||

|
Presto 01781 23-Quart Pressure Cooker/CannerThis is usually one of the best-priced pressure canners. They are reliable and inexpensive. I've had mine for 40 years. There is also a 16 quart version for even less. Click on the links at left or above for more info and current pricing. |
||
|
|
Shown at left is the Presto 23 quart pressure canner. Features below and
click here for more information or to purchase from Target.
See the seller's website for features, pricing and user reviews! |
||
| See here for related tools, equipment, supplies on Amazon See here for related tools, equipment, supplies on Amazon |
All American Pressure Canner and Cooker #921See the seller's website for features, pricing and user reviews! |
||
Illustrated Canning, Freezing, Jam Instructions and Recipes
[ Easy Home Canning Directions] [FAQs - Answers to common questions and problems] [Recommended books about home canning, jam making, drying and preserving!] [Free canning publications to download and print]


Looking for canning equipment and supplies?
Water bath canner with a jar rack
Pressure canners for gas, electric and induction stoves: Presto 23Qt or T-fal 22Qt
Canning scoop (this one is PERFECT)
Ball Blue book (most recent version)
Find Other types of farms:
- Easter egg hunts
- Children's consignment sales
- Farm markets and roadside stands
- Road trips and camping resources
- Local Honey, apiaries, beekeepers
- Local Meat, Milk and Eggs
- Consumer fraud and scams information
- Home canning supplies at the best prices on the internet!
- Maple Syrup Farms, sugarworks, maple syrup festivals
- Environmental information and resources
- Farms For Your Event for birthday parties, weddings, receptions, business meetings, retreats, etc.
- Festivals - local fruit and vegetable festivals
- Pumpkin patches and corn mazes
- Christmas Tree Farms and lots
Get the
most recent version of
the Ball Blue Book
Get the
most recent version of
the Ball Blue Book of Home Canning
Find other types of farms:
- Easter egg hunts
- Children's consignment sales
- Farm markets and roadside stands
- Local Honey
- Local Meat, Milk and Eggs
- Road trip and camping
- Pumpkin patches and corn mazes
- Christmas Tree Farms and lots
- Maple Syrup farms and sugarworks
Highly rated canning supplies:
- Regular Mouth Canning Lids with food-grade with BPA Free Silicone seals for Ball, Kerr Jars for Canning
- Canning accessories kit: funnel, jar tongs, lid lifter, etc
- Food Dehydrator, 400W Electric with 8 Trays, 48 hour Timer and Temperature Control 95-176℉, BPA-Free
- Water Bath Canner, 21 Qts with lid, Jar Rack, Speckled Black, cans 7 quart jars, 9 pint jars or 13 half-pint jars
- Air Fryer: Instant Pot Instant Vortex Plus XL 8QT Clear Windows, Custom Programming, 8-in-1 Functions that Crisps, Broils, Roasts, Dehydrates, Bakes, Reheats
- Pressure canner: All American 921, 21.5qt Pressure Cooker/Canner, never needs gaskets, Great for Gas, Electric or Flat Top Stoves - Made in the USA
- The Backyard Homestead:a guide to homesteading , on 1/4 acre, how to raise grains and vegetables; raise animals for meat, eggs, and dairy; and keep honey bees
- Smart silent HEPA Air Purifiers for Home, Large Rooms for Allergies, Smoke, Pets. Eliminates 99.97% of Dust, Pet Hair, Odors